

Simprosys Google Shopping Feed
Pre-Installation & Setup
Initial App Configuration
Product Submission Controls
Product Attributes and Optimization
Automated Feed Rules
Troubleshooting & Issue Fixes
Advanced Setup Made Easy
Google Merchant Center Setup
Tracking Tags Setup (Google Ads & Google Analytics 4)
Google Ads & Campaign Setup
Multi-Country & Market Setup
Promotions and Discounts
Microsoft Advertising Integration
Meta (Facebook) Integration
Pinterest Integration
How to Import Your Tracking Container into Google Tag Manager (GTM)
Mar 24, 2026
This guide walks you through importing the pre-configured container file from your Simprosys Google Shopping Feed app into your Google Tag Manager account.
The process is straightforward and designed to avoid disruption. It won’t affect how your store looks or how it functions.
You don’t need prior experience with Google Tag Manager to go through this. Simply follow the steps, and you should be able to complete the setup comfortably.
A Few Things to Have Ready
- Download the container file from the Simprosys app
- Make sure you have Admin access to your Google Tag Manager account
- Know which GTM Web Container is connected to your website
- Keep a few uninterrupted minutes aside to complete the setup
After completing the checklist, follow the steps below:
Step 1: Sign in to Google Tag Manager
1. Go to Google Tag Manager
2. Sign in using the Google account that has access to your website’s Tag Manager.
3. Select the web container connected to your website. Make sure it’s the same container you selected earlier in the Simprosys app.
Step 2: Open Admin Settings in Google Tag Manager
1. In the top navigation, click Admin.
2. Under the Web Container column, select Import Container.
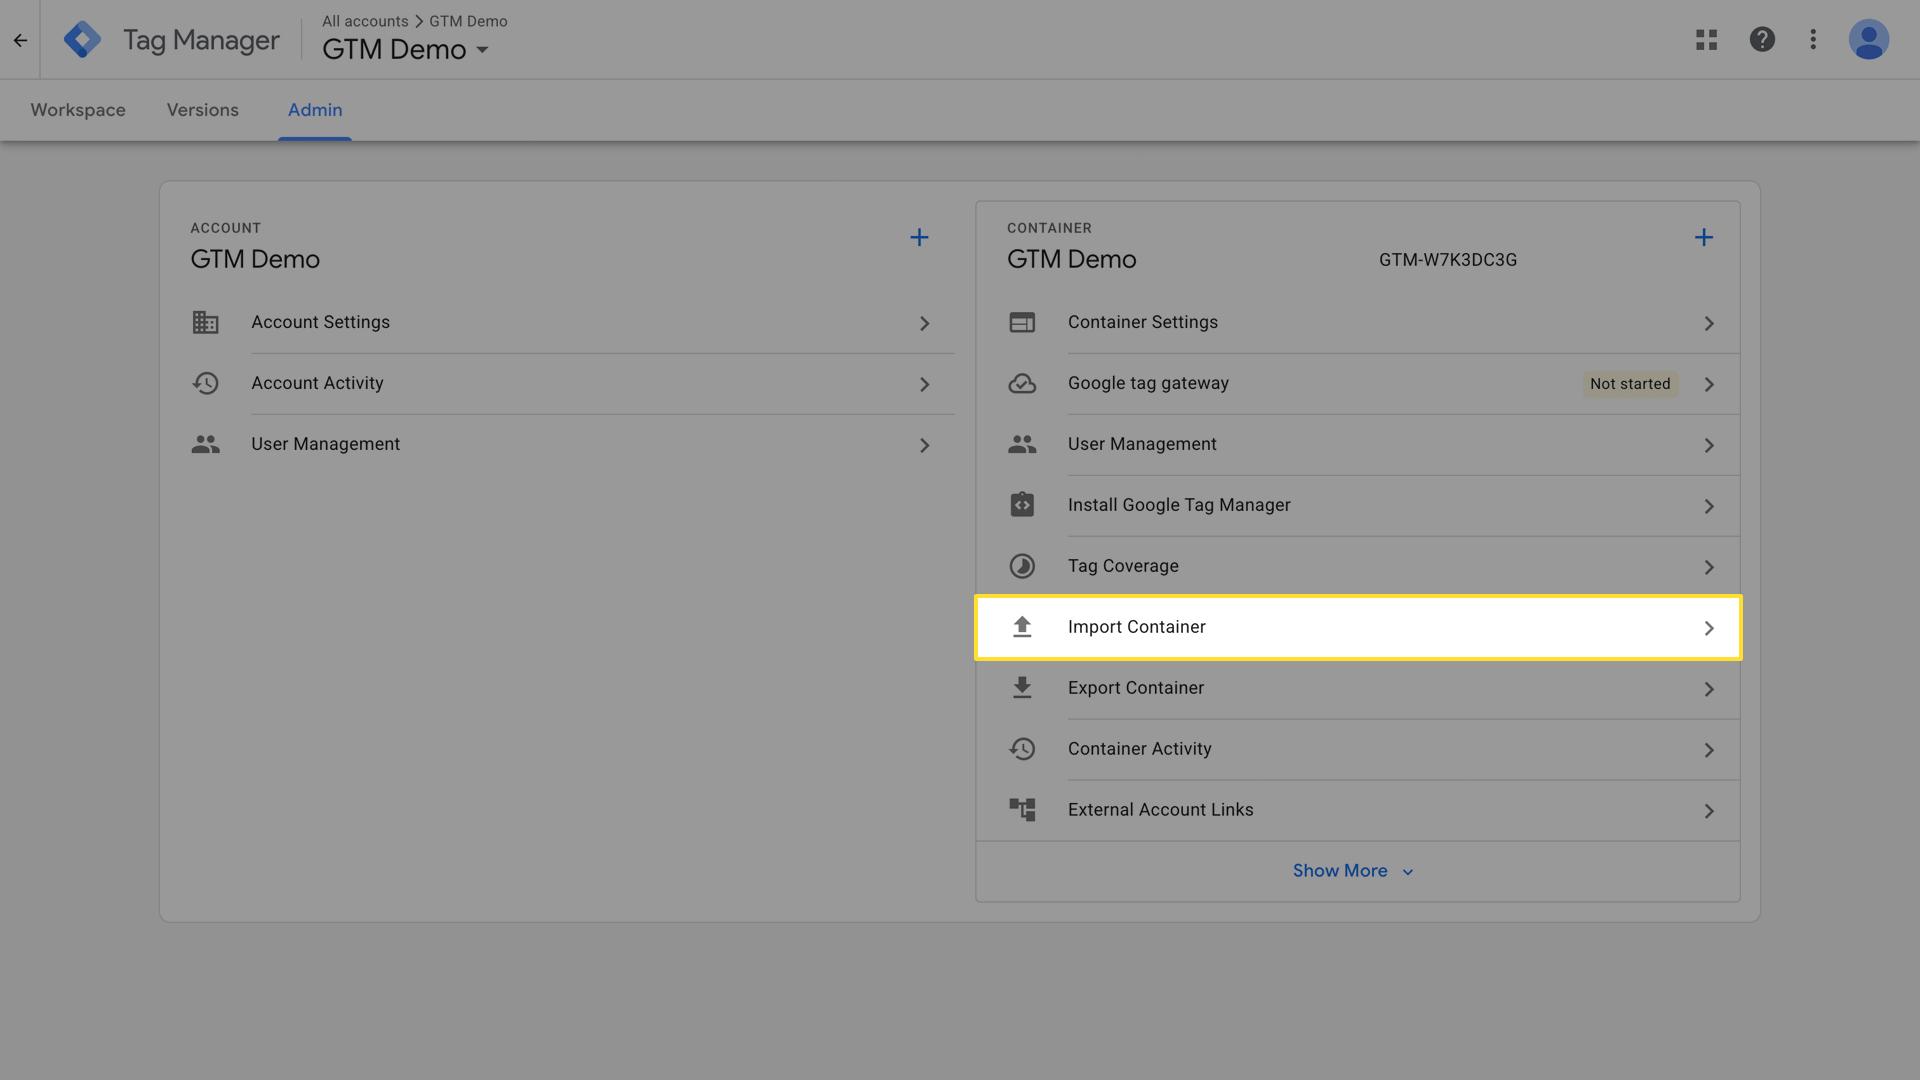
This is where you can import pre-built setups like the one provided by the Simprosys app, without affecting your existing setup.
Step 3: Upload the Container File
1. Click Choose container file.
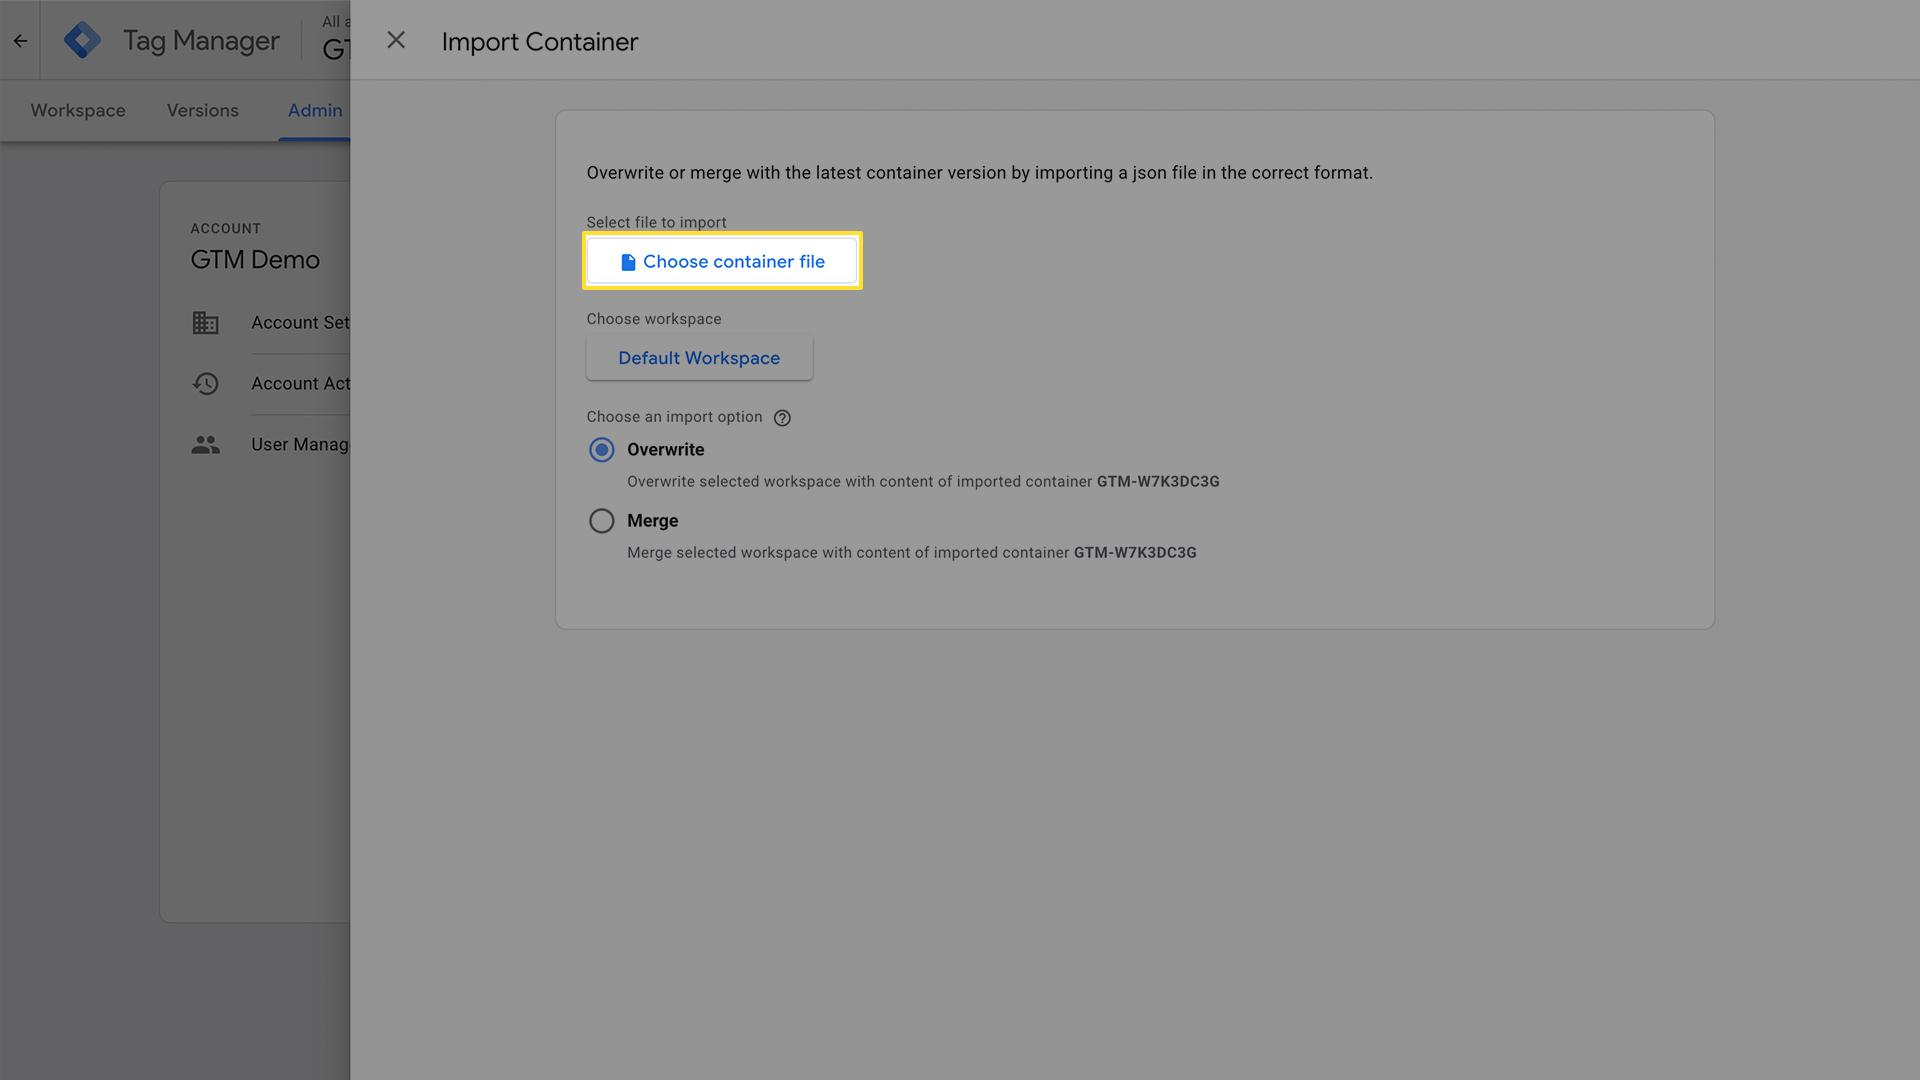
2. Upload the file you downloaded from the Simprosys app.
3. Click Open.
Once the file is uploaded, Google Tag Manager will read it and get it ready for import.
Step 4: Choose Import Settings
4.1: Select a Workspace
Next, Google Tag Manager will ask where you want to import the container.
- Click Choose workspace.
- In the menu that appears, you can either:
- Select Existing and pick your Default Workspace, or
- Create a new workspace if you want to keep the changes separate
Both options work, so choose whichever feels most comfortable for you.
Select Import Method (Important Step)
This step decides how the new tags are added to your account. You’ll see two options: Overwrite and Merge. Choose the one that works best for you.
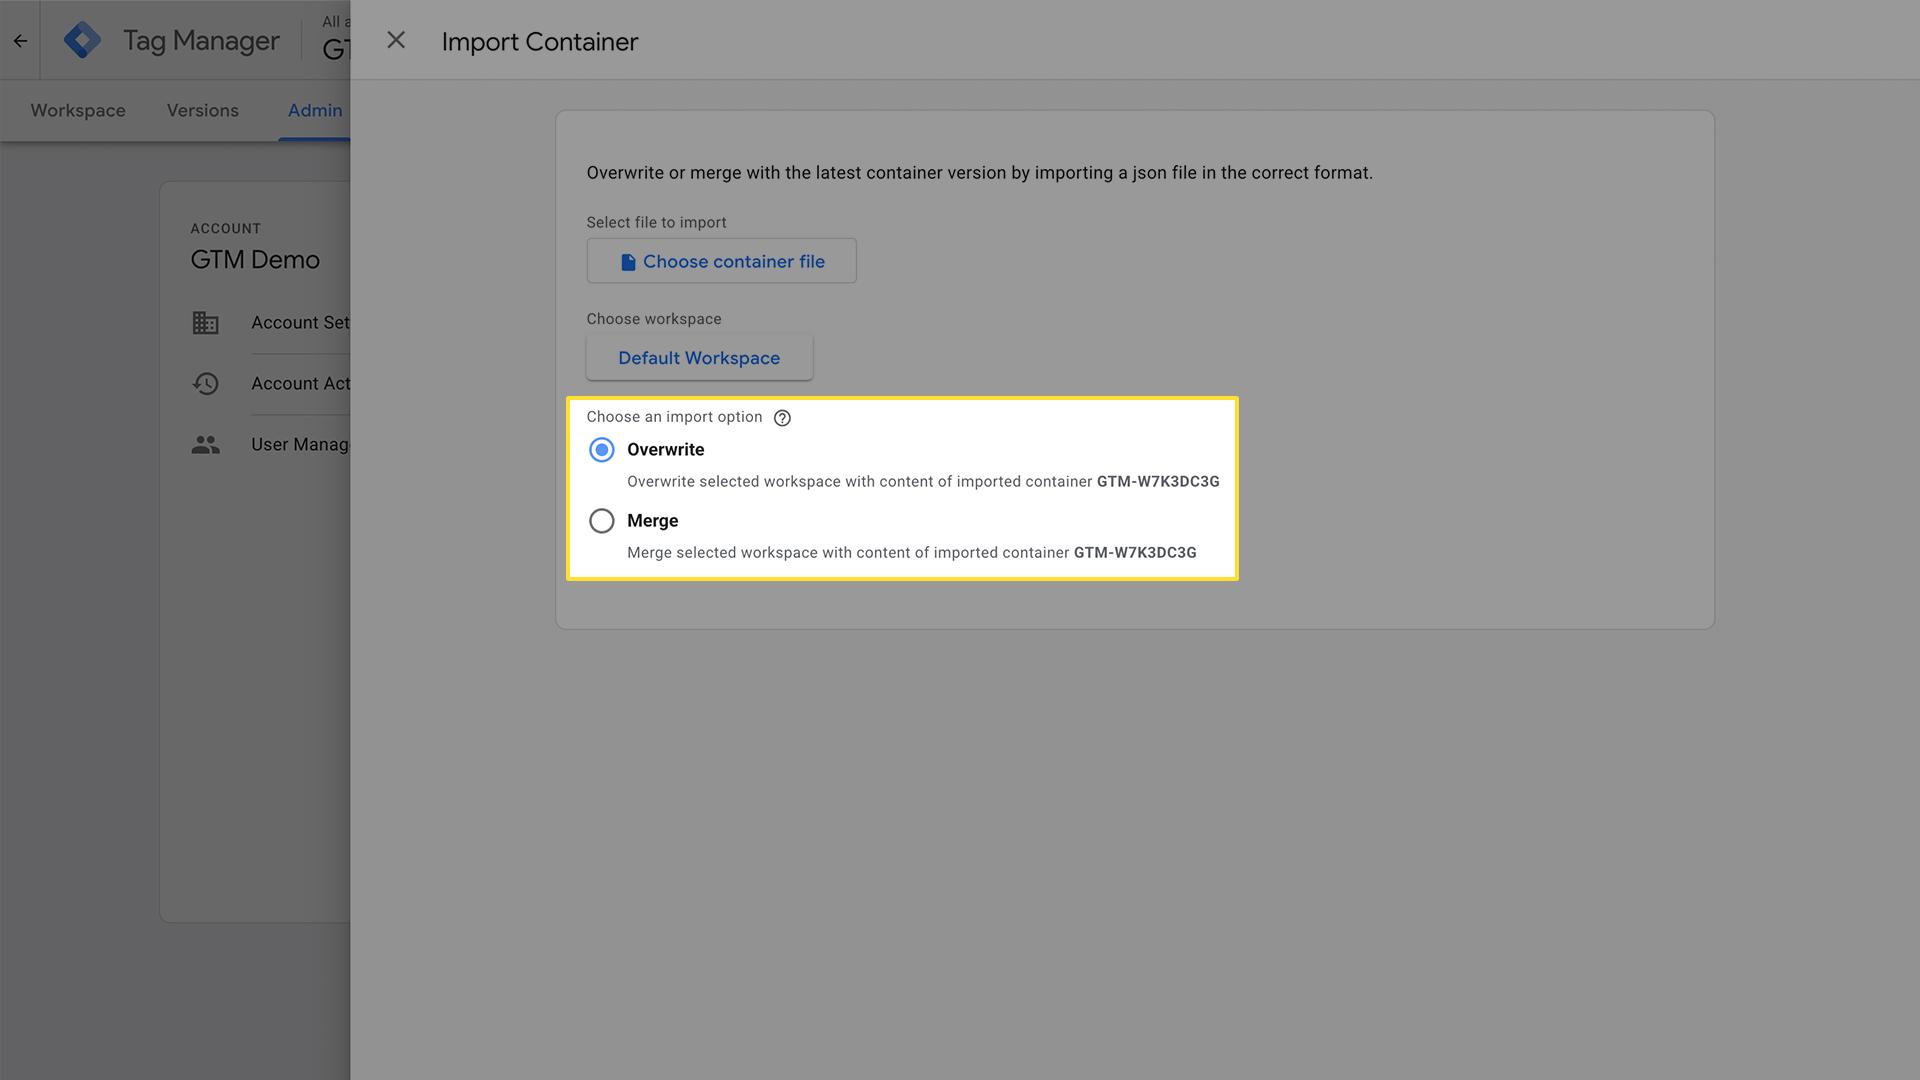
Option A: Overwrite (Recommended for New Setups)
Choose this if:
- You’re setting up tracking for the first time
- You don’t have any existing tags you need to keep
What it does:
- Removes everything currently in the selected workspace
- Replaces it entirely with the Simprosys tracking setup
Only choose Overwrite if you are confident you don’t need existing tags, as this option removes them.
Option B: Merge (Recommended for Existing Setups)
Choose this if:
- You already use other tracking tools in Google Tag Manager, like Meta, TikTok, or Snapchat.
- You want to keep your existing tags and add Simprosys tracking alongside them.
When you choose Merge, you’ll see two options:
1. Overwrite conflicting tags, triggers, and variables
- Replaces any existing items with the same name
- Keeps all unrelated tags unchanged
2. Rename conflicting tags, triggers, and variables
- Keeps both versions by renaming the older items
- Useful if you want to review differences later
Step 5: Review Changes Before Saving
Google Tag Manager will show a summary of what’s about to be added. You may see:
- New tags
- New triggers
- New variables
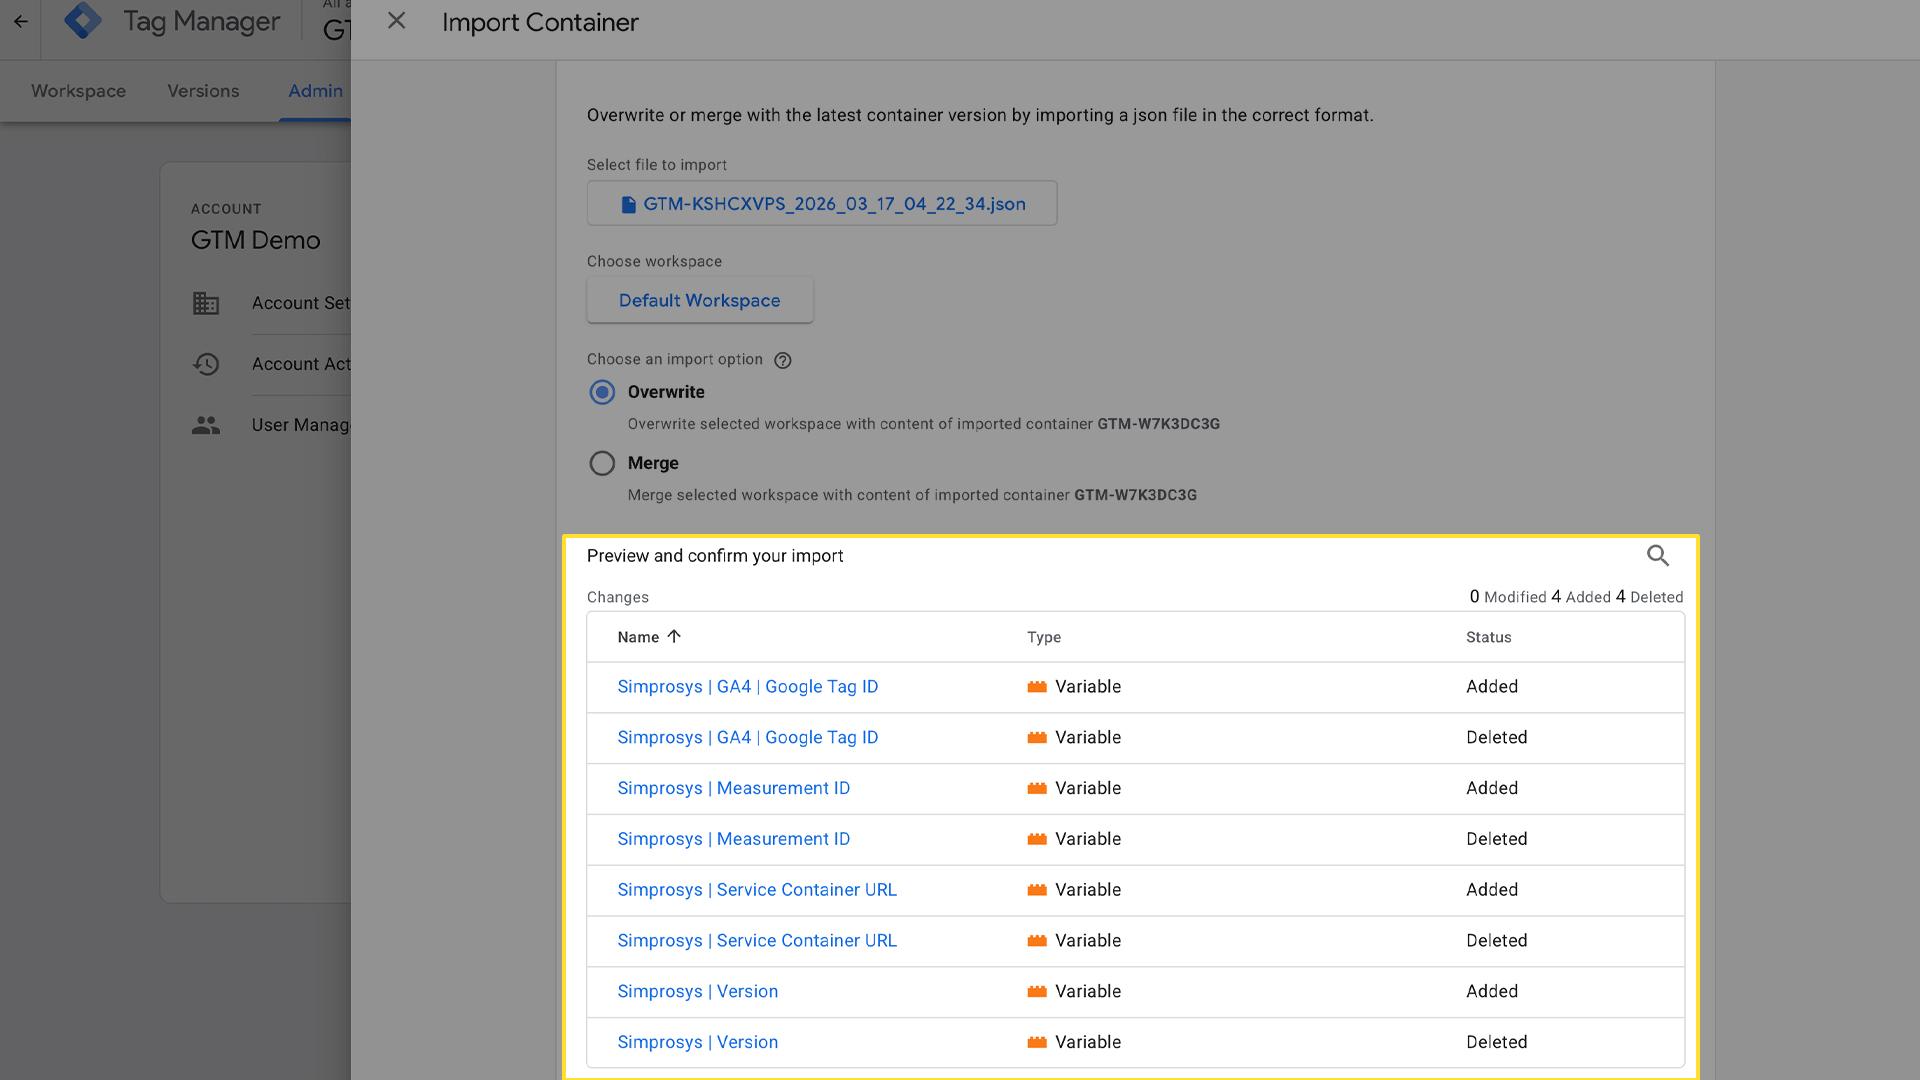
This is normal and necessary for tracking to work correctly. Take a moment to review the list, and if everything looks good, click Add to workspace at the bottom to complete the import.
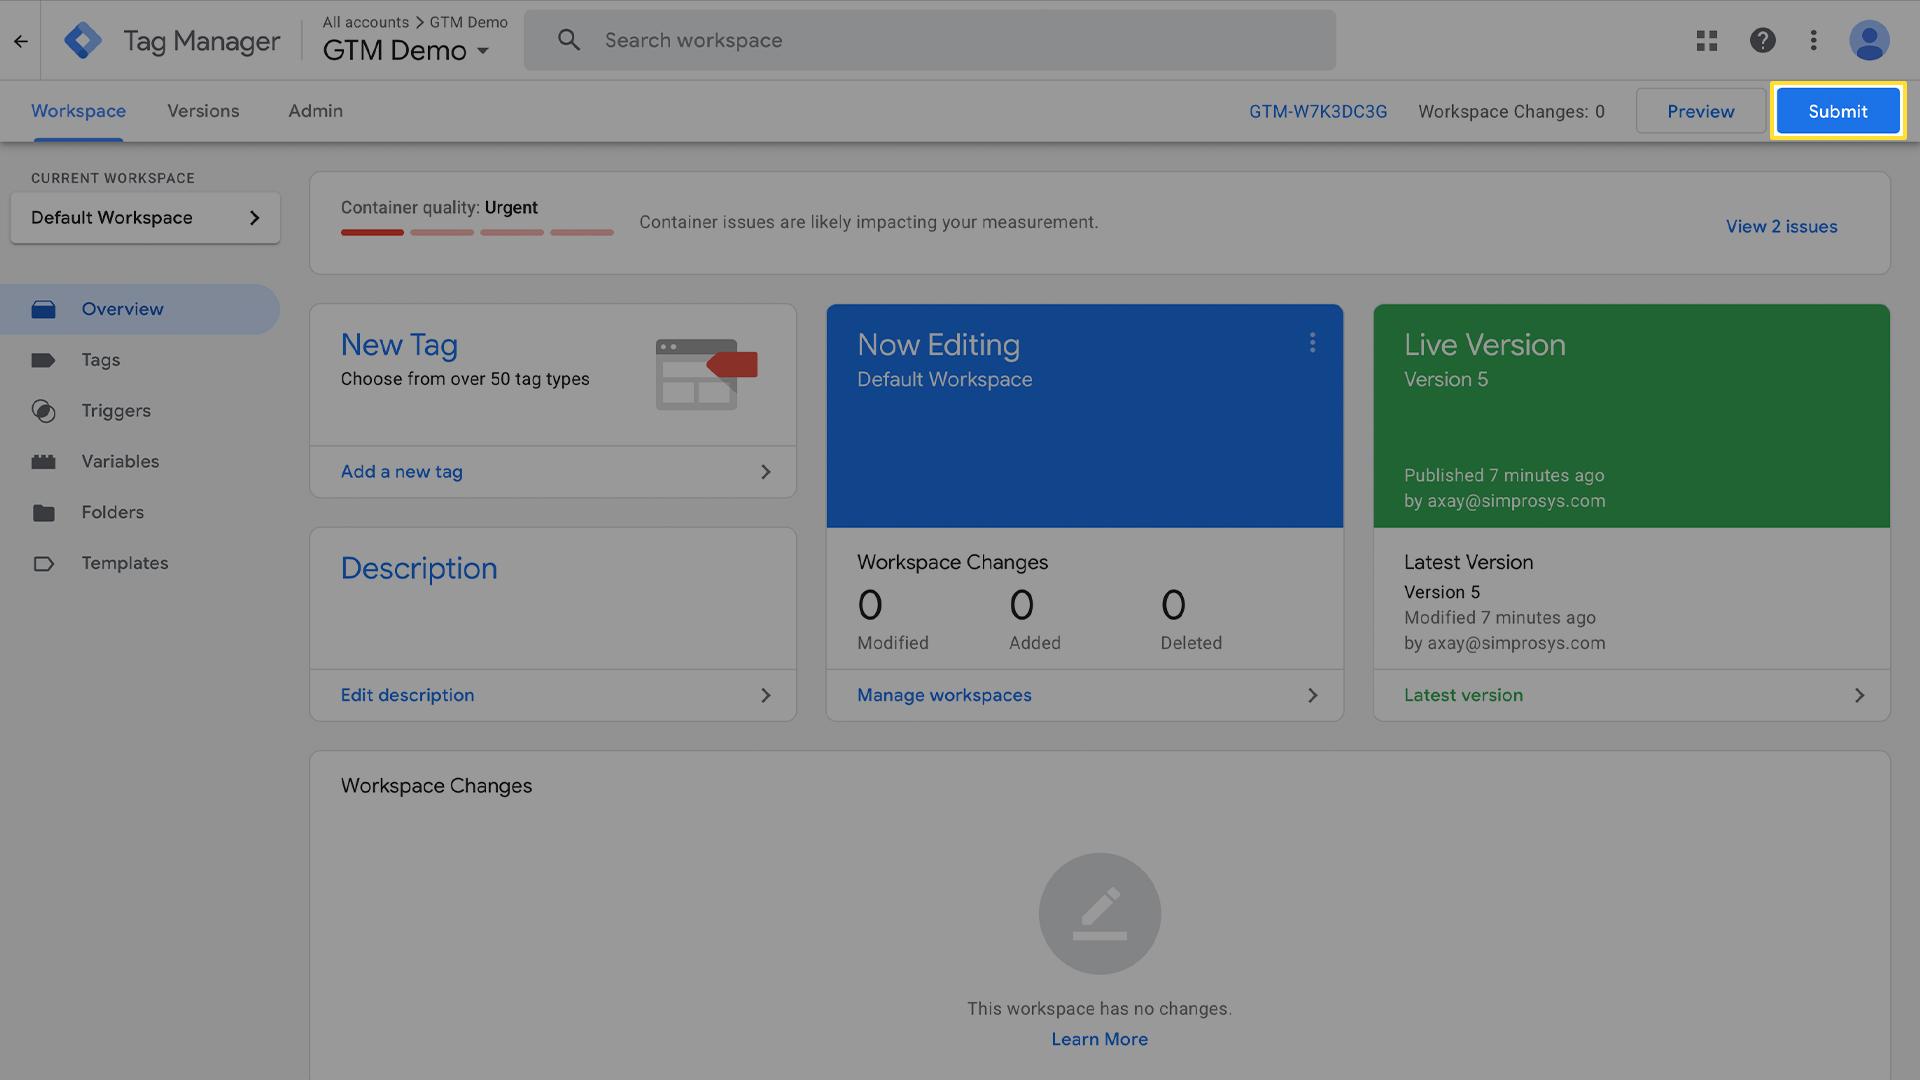
Step 6: Save and Publish the Container
After importing the container:
- Click Submit in the top-right corner.
- Give the version a name, for example: Simprosys Server-Side Tracking Setup.
- Add a short description if you like (optional, but helpful later).
- Click Publish.
Step 7: Verify the Setup in the Simprosys App
After publishing the container:
- Go back to the Simprosys app.
- Click Verify Import.
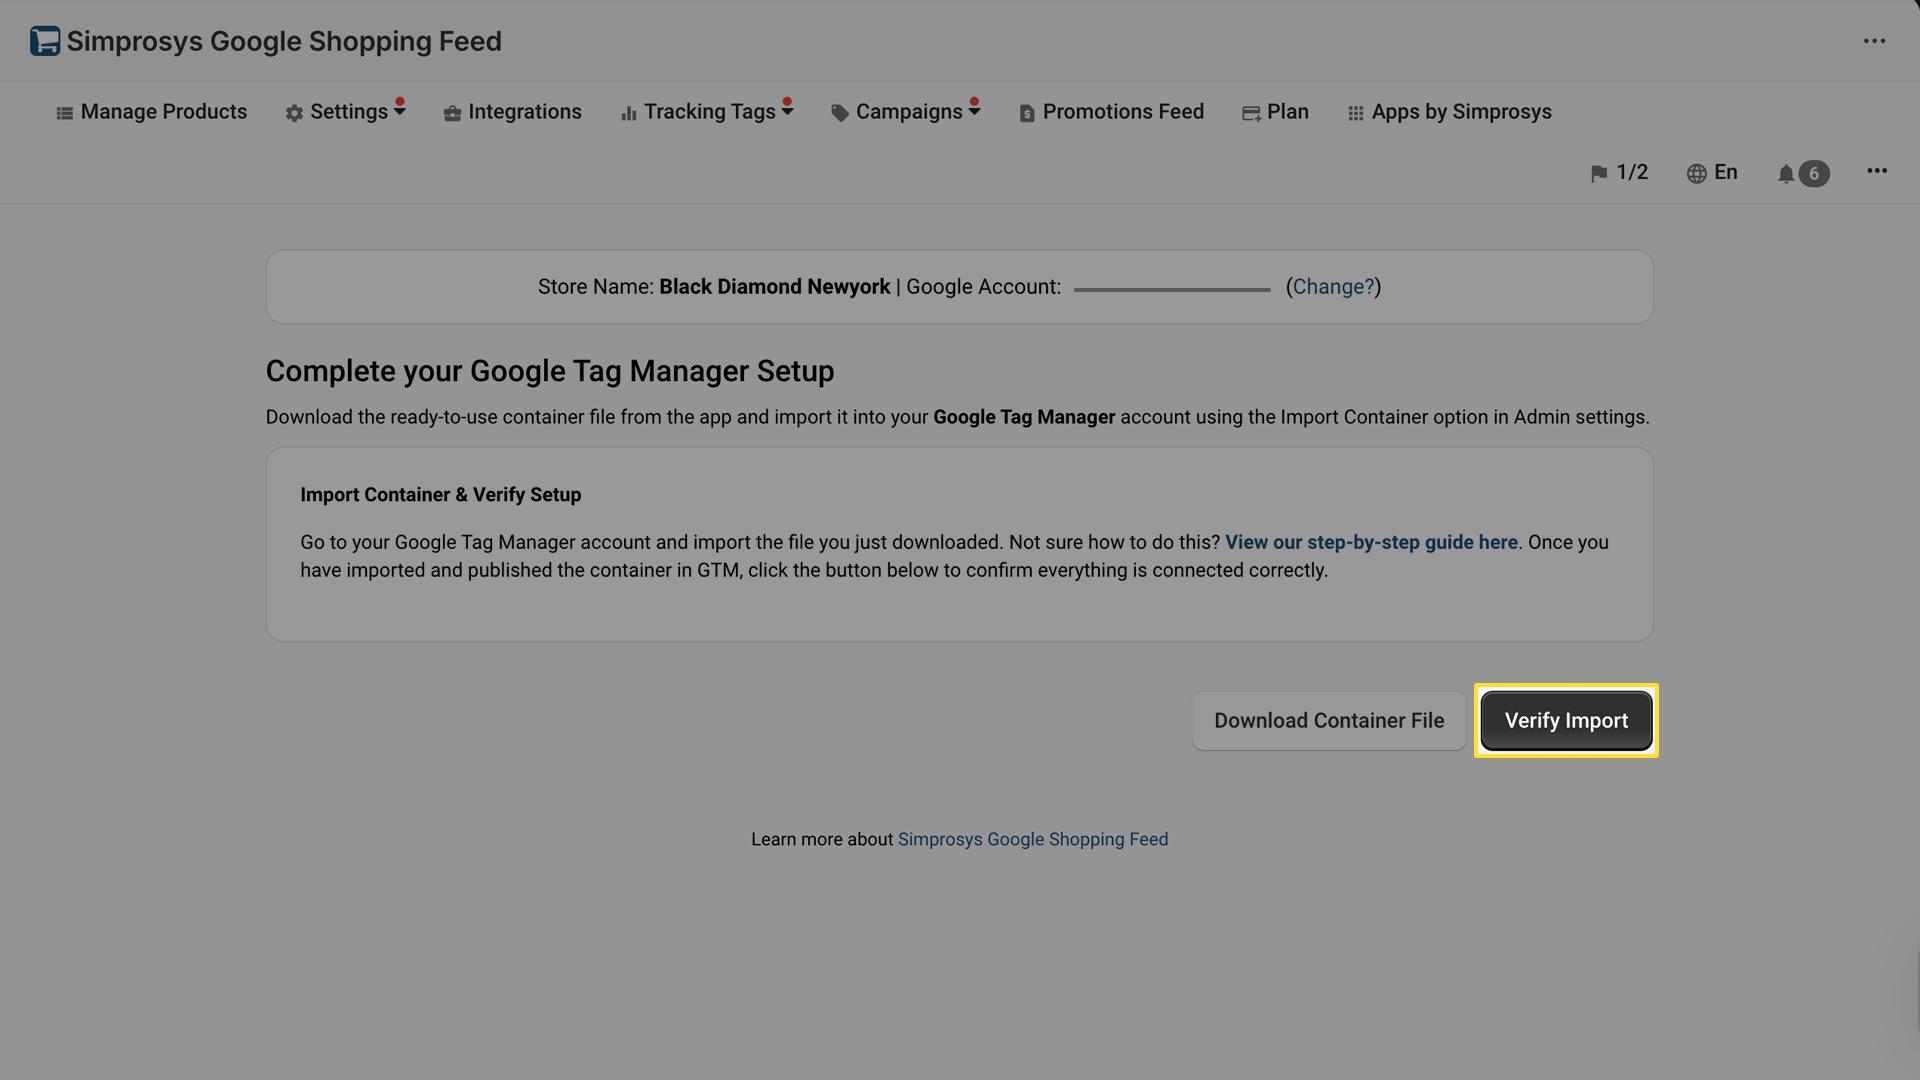
- Wait for confirmation.
You’re All Set
Once the container is imported and published, your tracking foundation is ready. You can now continue with the final setup step in the app.
You can reach out to support@simprosys.com for any further information.
Next article

Simprosys Google Shopping Feed
Pre-Installation & Setup
Initial App Configuration
Product Submission Controls
Product Attributes and Optimization
Automated Feed Rules
Troubleshooting & Issue Fixes
Advanced Setup Made Easy
Google Merchant Center Setup
Tracking Tags Setup (Google Ads & Google Analytics 4)
Google Ads & Campaign Setup
Multi-Country & Market Setup
Promotions and Discounts
Microsoft Advertising Integration
Meta (Facebook) Integration
Pinterest Integration


