

Simprosys Google Shopping Feed
Pre-Installation & Setup
Initial App Configuration
Product Submission Controls
Product Attributes and Optimization
Automated Feed Rules
Troubleshooting & Issue Fixes
Advanced Setup Made Easy
Google Merchant Center Setup
Tracking Tags Setup (Google Ads & Google Analytics 4)
Google Ads & Campaign Setup
Multi-Country & Market Setup
Promotions and Discounts
Microsoft Advertising Integration
Meta (Facebook) Integration
Pinterest Integration
Setting up a Microsoft / Bing Account
Dec 21, 2025
1. Basic Setup Requirement
a. Shopify Store with updated product information.
b. Microsoft account (If you don't have one, create one )
c. Create an account on Bing Webmaster Tools (You can use the same Microsoft ID from above to log in)
2. Setup your Bing Webmaster account for your Shopify store
For creating a Microsoft Merchant Center Store, you will need to verify your store’s primary domain in the Bing Webmaster Tools.
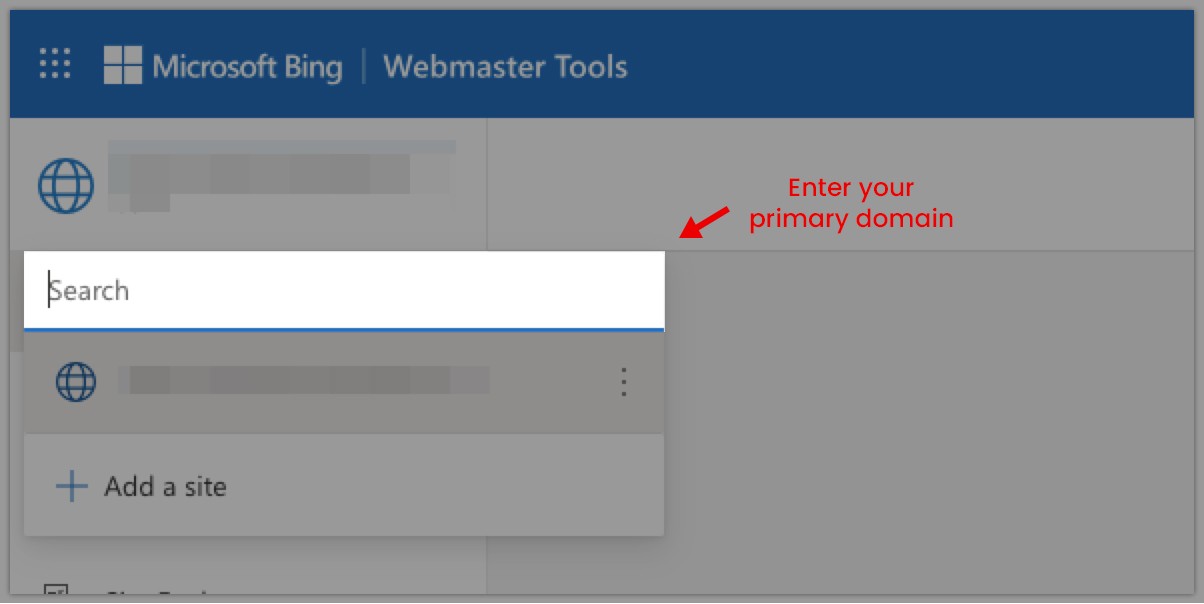 a. Once you sign up to your webmaster account you will find an option to add your site on the upper left corner as shown above.
b. Click the “Add a site” button and you will have two options to verify your website/store
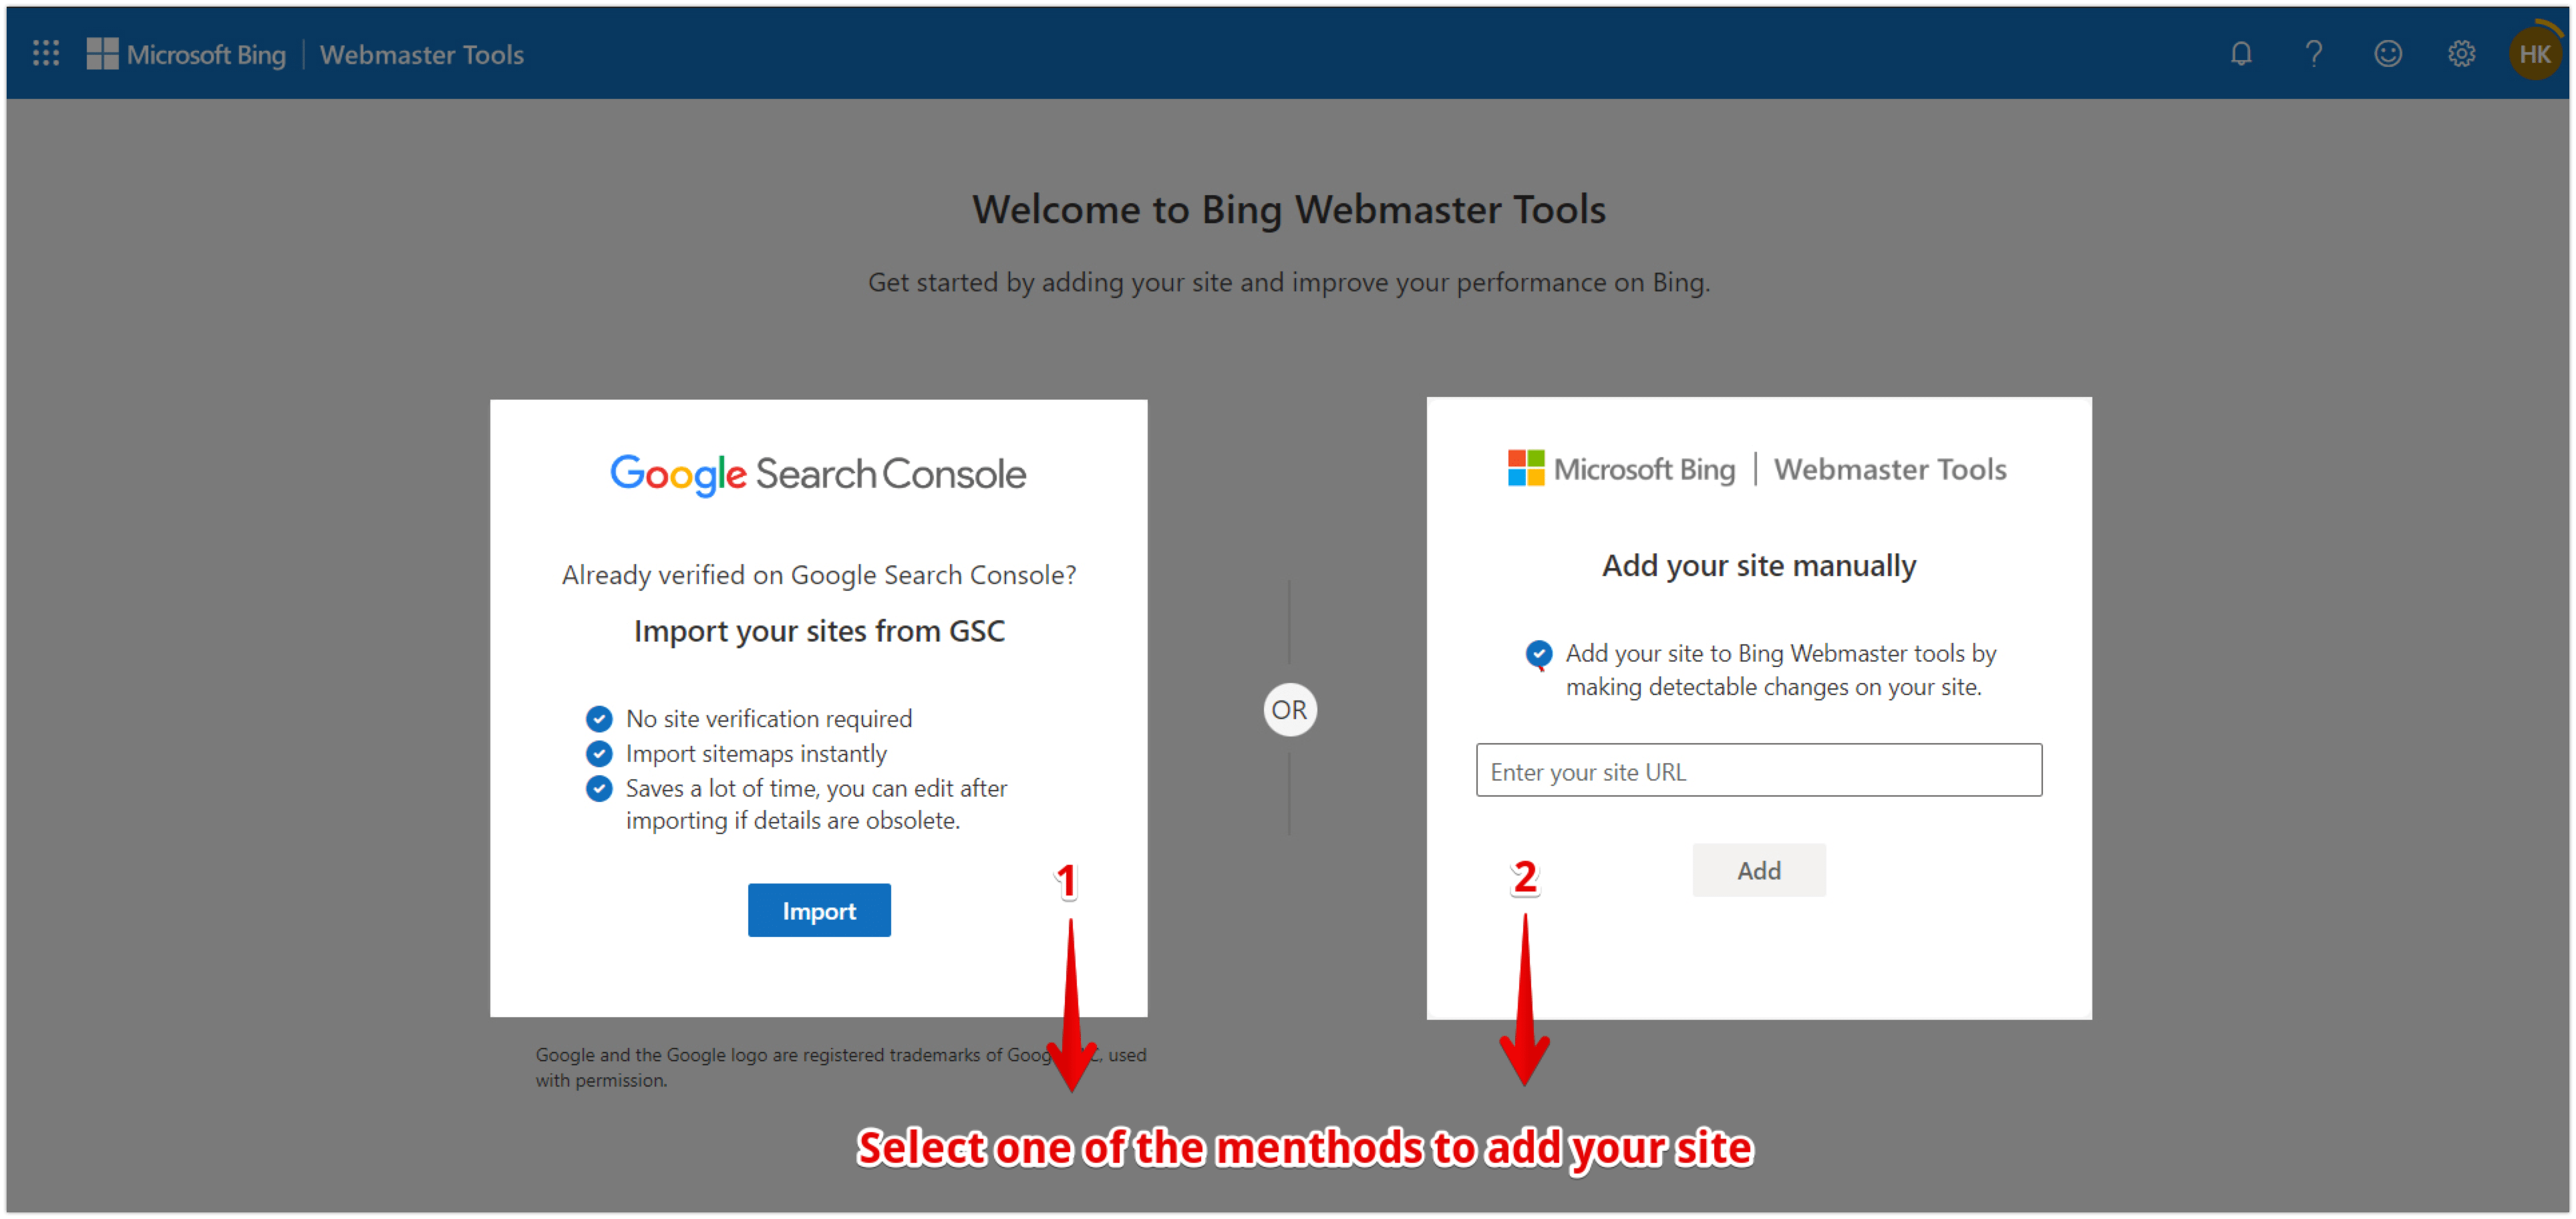
c. If you have already verified your site/store on Google Search Console then you can directly click on the first option.
- Click on Import.
- Login to your Google account.
- Select the domain from the Google account that you want to import or verify.
- You will start seeing basic metrics for your imported domain.
d. Now if you have not verified your website on Google console then you can manually enter your domain in the second available option to get it verified. Make sure that you are adding your primary domain.
e. Once you add the primary domain, you will be given the following three options as shown in the below images to verify your domain
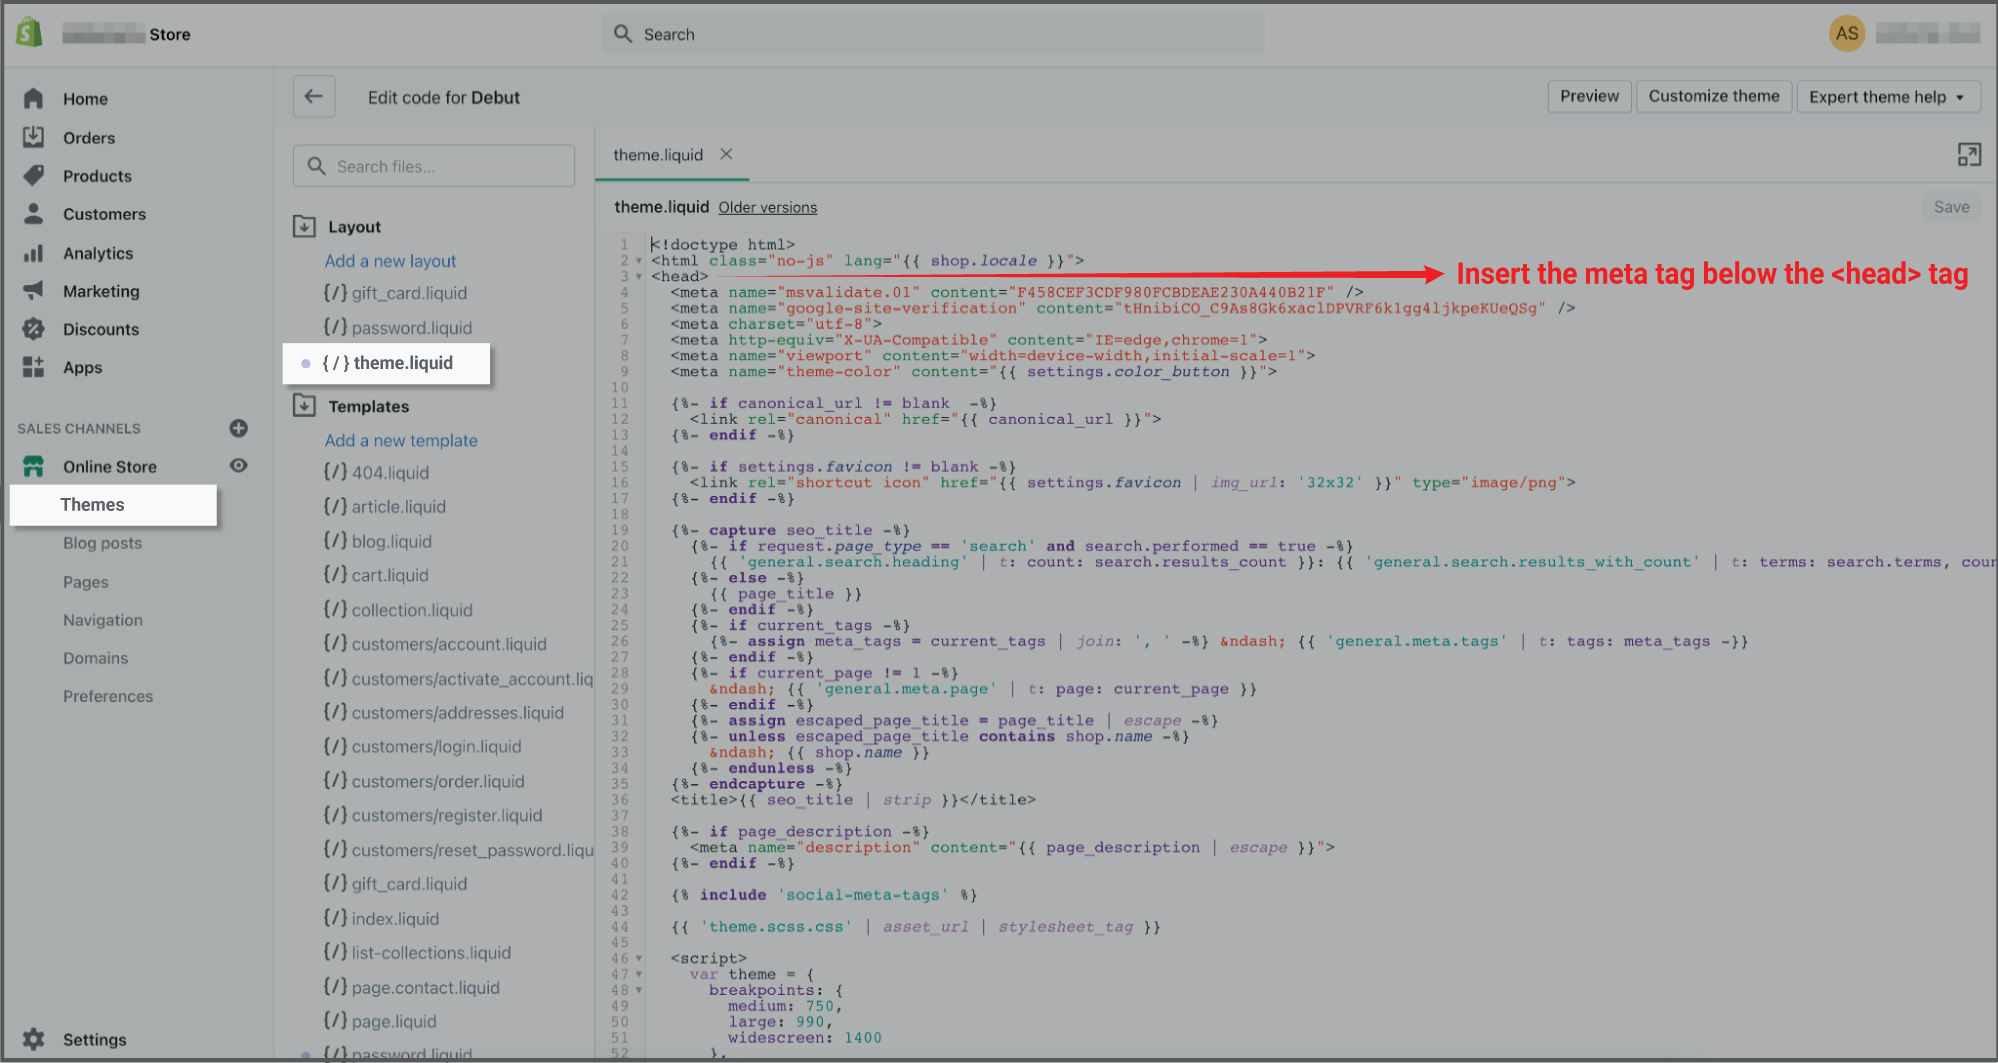
- In our case of verifying shopify store we will have to go with the second option highlighted in image below, click on the copy button to copy the metatag.
 f. Copy the meta tag and open your Shopify store admin and follow the following steps
- Click on the Online Store on left-hand side
- Click on Themes> Actions> Edit code, once you do this you will see your code
- Open theme.liquid file. Find the opening Head tag, paste the copied HTML Meta Tag under it and then Save the changes

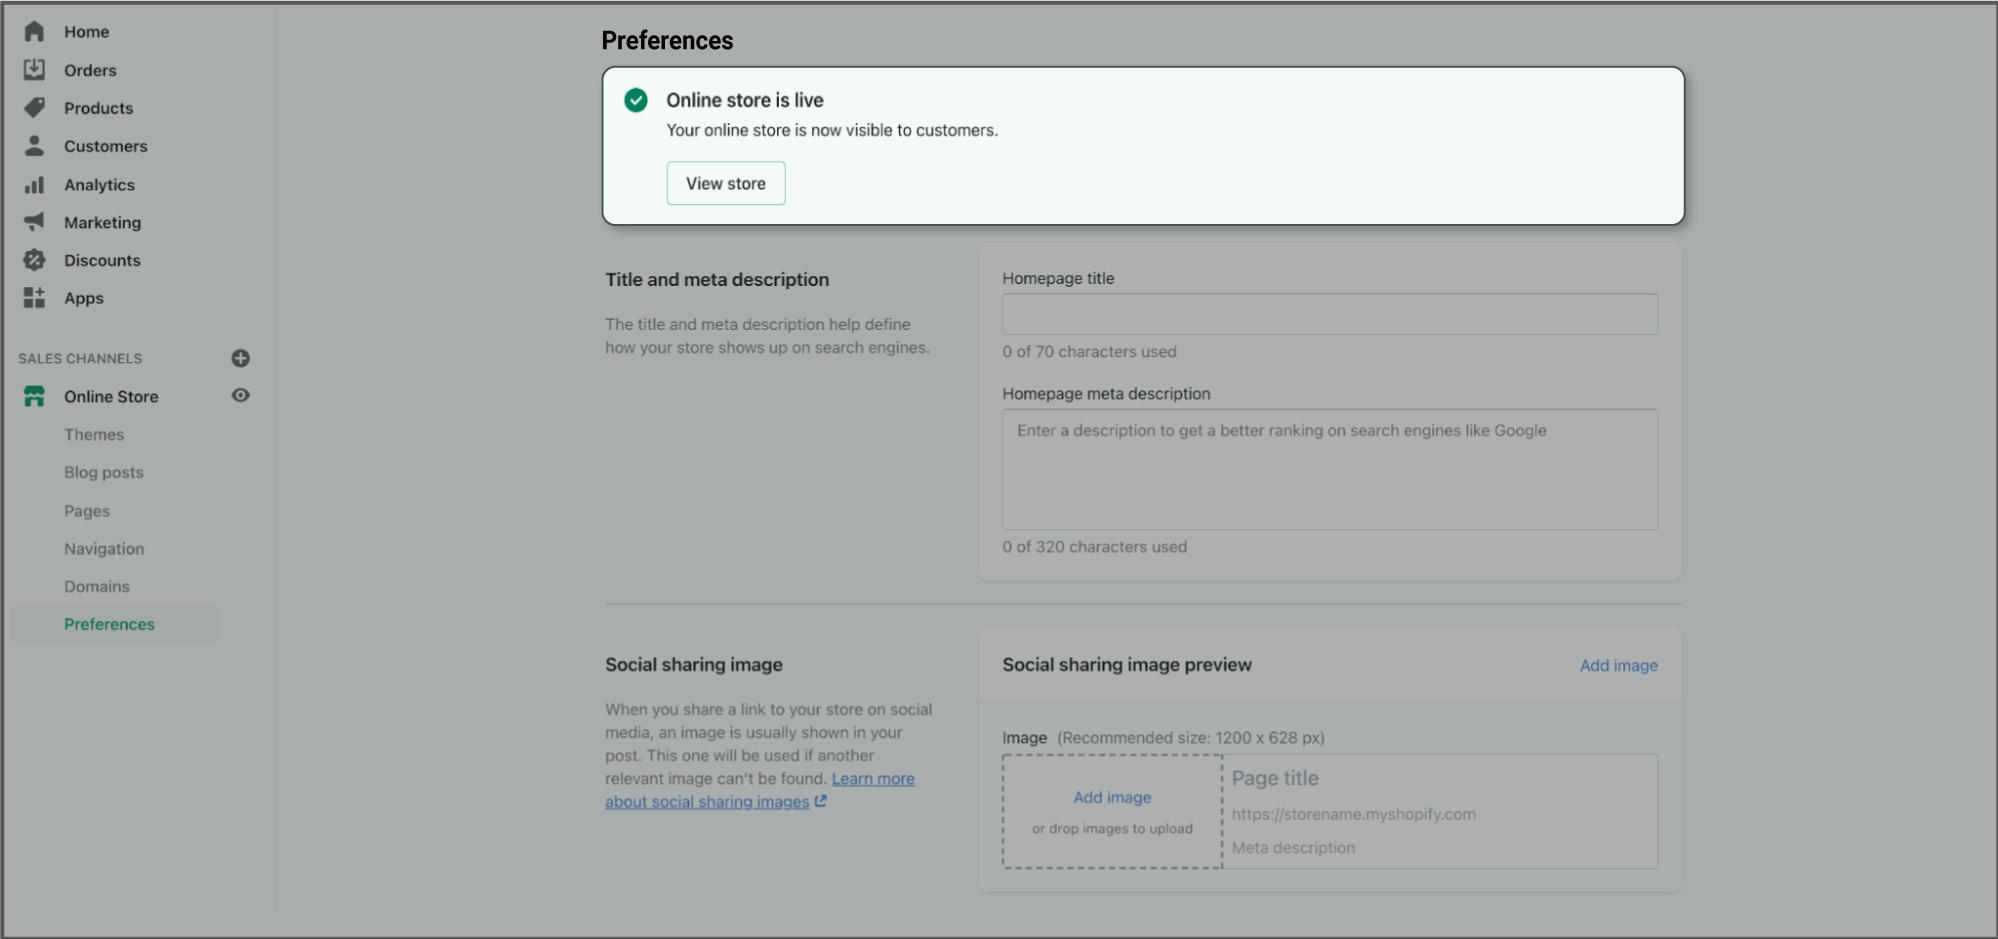
 g. Please make sure your store is already published and not password protected or blocked for crawling, using any other meta tag.
(Follow these steps to check and update it if it is password protected)
- Click on the PREFERENCE option on left hand side as shown below (If your store is password protected then you will see a warning message ‘online store is password protected” as shown)
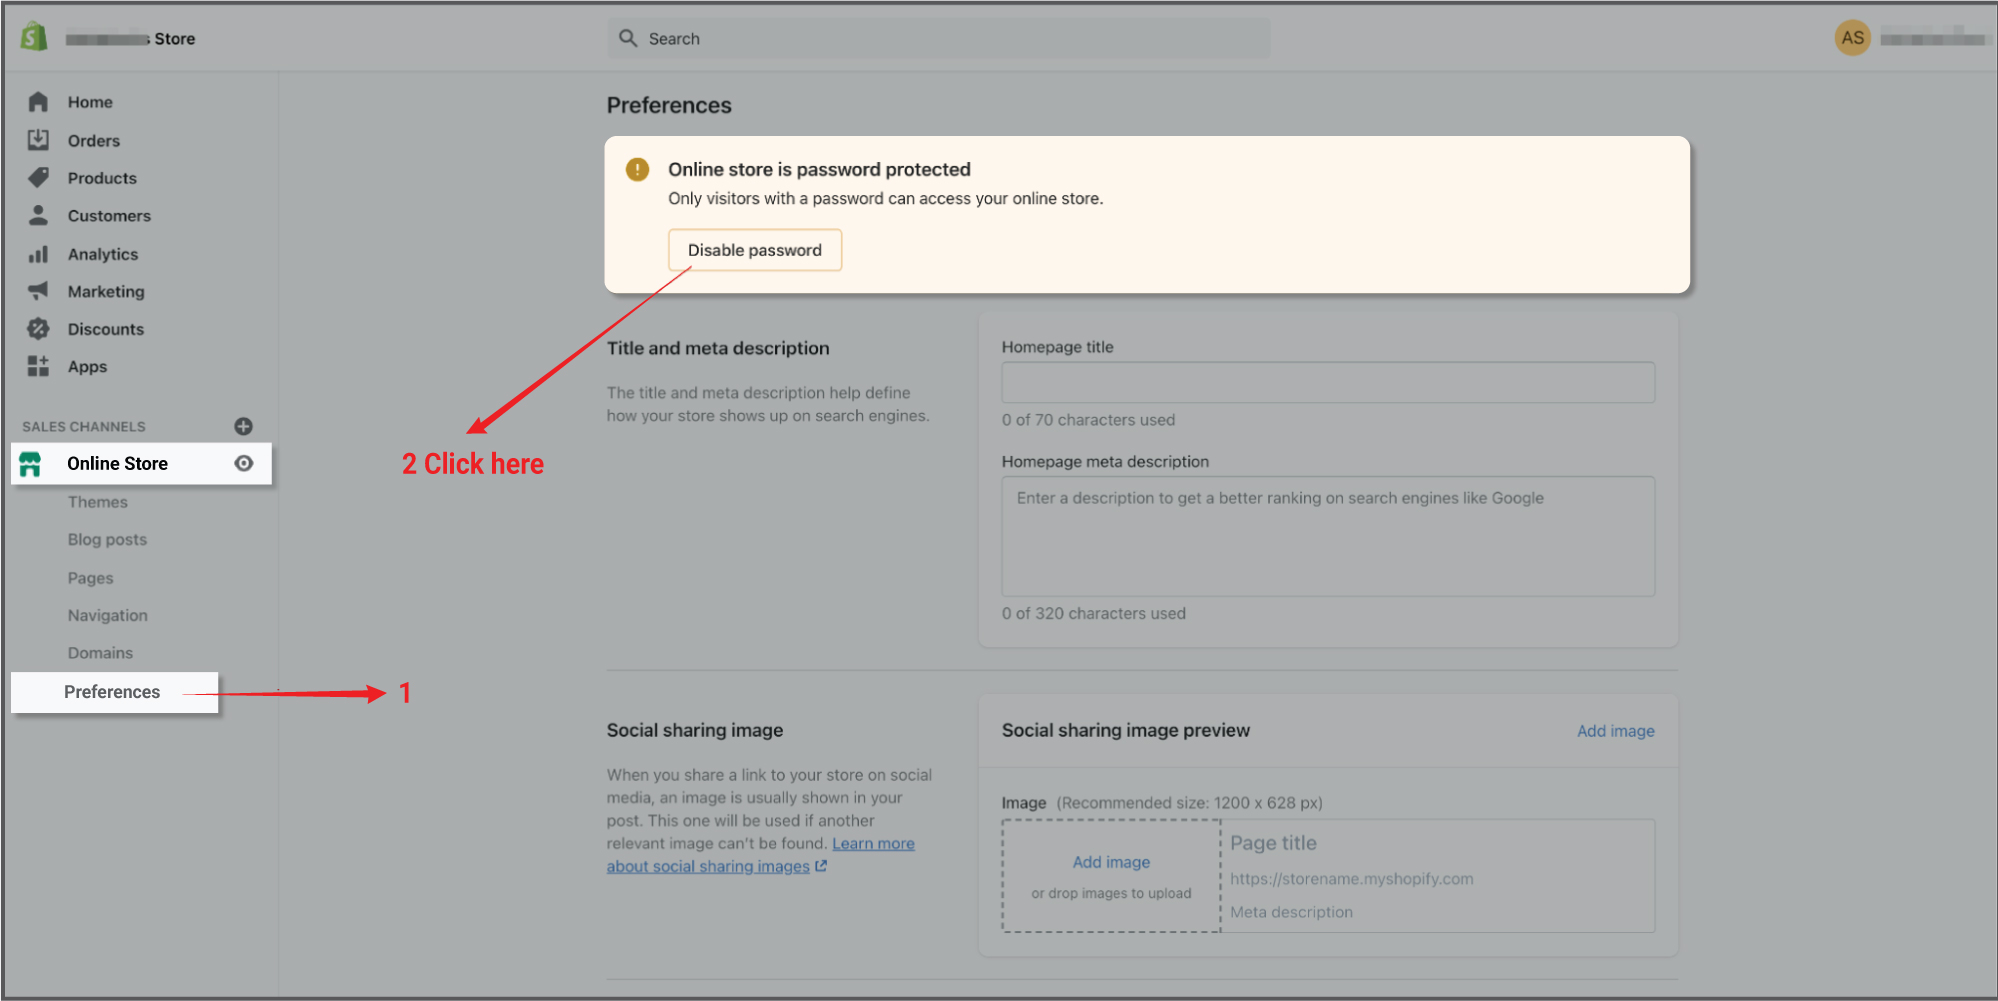
- Click on Disable Password and UNCHECK box shown below and click on SAVE

h. You will see the following screen once you click on SAVE with a message that your online store is live.
Now we need to go back to the webmaster window to complete the site/store verification process.
i. On the webmaster click on VERIFY on the Second option from where we copied our meta tag.
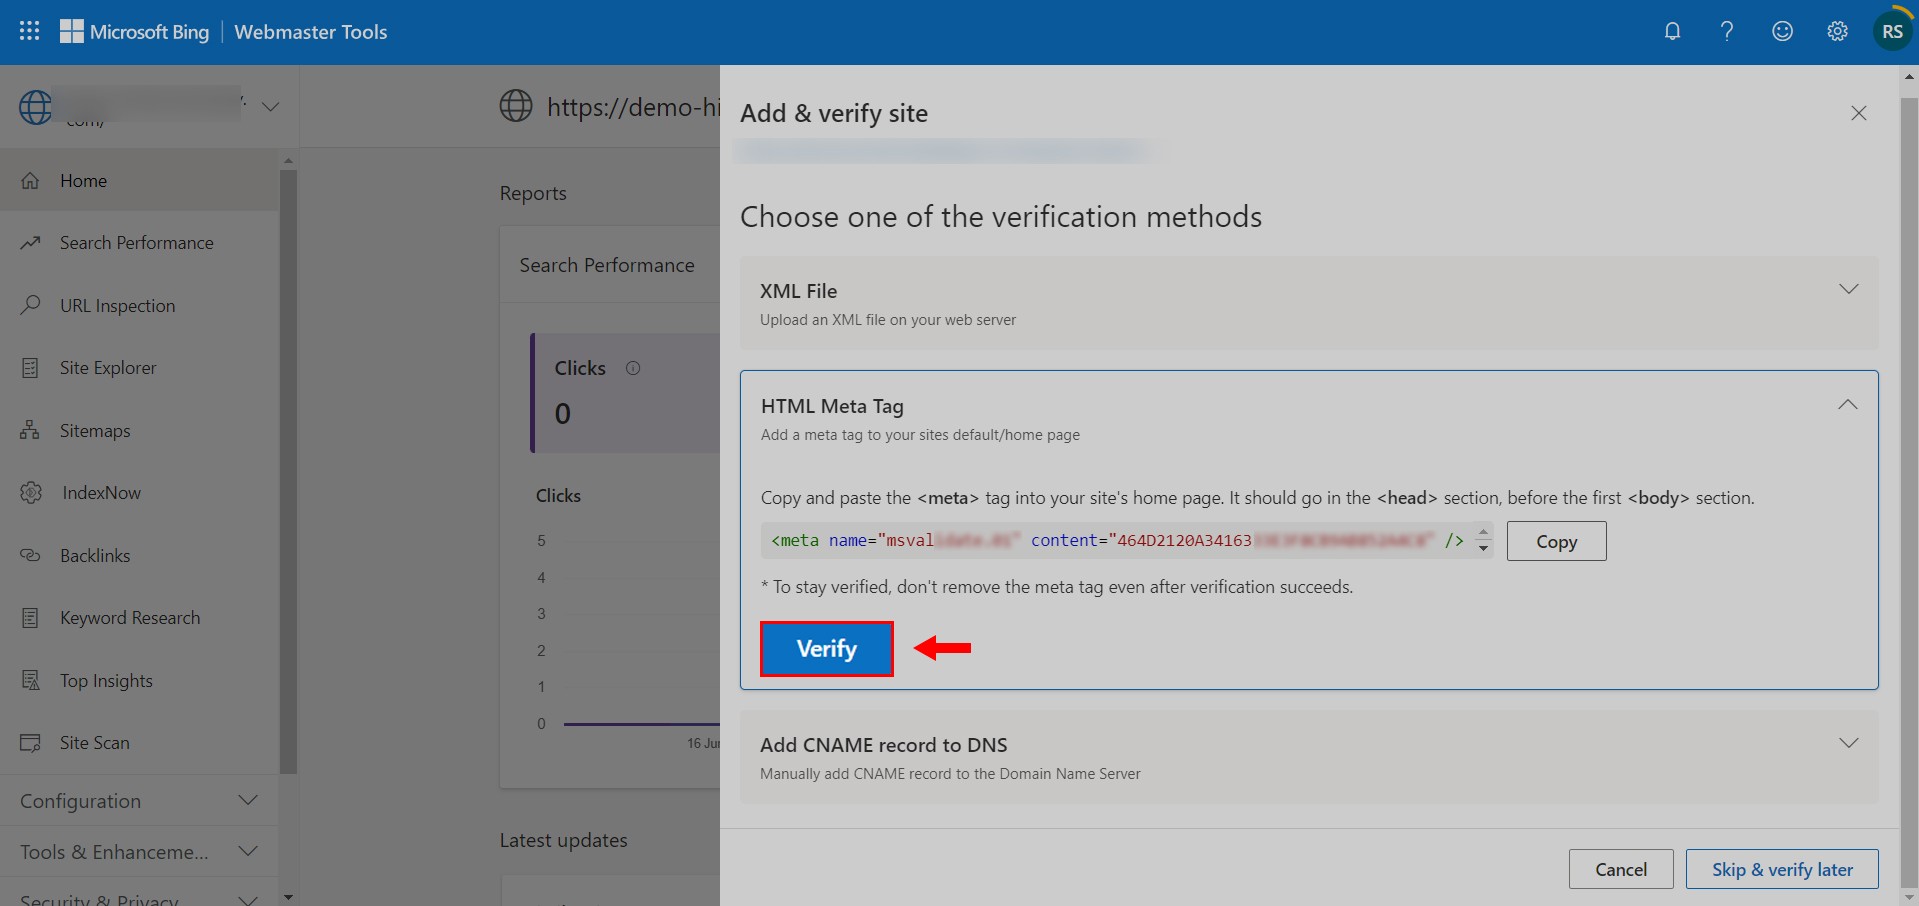
(If it shows any Error message like “unable to locate any meta Tag on your store” you will need to wait, as Microsoft sometimes takes up to 24 hours to validate the Meta Tag from your store)
3. Setting up Microsoft Advertising Account
a. Open a Microsoft ADS account and login with the same MS account that you used for webmaster.
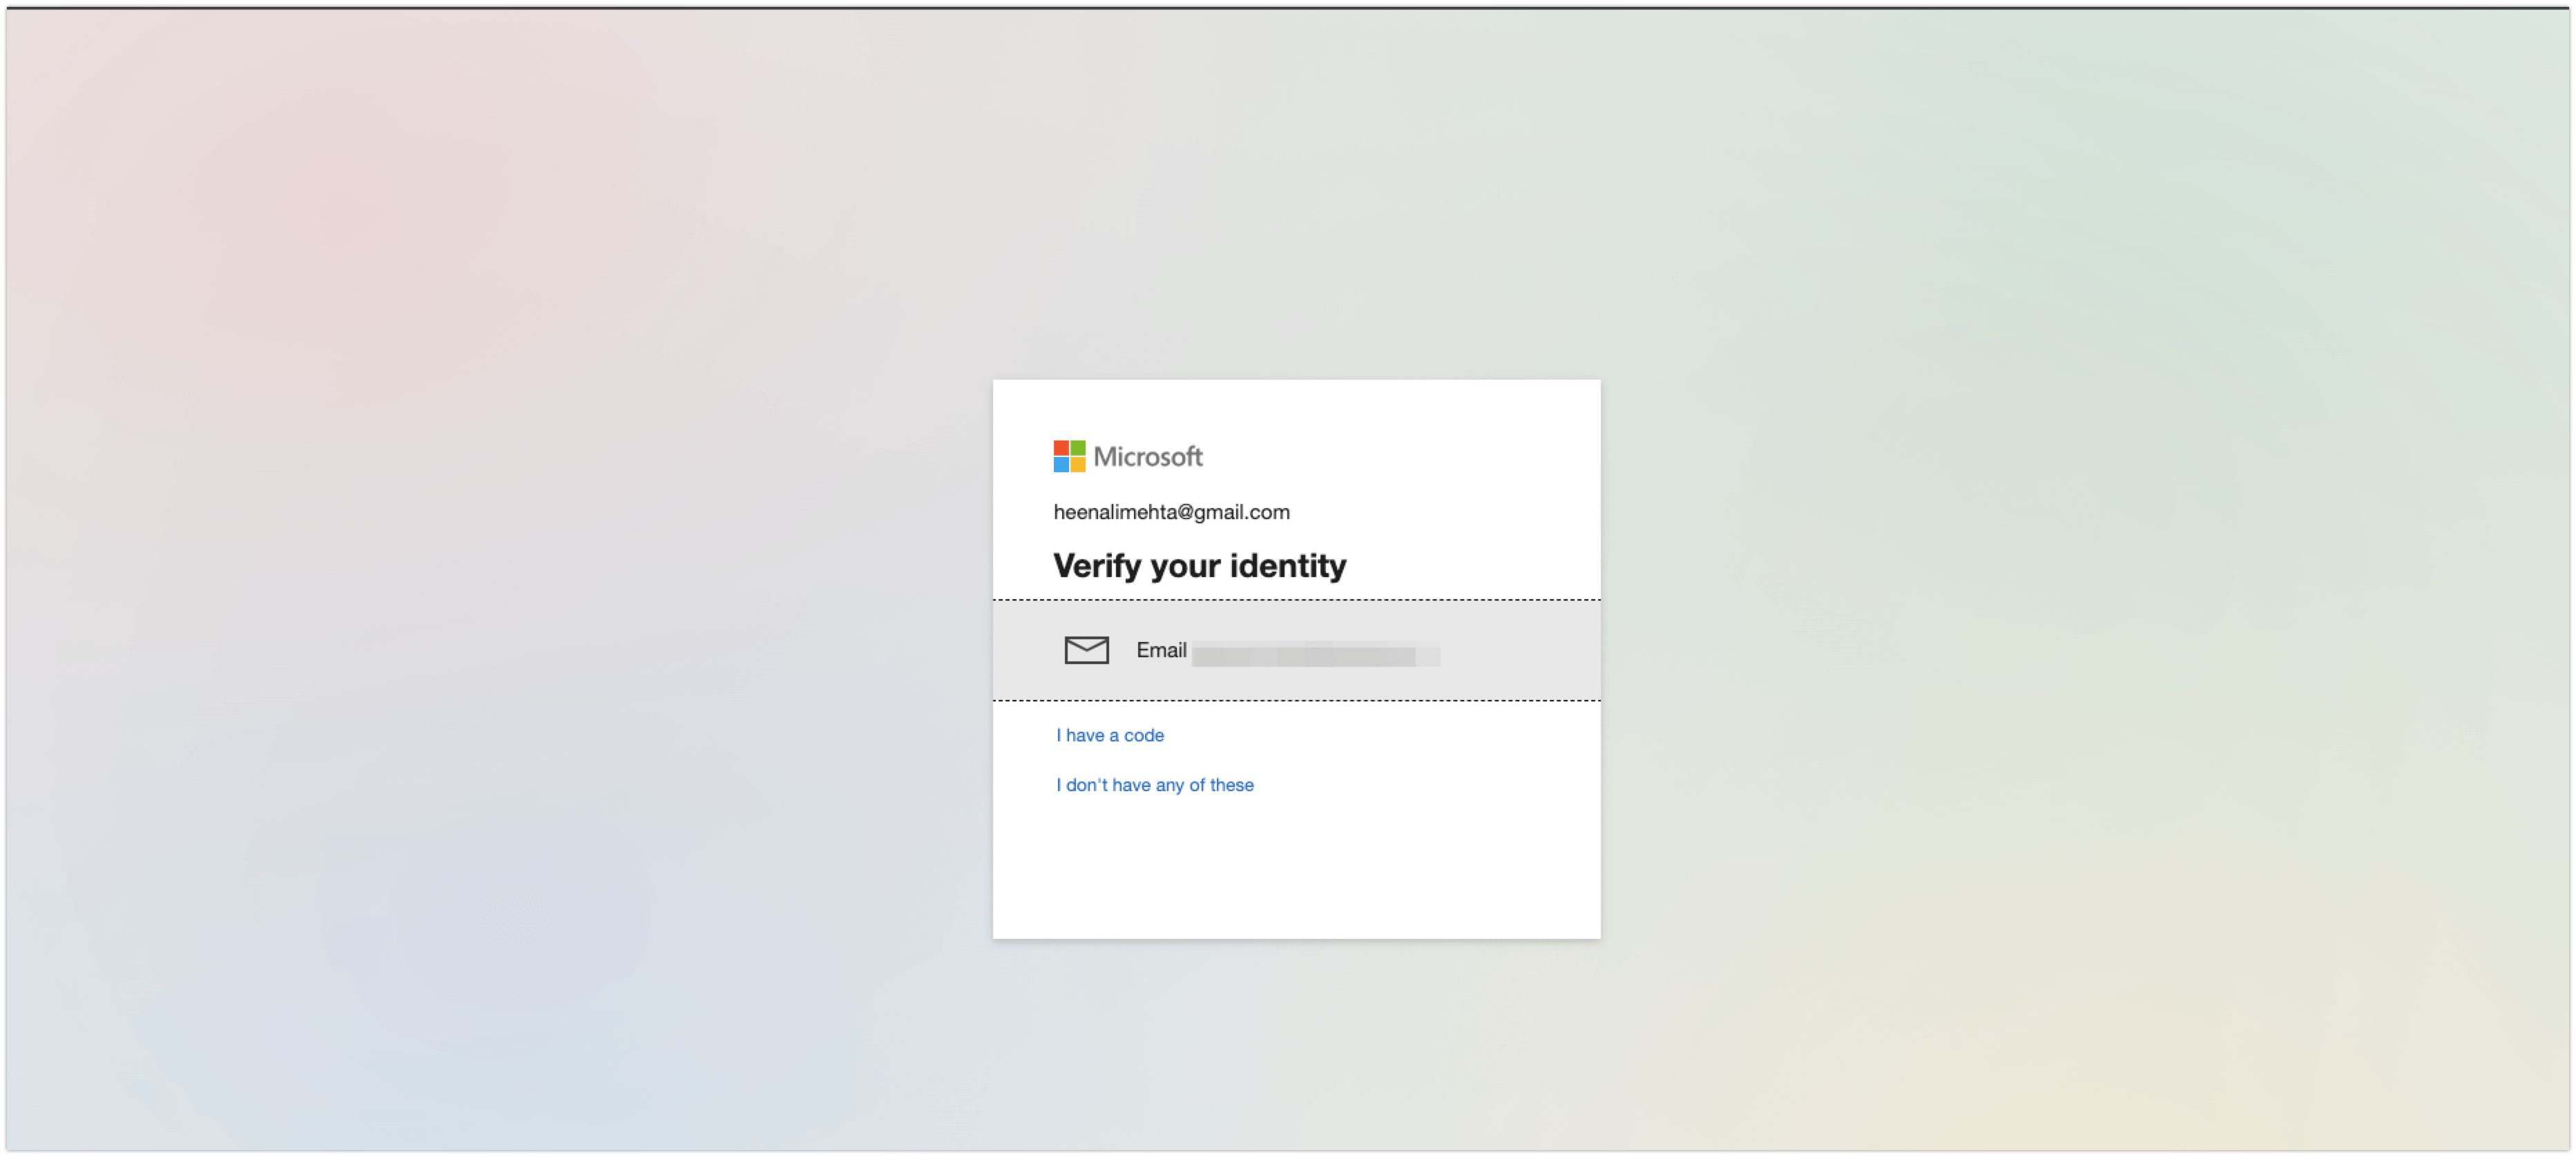
b. Once you try login they will ask you to verify your account by sending a code to the account you logged in with, add the code and click Login
c. Once you login successfully a window will open, as shown below asking about your account goal. At the bottom of the page you will see a message and an option to
switch to expert mode, click on that, you will get further instructions to set up your account.

d. Once you switch to the expert mode you will see options to fill in information about your business and create your ad account. Then you need to provide a Legal Business Name, Phone Number, Business Location, Currency, Time zone, and the purpose of the Primary use of this new account.
.jpg)
Note: While entering other details of a business account, make sure you are entering the details of the Business Location and not the details of the target country. For example, if you are an entity established in India, but planning to sell products in the United States, then enter the business details of India only
e. Once you select to agree with the terms and conditions, click on the CREATE ACCOUNT button. As shown below, a window will open with the following options
- Import from Google Adwords
- Create a new Campaign
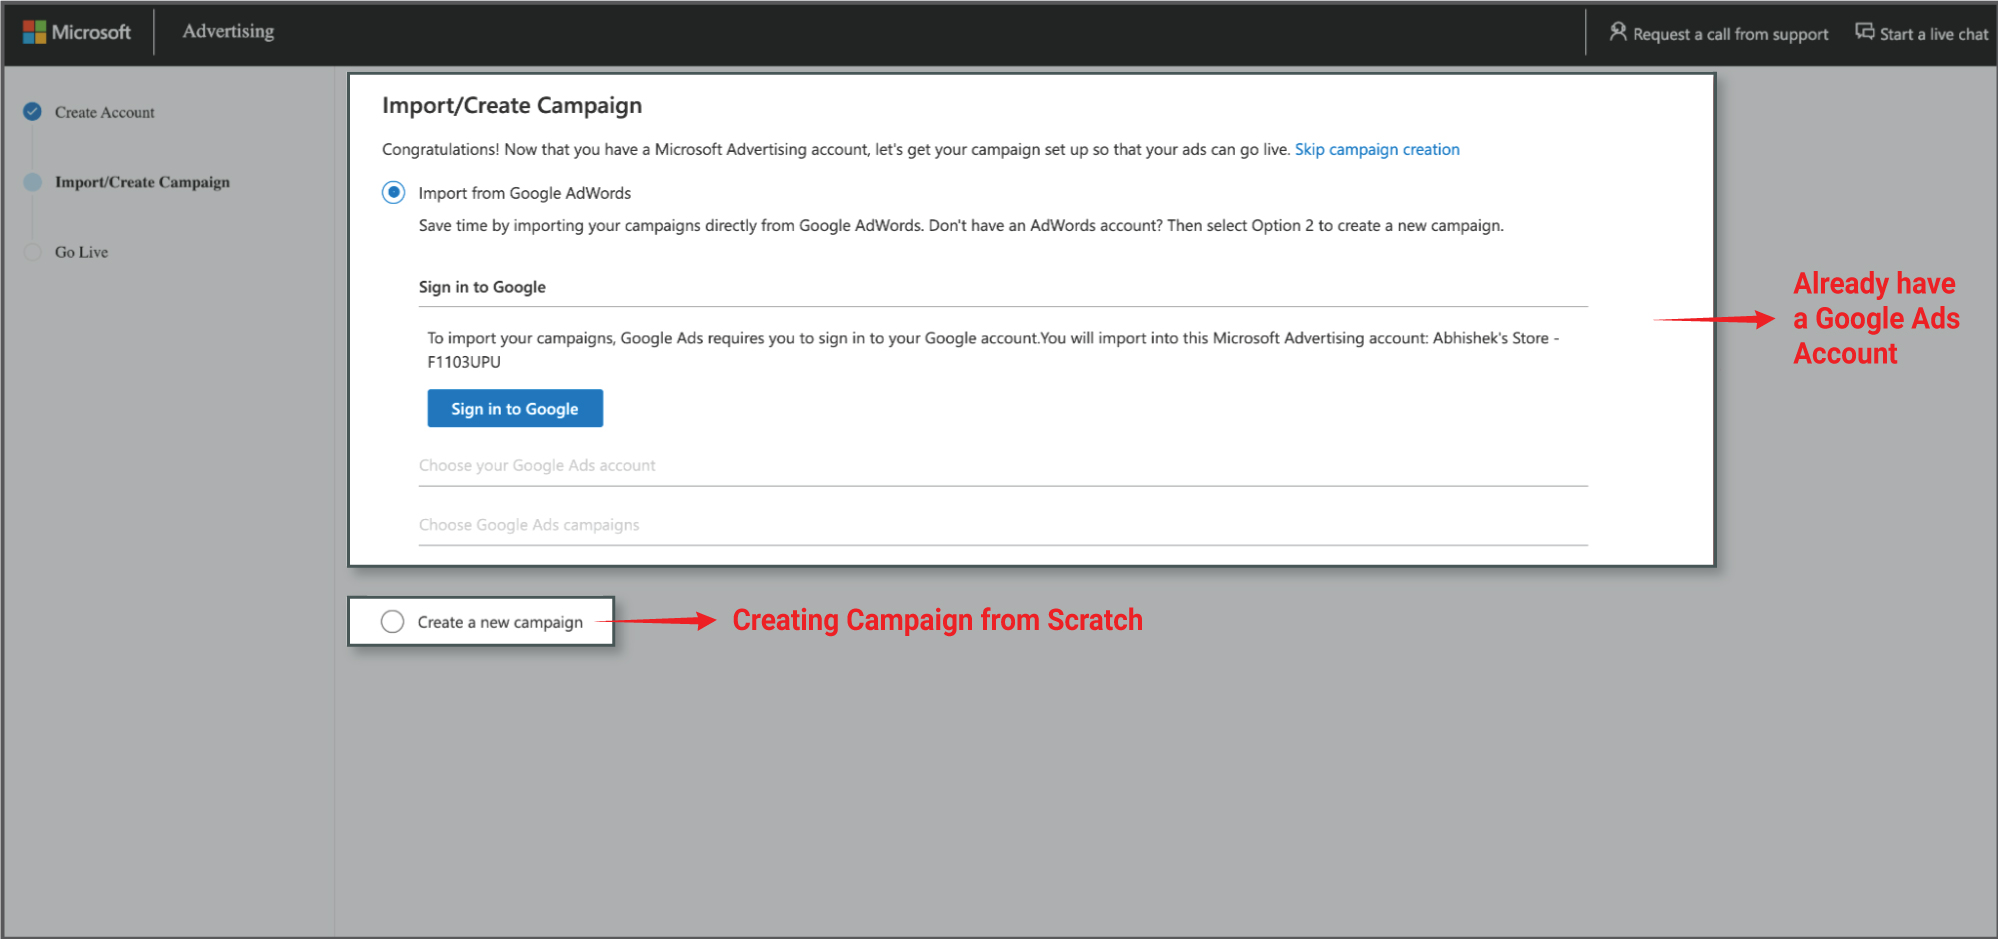
f. If you simply want to replicate your product feed and catalog from the Google Ad account, click on Import from Google Adwords >> Sign in with the Gmail id with which you have created Google ad account >> select the AD Account >> Select the AD group that you want to import and you are done.
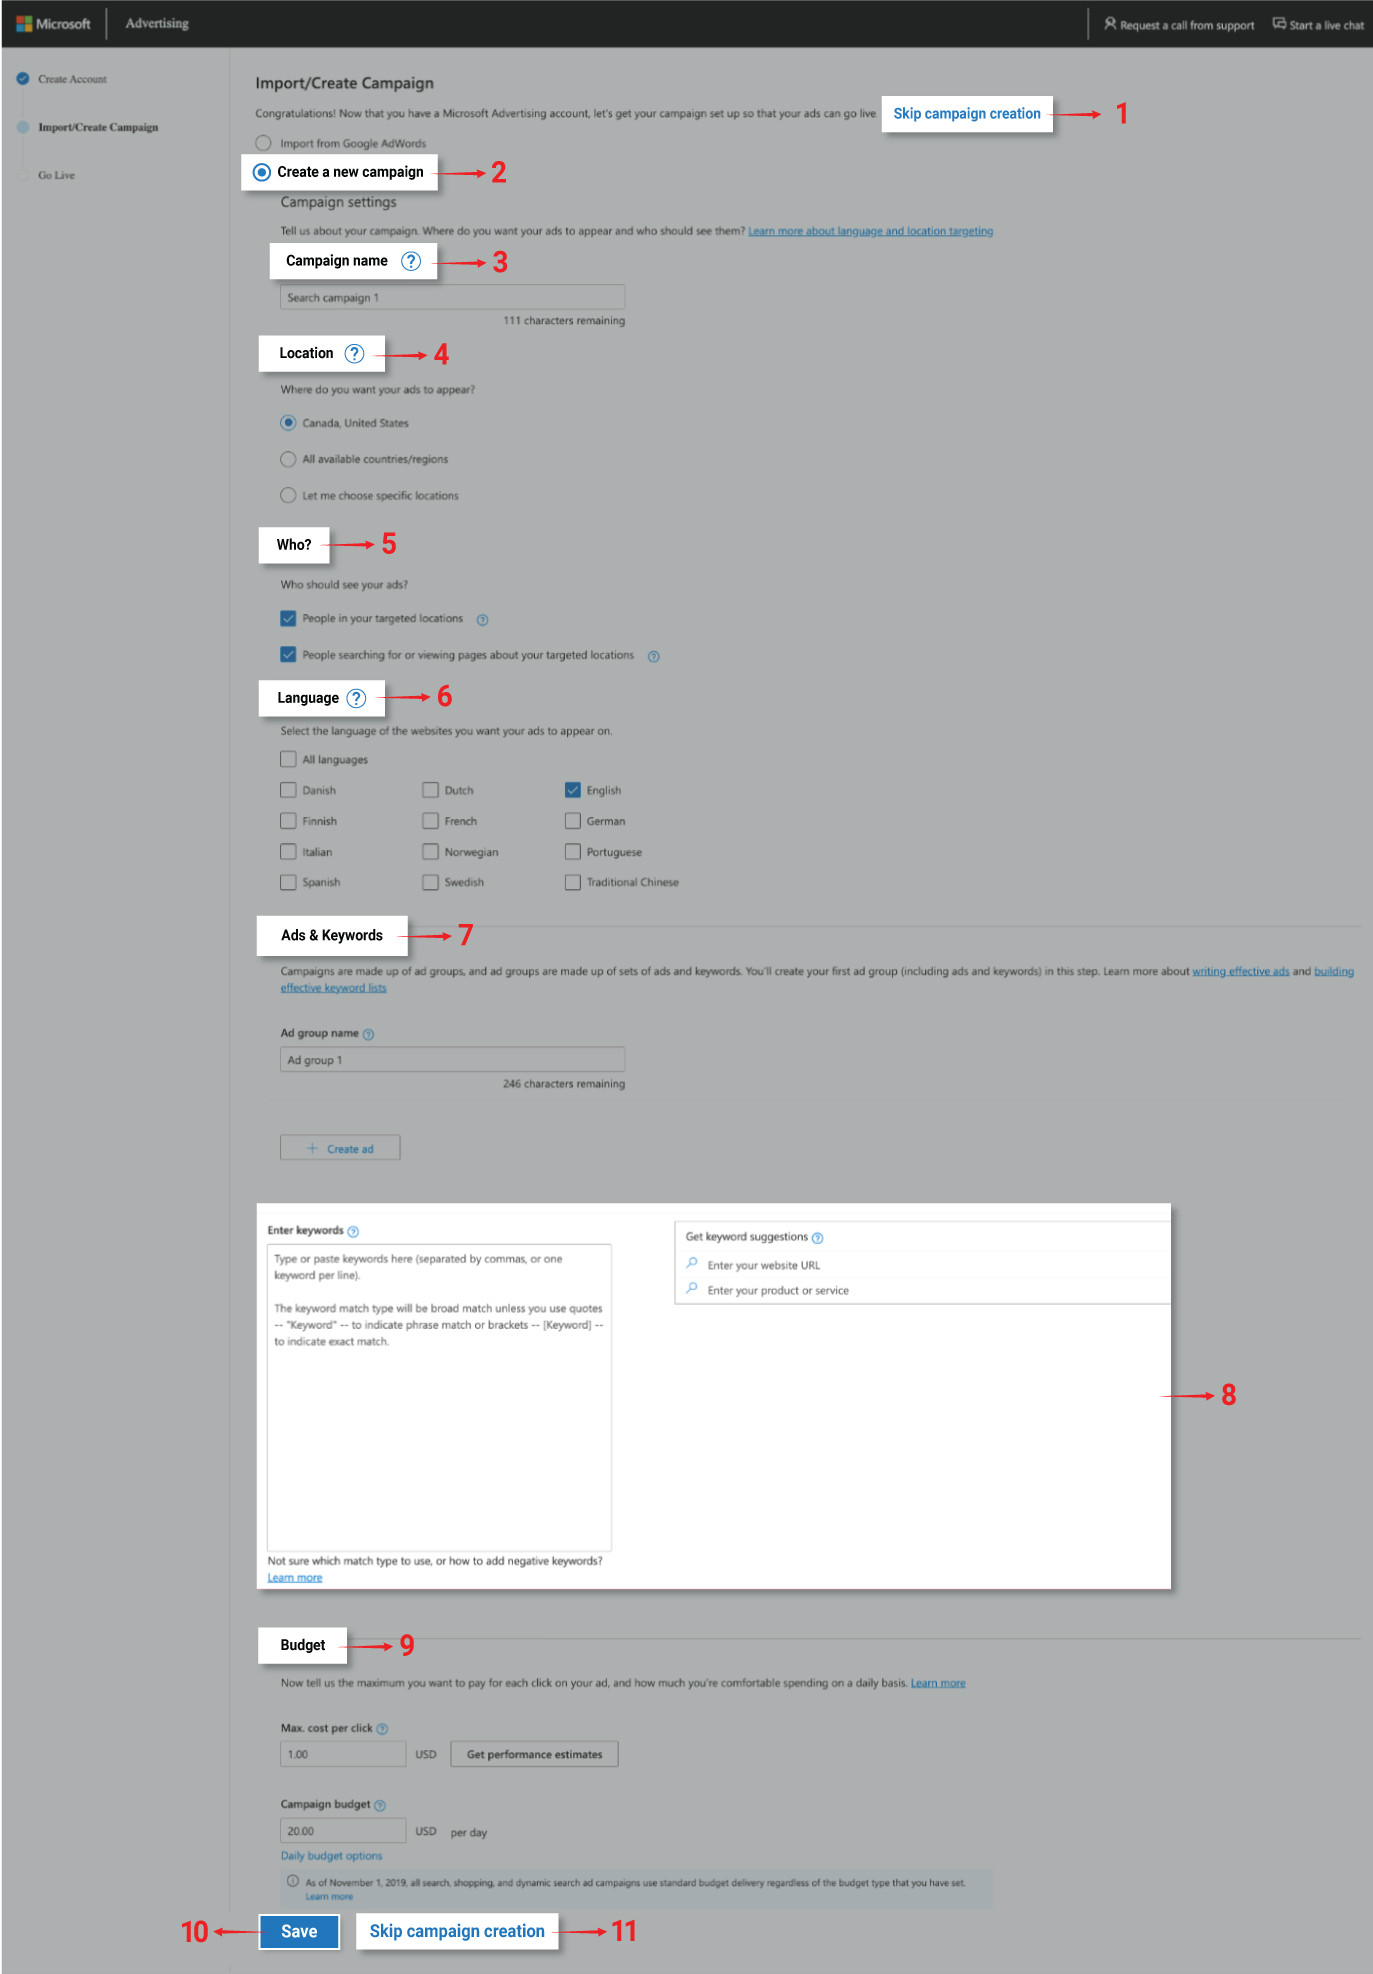
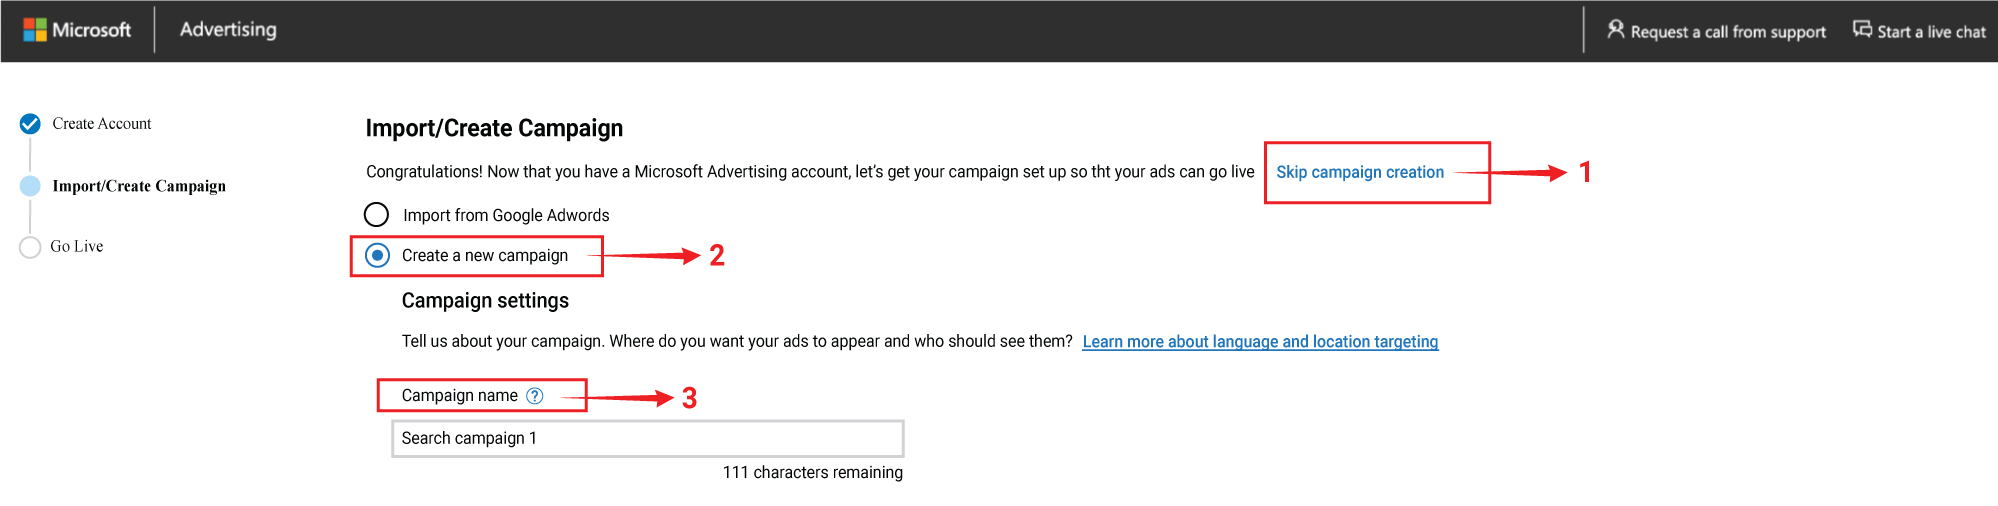
g. If you don’t want to import your campaign from google then you can select the option Create a new Campaign as shown above, then you will be able to see a window as shown below. For now click on the Skip Campaign Creation as shown below by arrow 1 (We first need to set up our store by connecting shopify store here, we will come to this part later)
 h. Once you have skipped the campaign creation options, you will be directed to the following window where you have to fill in options such as Business Location, Business Address, Billing country or region, and Billing methods. Fill in the options and click on save.
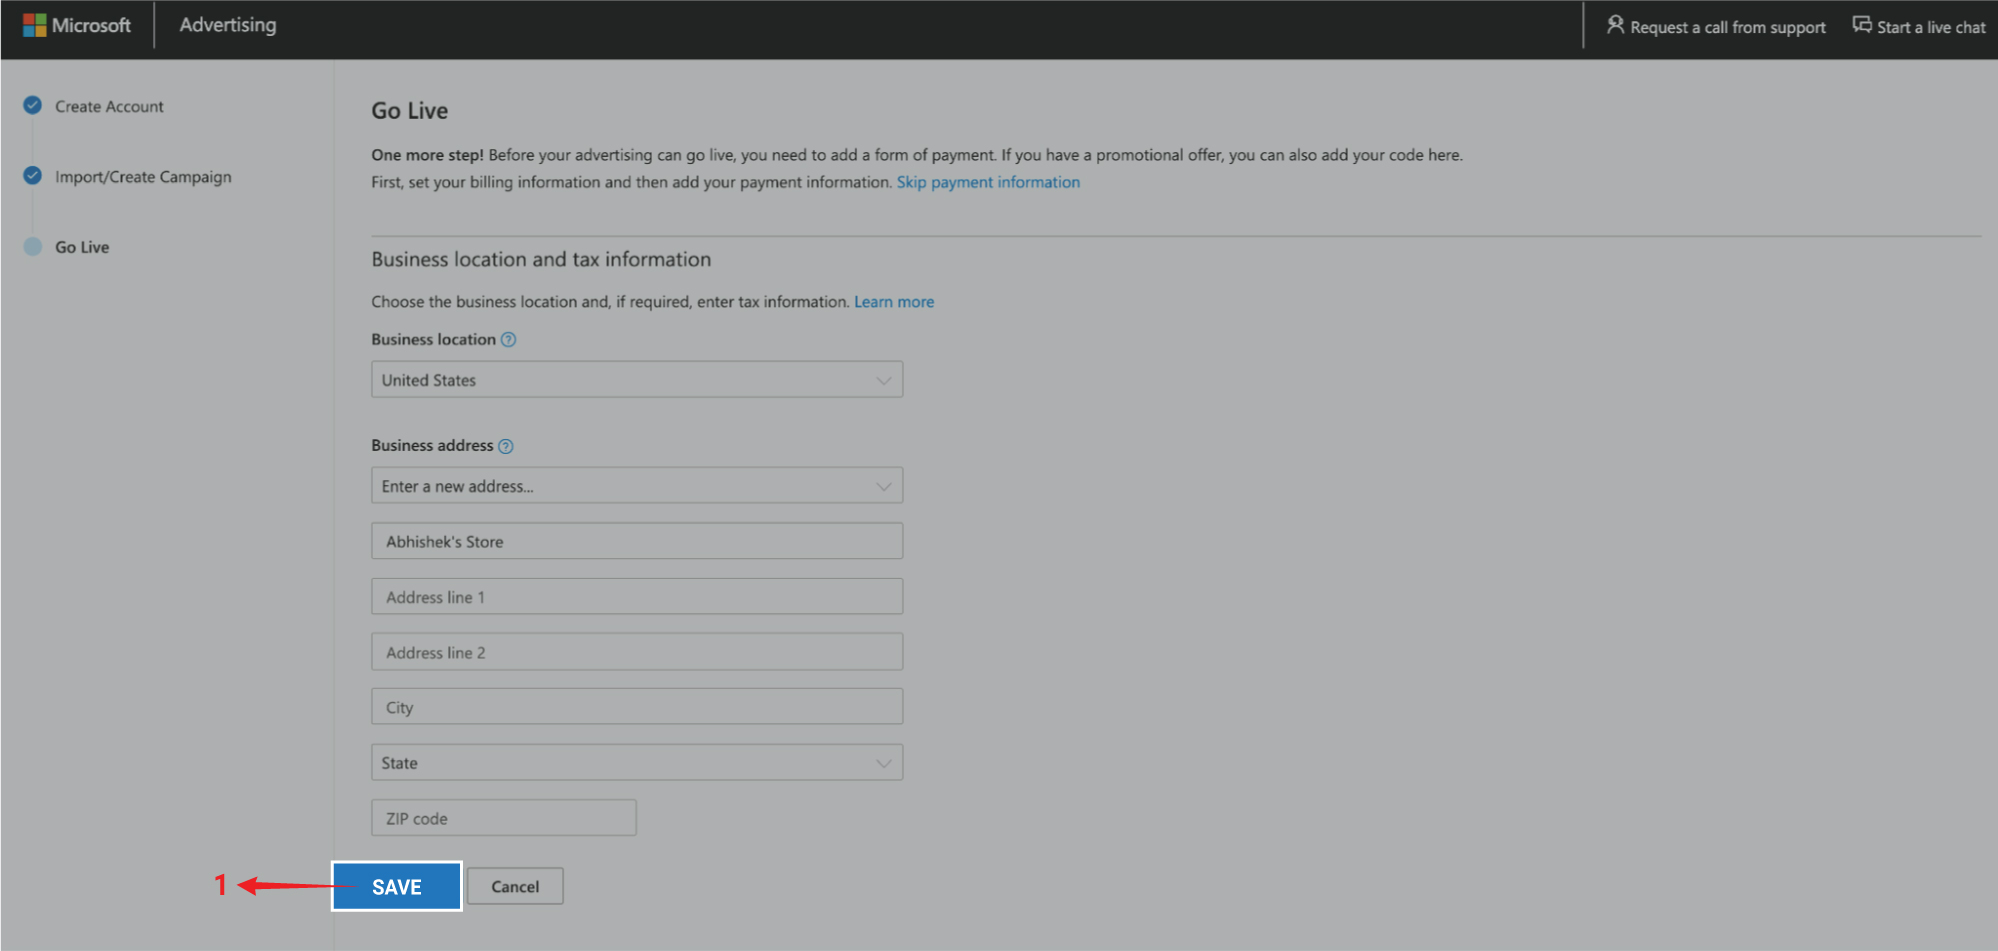 i. Once you add all the details, you will be also asked to verify your address, click on the verify button and now you will be redirected to the Billing information section.
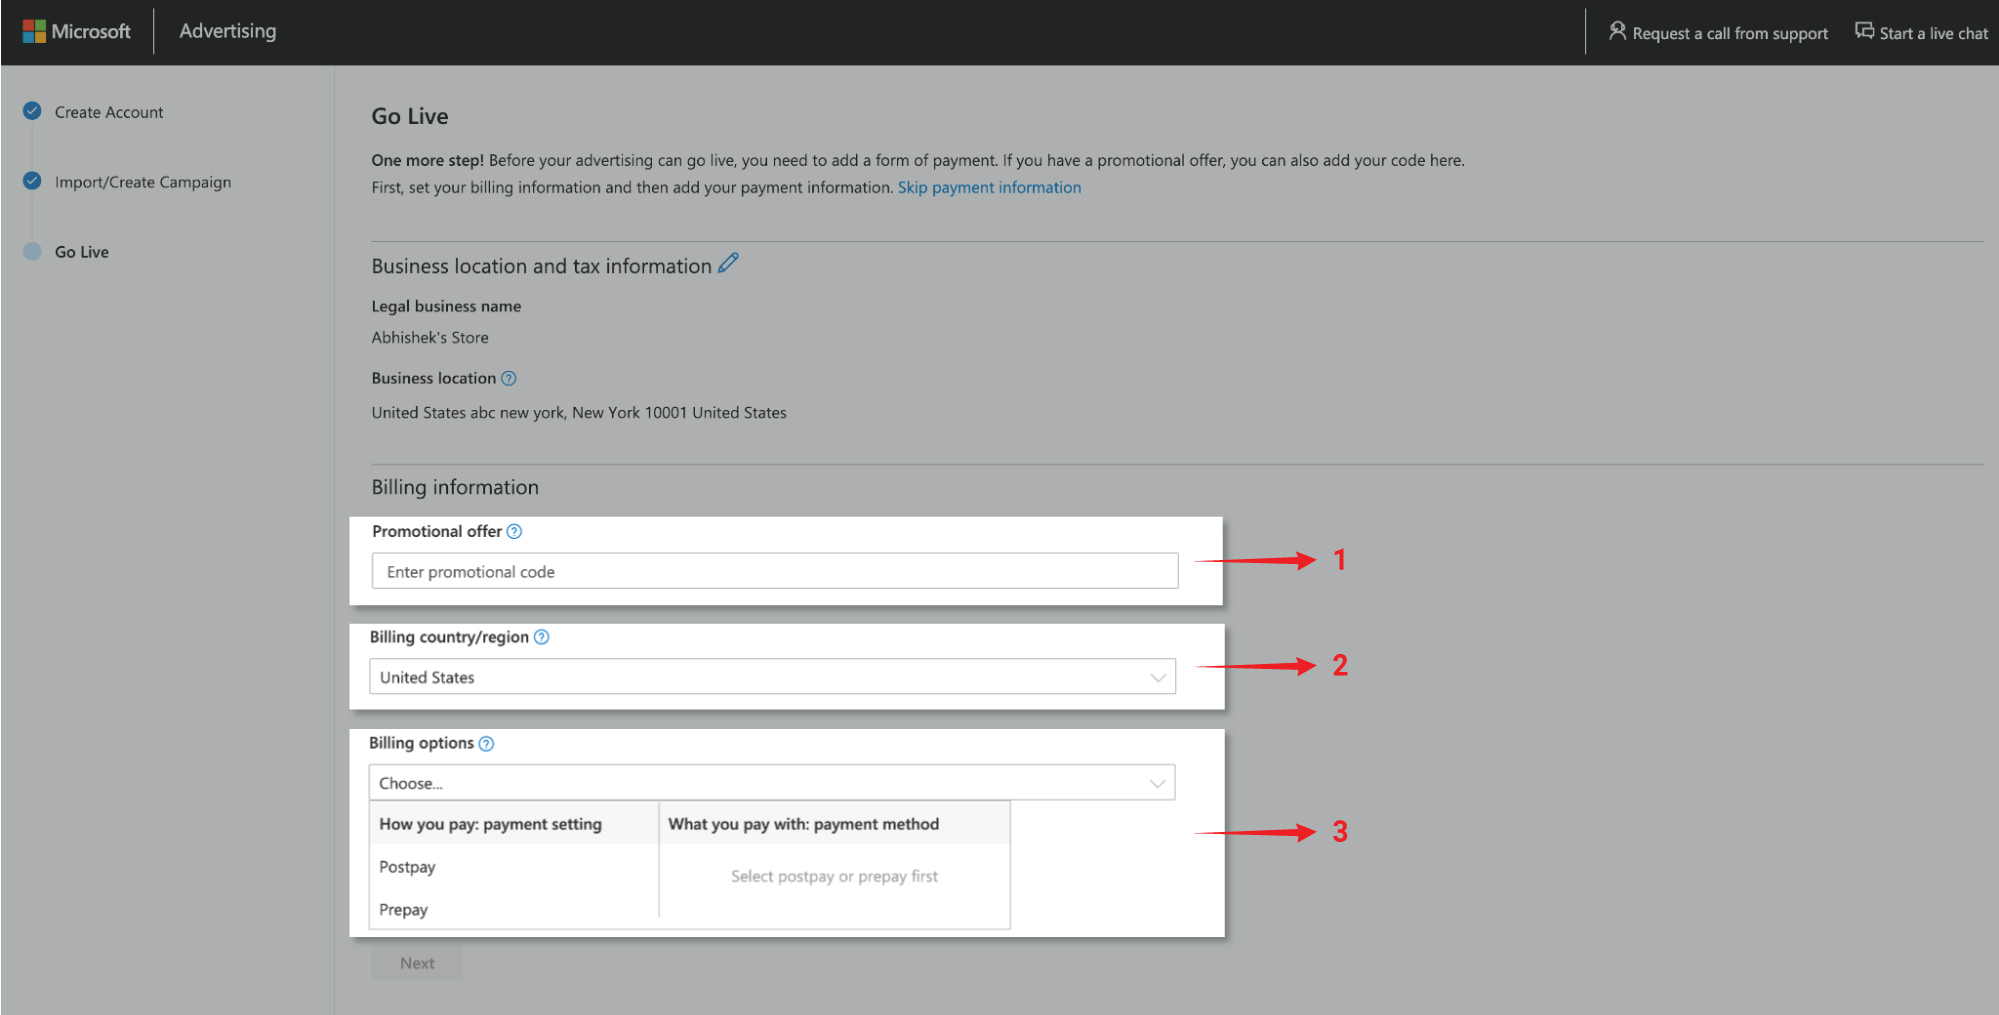
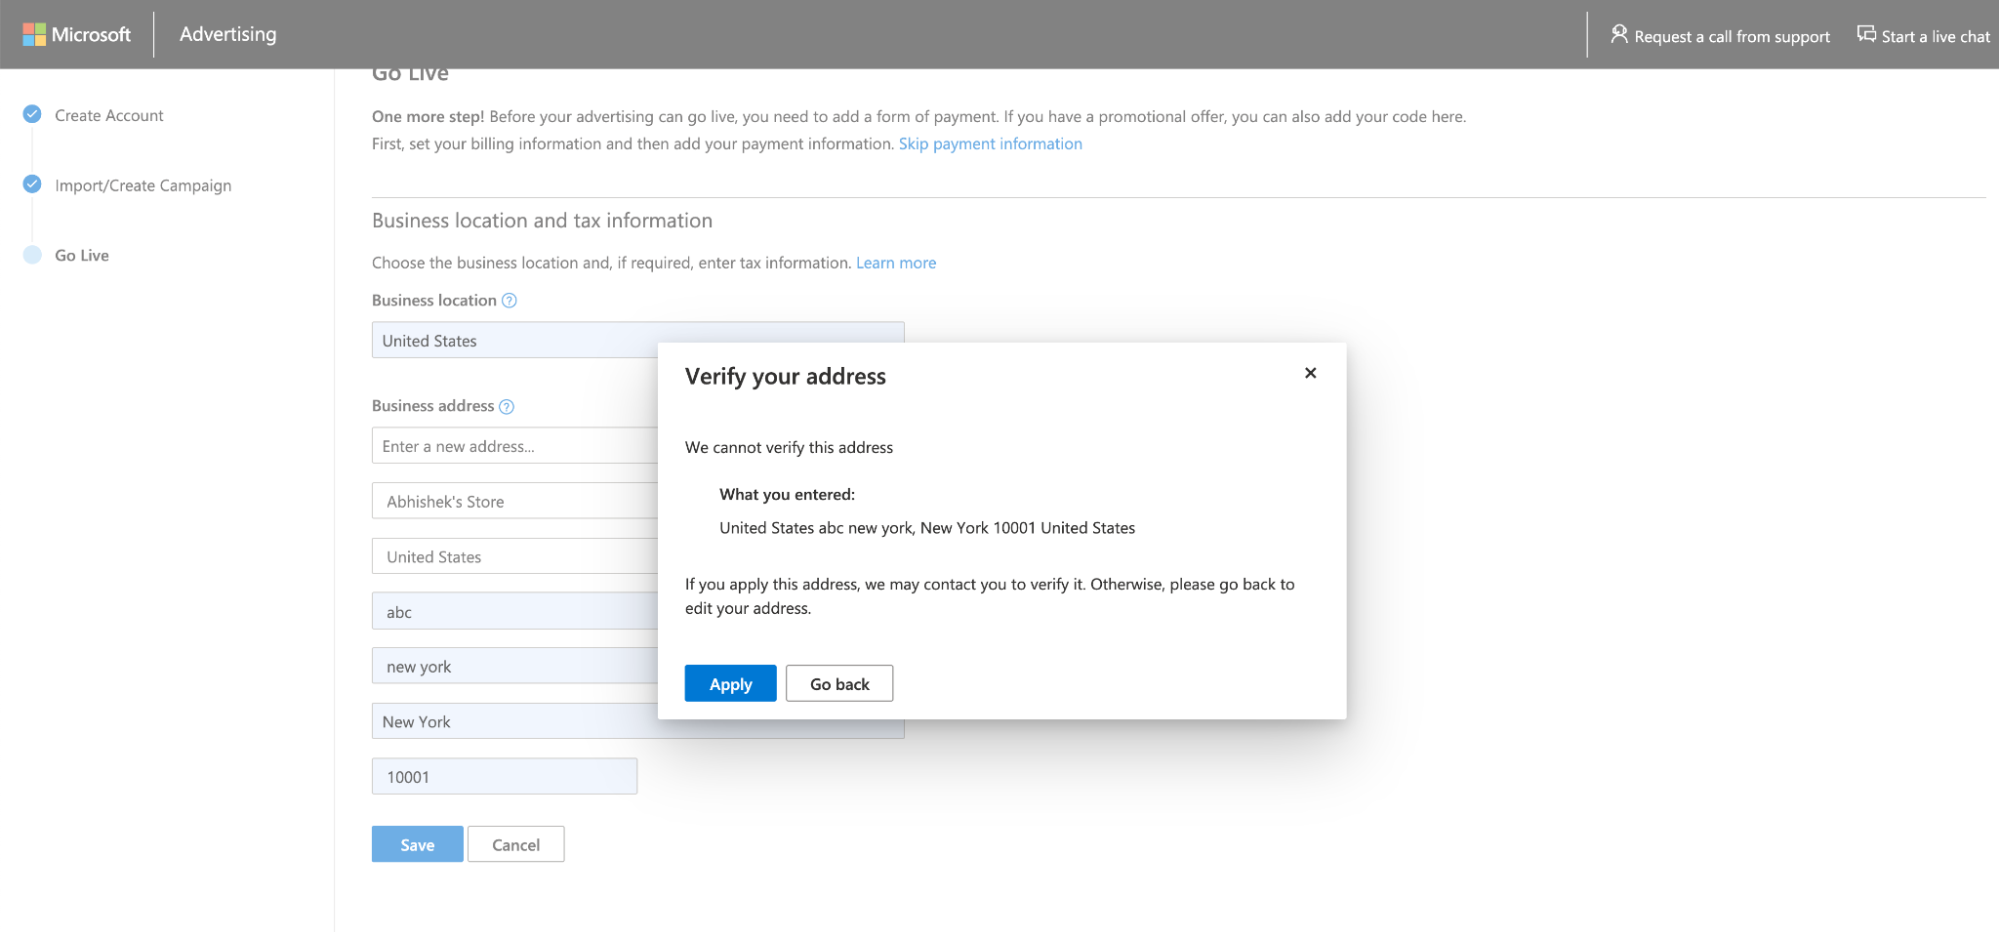
j. Add the following information
- Promotional offer (If you got any discount promo code)
- Billing country/region (While entering other details of a business account, make sure you are entering the details of the Business Location and not the details of the target country. For example, if you are an entity established in India, but planning to sell products in the United States, then enter the business details of India only.)
- Add the billing option as per your convenience (You have to add the payment information before starting the campaign. And you will be able to do that by clicking on this link given in the overview screen of the account.)
- Once you are done, you will be redirected to the Home page of the Microsoft merchant center.
 4. Setting up Store Merchant center and connecting Shopify store
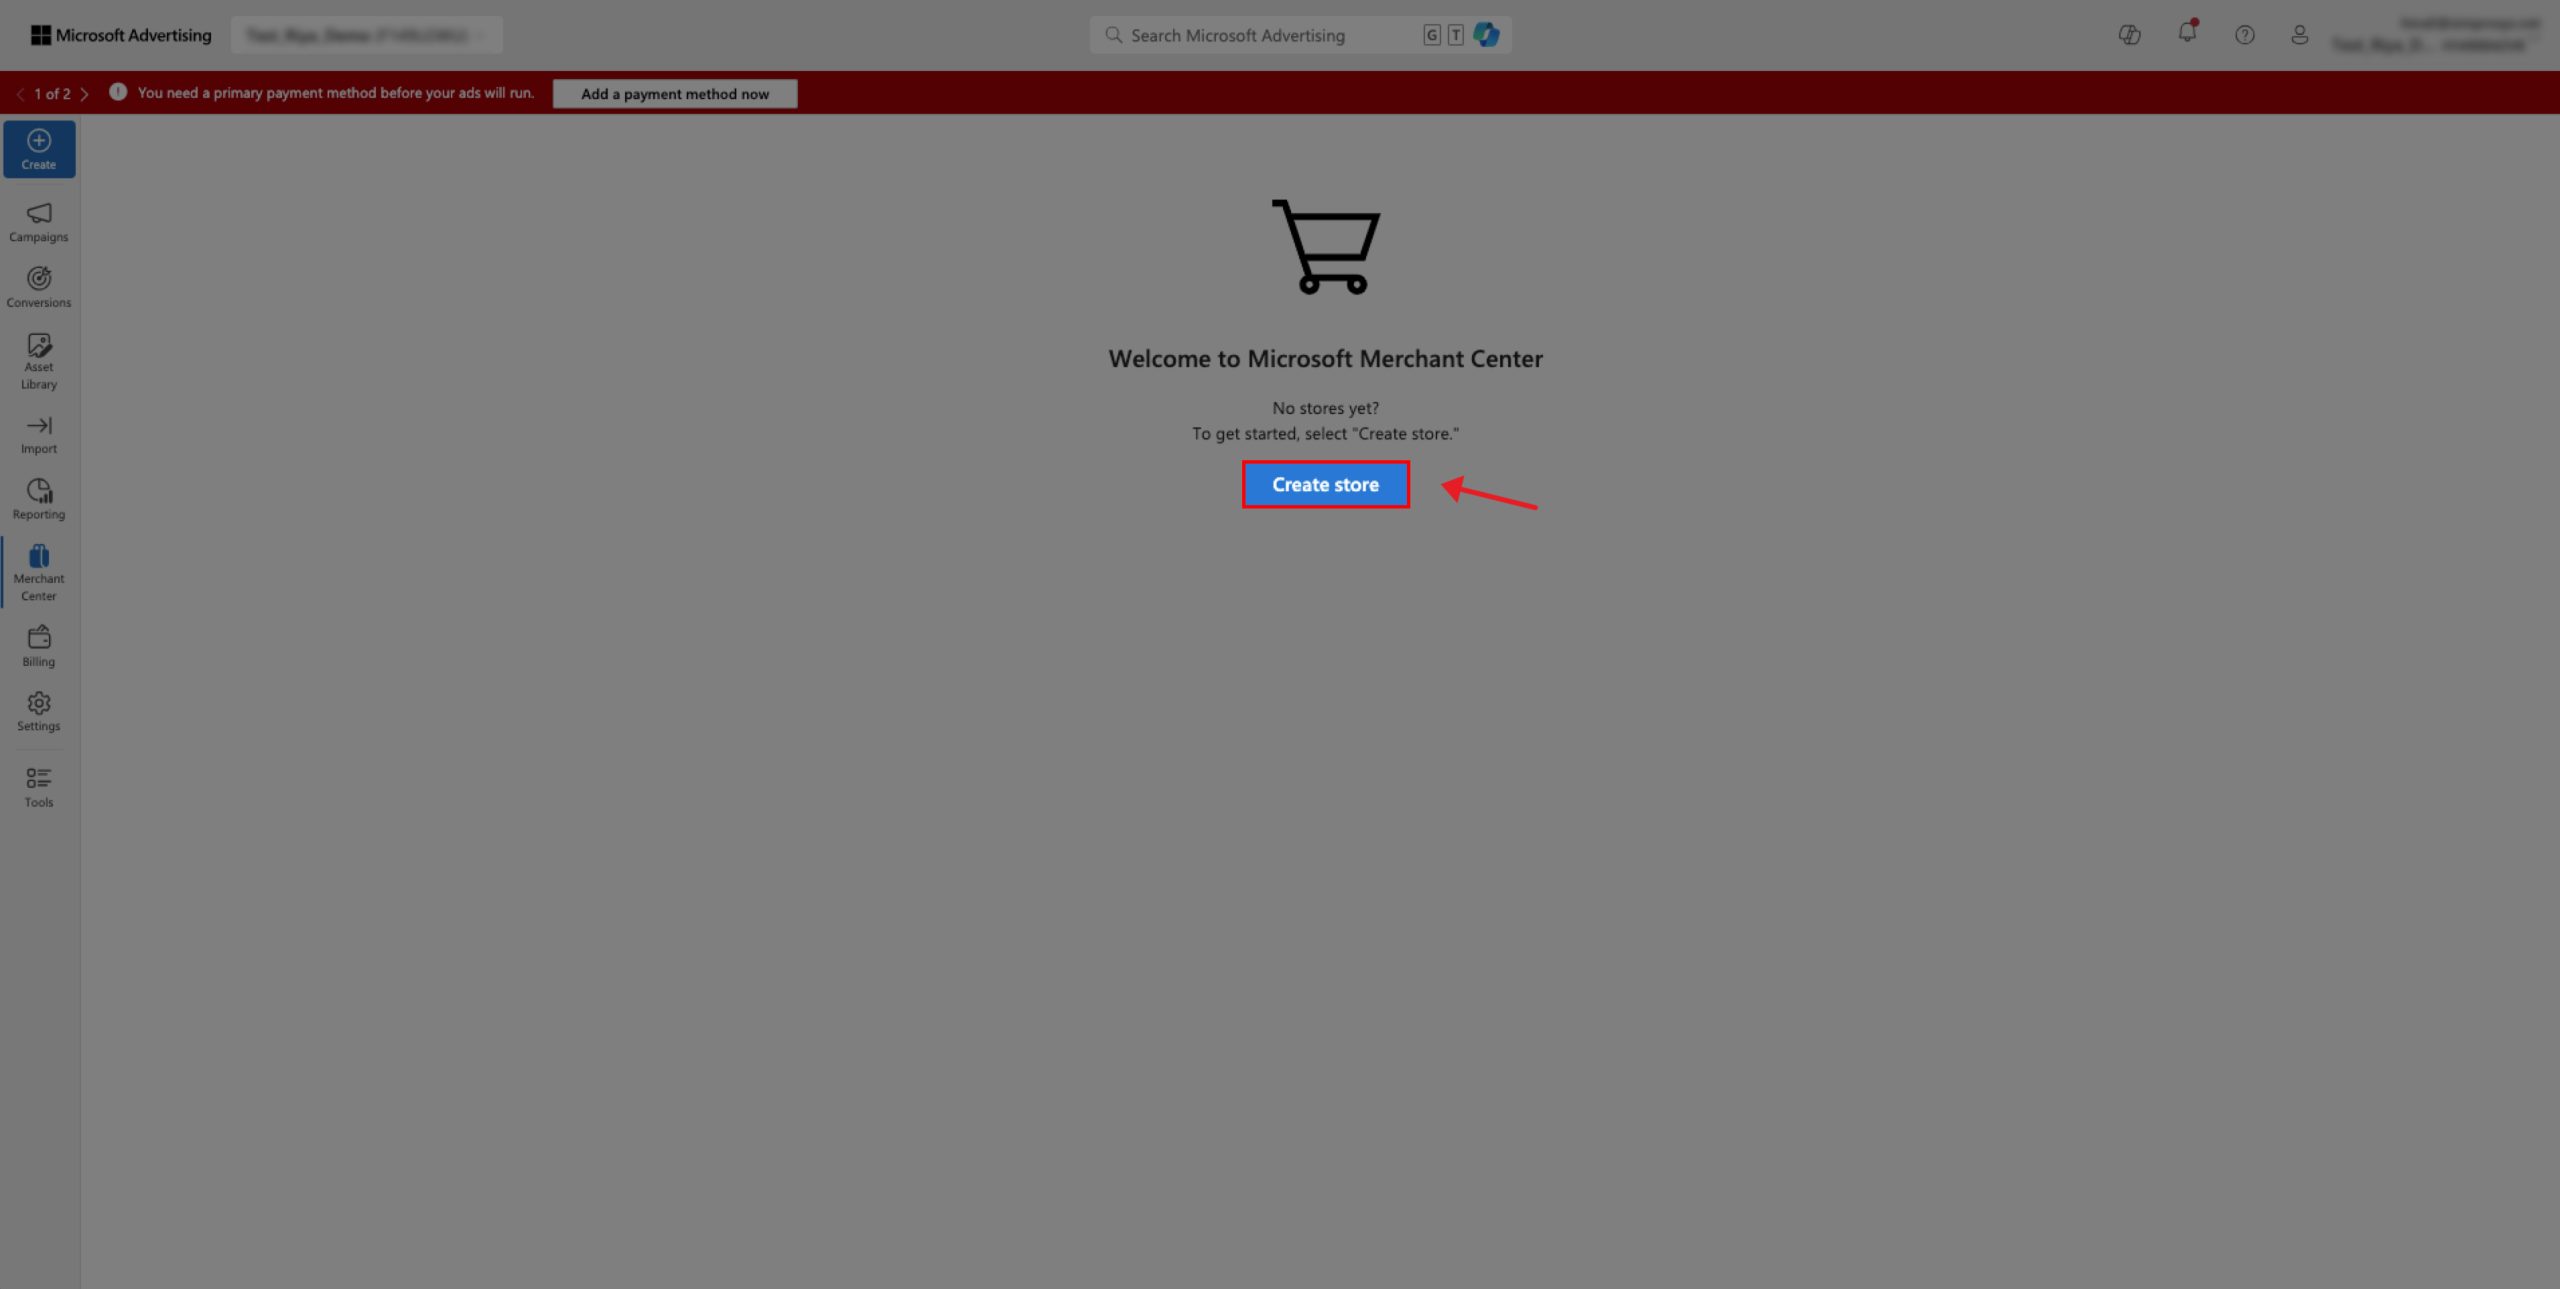
a. Here once you are on the dashboard click on create store you will see the following screen
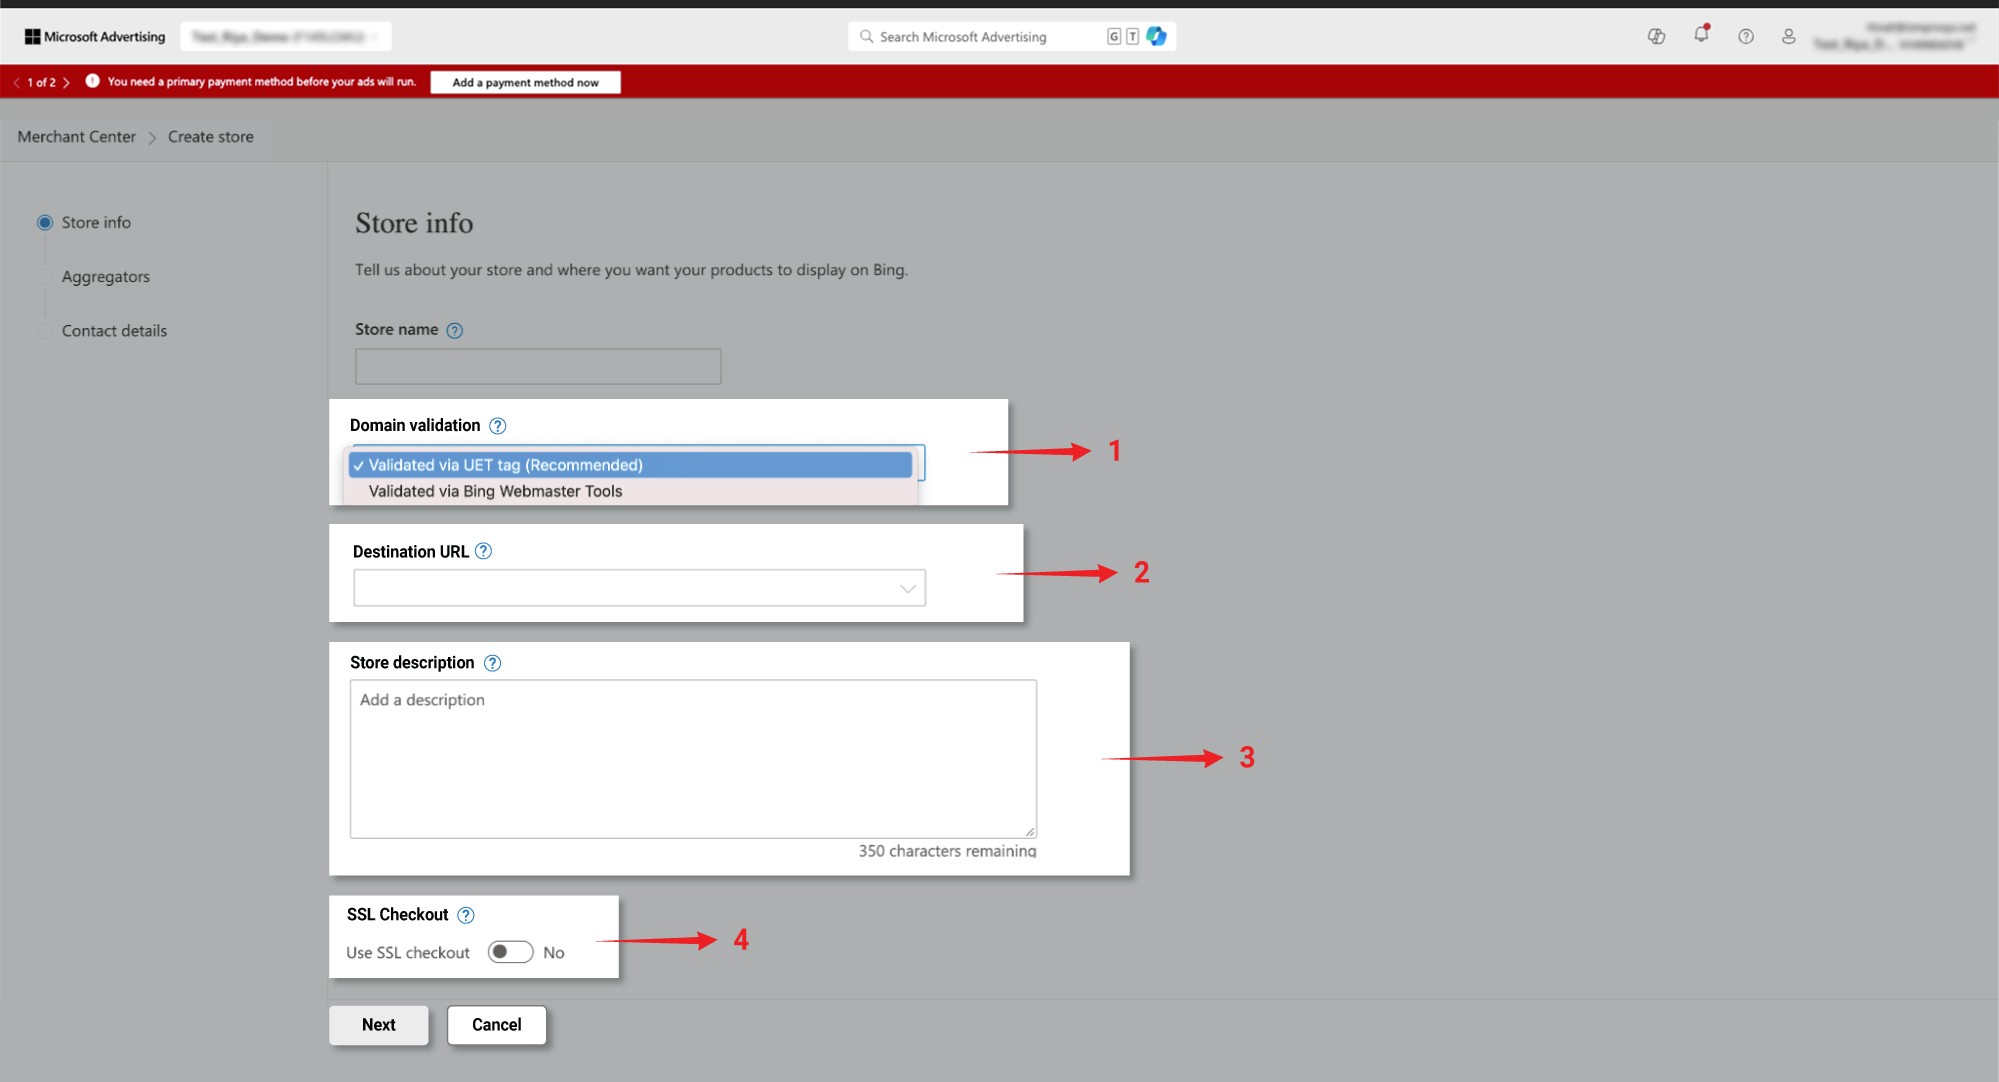 b. Enter the store name that you want to keep plus there are other 4 important details that you need to fill up carefully
- For domain verification, we need to select validated via Bing Webmaster Tools
- Add your store URL here
- Write in brief about what your store sells and does.
- Remember that you have kept your SSL checkout on otherwise Microsoft will straightaway reject your Microsoft Merchant Center store.
- Once you are done with this click on the next part you will be taken to the Aggregators page.

- In the Aggregators section make sure not to block the Aggregators. If you block the aggregators then you will not be able to show your products in Bing Ads.
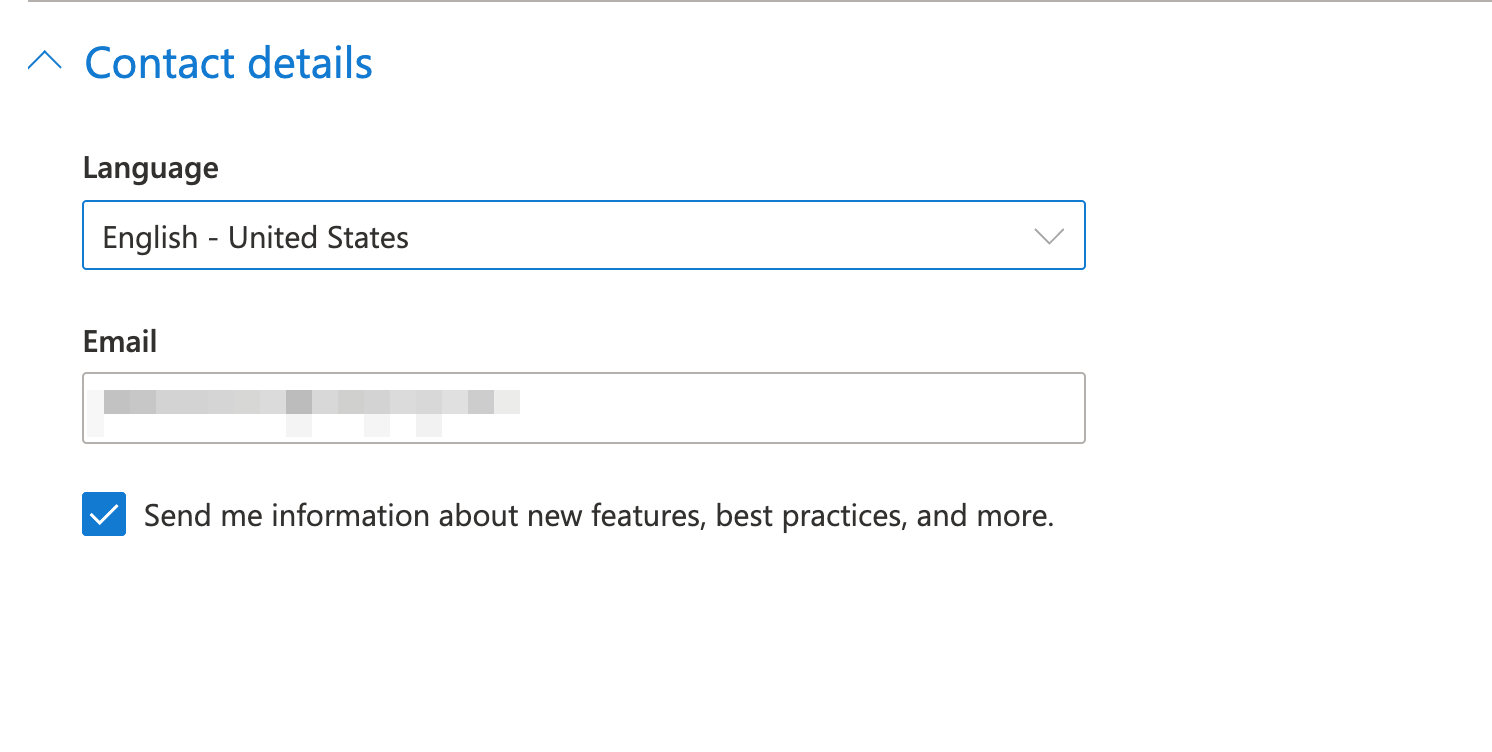
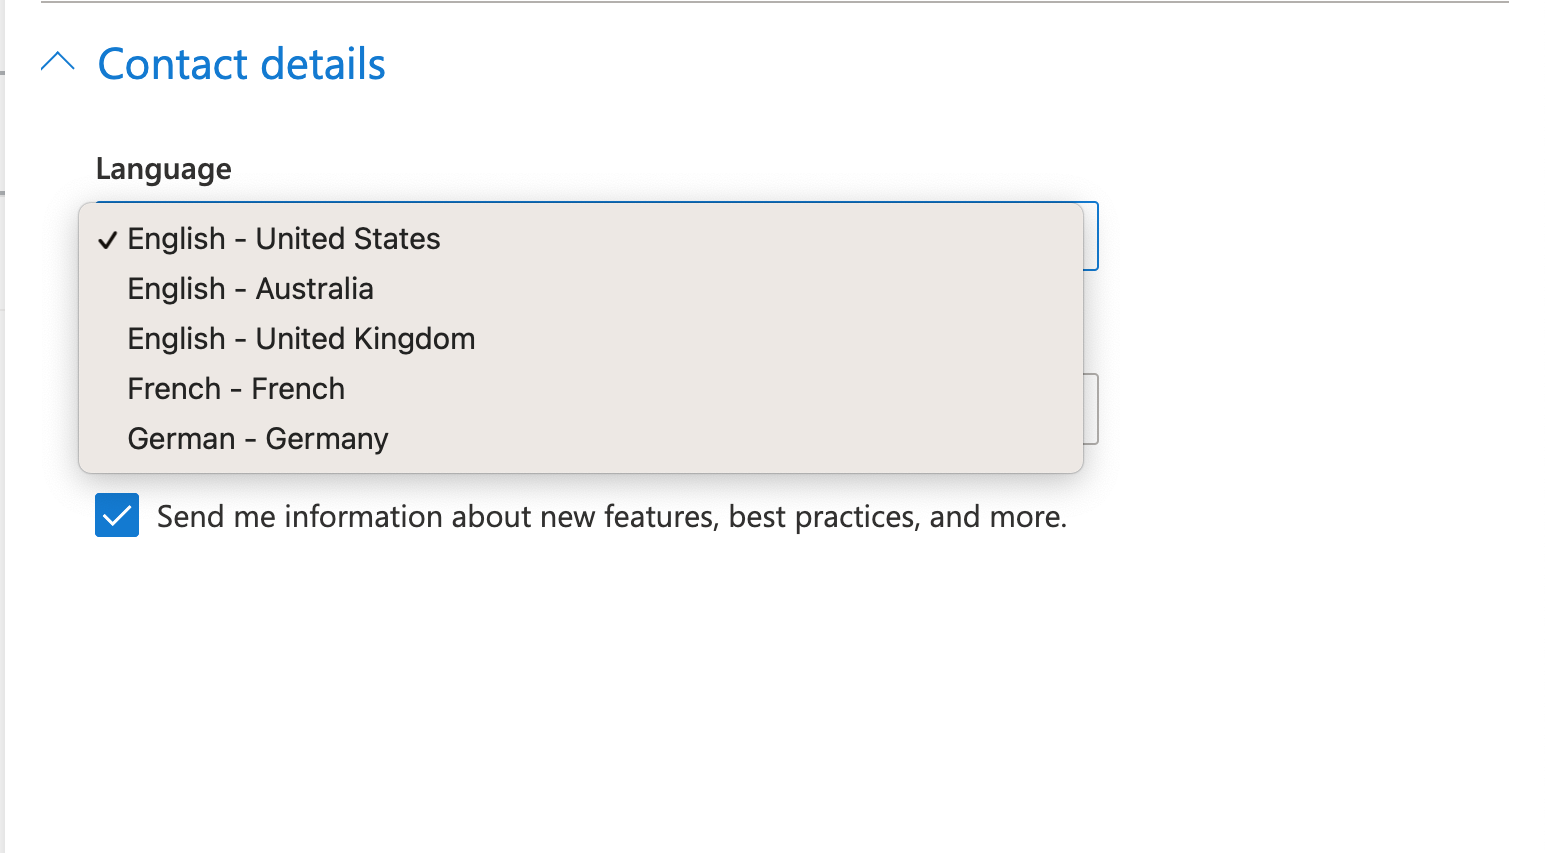
- After this, they will redirect you to the Contact details page where you need to add information such as your Email address where you want to be contacted and the preferred language for the communication. Select your preferred language to receive any notifications from Microsoft, from the Language drop-down menu available under the “Contact Details” section.
- Now you are ready with your store set up, once you are done with this you will be carried to the store page, where you will see a default catalog( point 4), apart from that you will also see options to create your own feed (point 1). You also have options for navigating through the multiples feeds.(This is when you have a large no. of feeds to go through)

- Once you are done with this part you can move to our app, which will help you to sync your catalog from Shopify effortlessly, apart from that it also helps you to optimize your feed strategically so that your catalogue gets submitted for Microsoft ads error free and up to the quality standards
- This is the link to our app > https://apps.shopify.com/google-shopping-feed
5. Syncing your catalogue effortlessly & error-free on BING / Microsoft
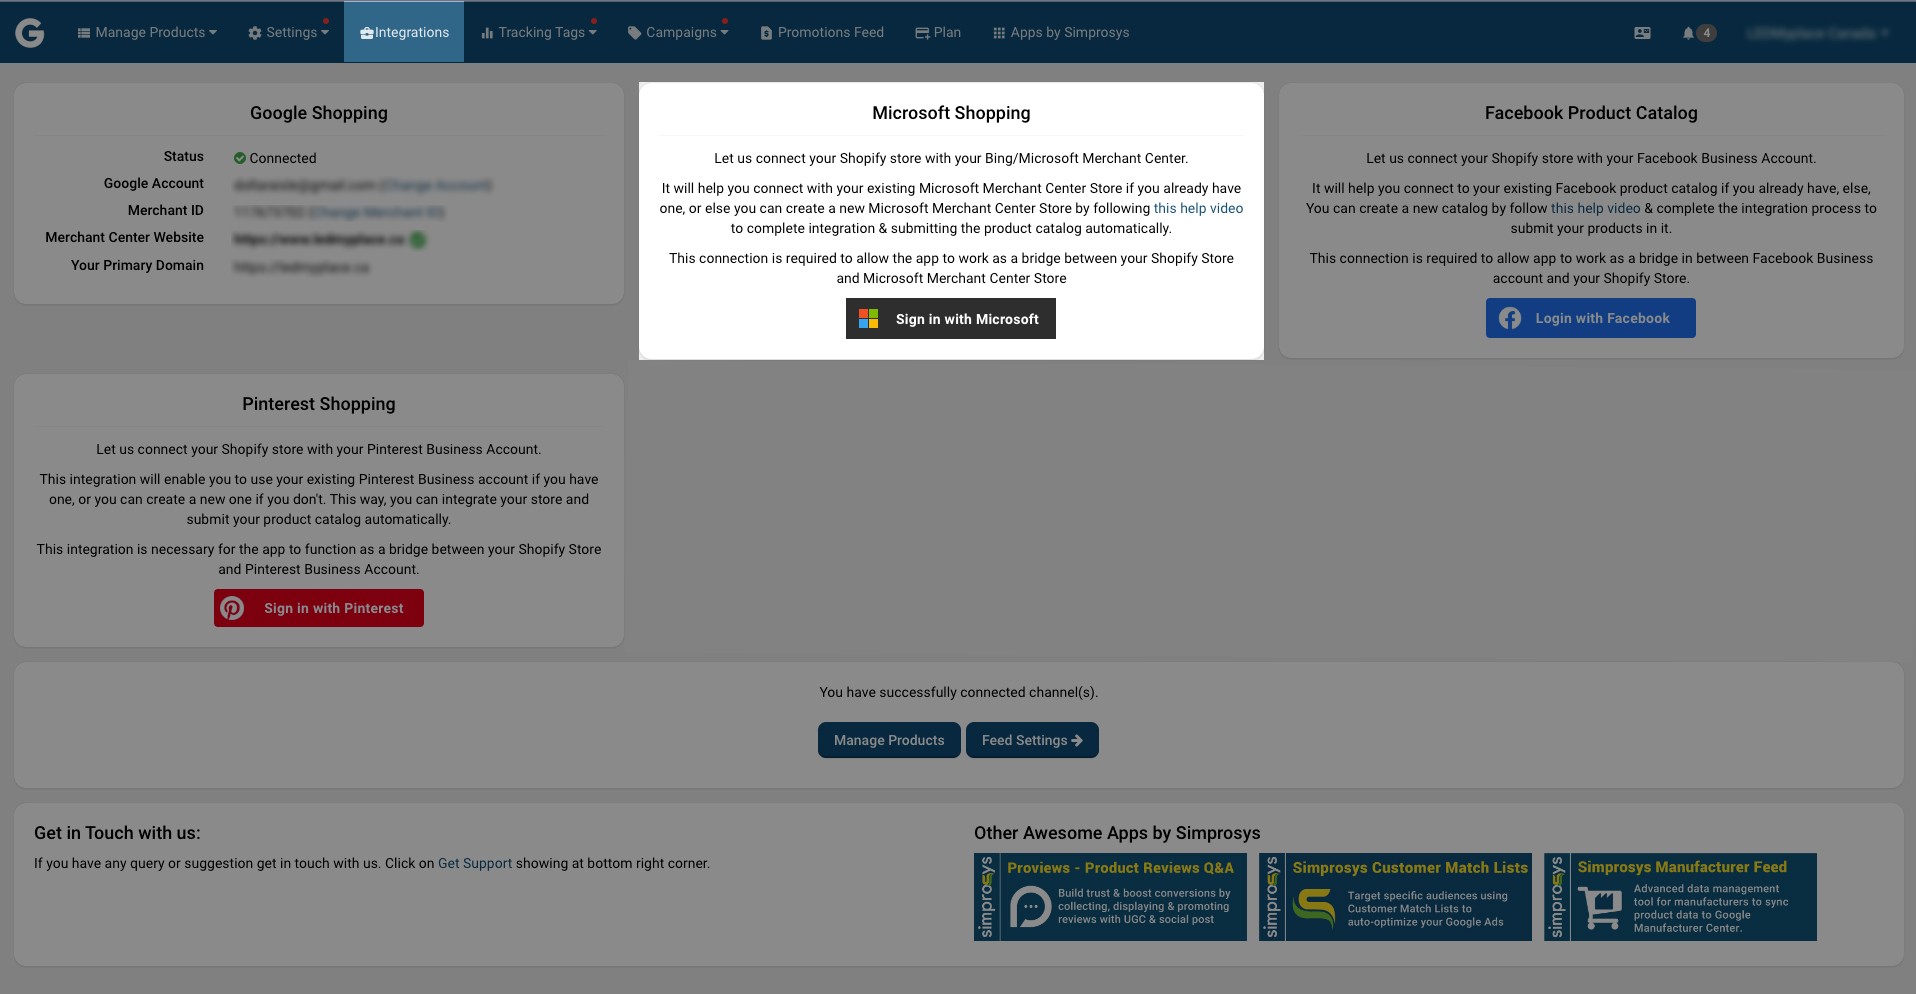
a. Once you are on our app, go to the Integrations sections(Point 1) as shown below in the image and then in the Microsoft Shopping section click on the option Log In with the Microsoft Ads.(Point 2)
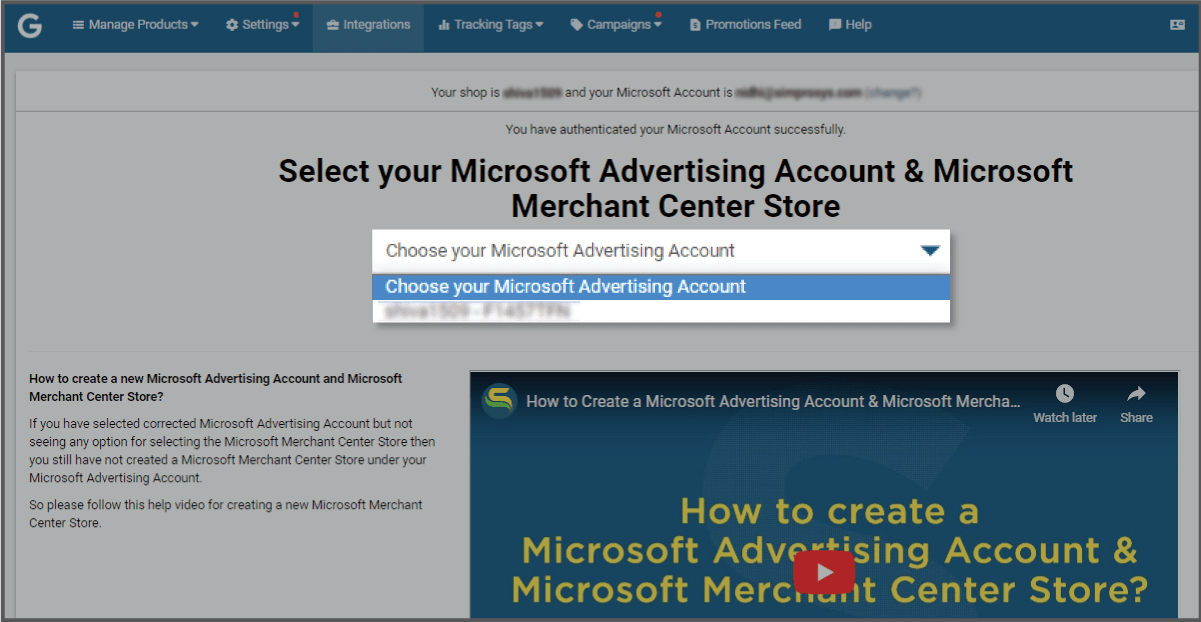
c. You will be redirected back to the app where you will have to choose your ad account and Microsoft Merchant Center Store, and then click on CONFIRM YOUR ACCOUNT. You will be redirected to the following window below.

d. As seen above you will have to choose the way you want to sync your store, for example
- Sale price with price: This helps you to submit both your actual price and selling price to the ad platform to know more about this please visit this Link
- Append UTM tracking parameters to URL: add additional tracking parameters provided by our app, to track your product's buyer journey.
- Then choose the product Id format that you want, our app provides three options as shown above
1. Global Format
2. SKU as product ID
3. Variant ID as product ID.
e. Once you are done syncing, you can see a new catalogue added in your Microsoft Advertising account below default catalogue.
Points to Remember:
- After the catalog is synced, the product count will be shown in the summary page of your Microsoft Merchant Center in around 24hrs.
- It is suggested that you don’t make any changes in the catalog settings till the products are shown.
- It might also display the error message that Catalog is empty. If the catalog details are okay, you can ignore it, because the app uses the Content API Method for feed submission and hence the products might not appear.
Previous article

Simprosys Google Shopping Feed
Pre-Installation & Setup
Initial App Configuration
Product Submission Controls
Product Attributes and Optimization
Automated Feed Rules
Troubleshooting & Issue Fixes
Advanced Setup Made Easy
Google Merchant Center Setup
Tracking Tags Setup (Google Ads & Google Analytics 4)
Google Ads & Campaign Setup
Multi-Country & Market Setup
Promotions and Discounts
Microsoft Advertising Integration
Meta (Facebook) Integration
Pinterest Integration


