

Proviews ‑ Product Reviews Q&A
Legal Policies
Setup & Configuration
Additional Information
Installation Processes
Feature Policies & Guidelines
How to Connect Mailchimp with Proviews: Setup Guide
Jun 12, 2026
Overview
Integrate your Mailchimp account with Proviews to automatically sync customer review and Q&A data, enabling you to build highly targeted email campaigns. Segment your audience based on review activity, reward loyal reviewers, or re-engage customers who have not left feedback, all without manual data exports.
What this integration enables:
Automatically push customer data (name, email, review status) to your Mailchimp audience lists. Use this data to create segments, trigger automations, and personalize campaigns based on real customer feedback behavior.
Before You Begin
Make sure you have the following ready:
- An active Mailchimp account with at least one audience list created.
- Access to the Proviews app from your Shopify admin panel.
- (Optional) Your Mailchimp API Key if you prefer manual authentication.
Tip: We recommend using OAuth authentication for a faster, more secure connection. API Key authentication is available for users who prefer manual control or have specific security requirements.
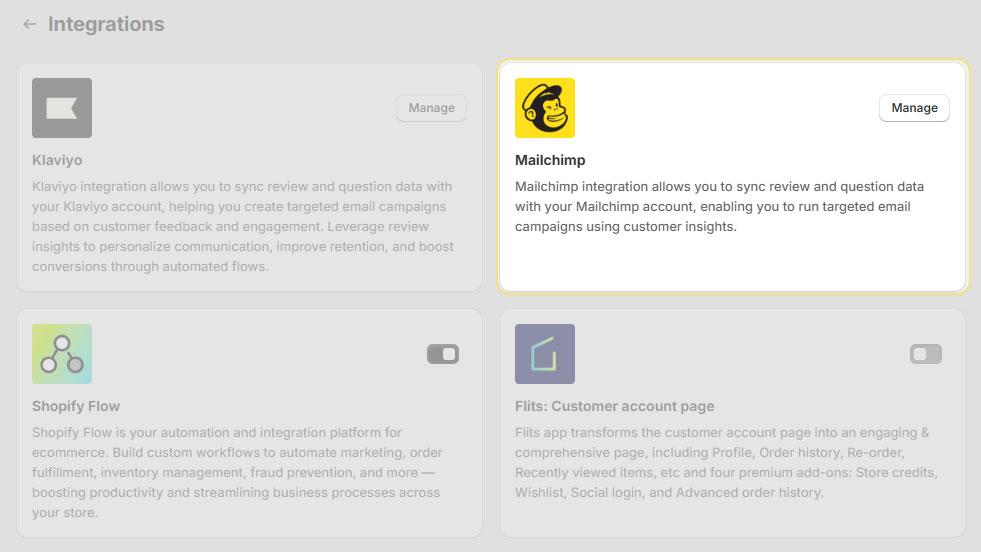
Step 1 — Navigate to the Mailchimp Integration
Follow these steps to locate the Mailchimp integration settings:
1. Log in to the Proviews app from your Shopify admin panel.
2. Click on Settings in the left sidebar navigation.
3. Select the Integrations tab and click the Manage button.
4. Locate the Mailchimp card in the integrations list and click Manage.
Step 2 — Choose Your Authentication Method
Proviews offers two ways to connect your Mailchimp account. Choose the method that works best for you:
Option A — OAuth Authentication (Recommended)
- Click Connect under "Authentication via OAuth".
- You will be redirected to Mailchimp's secure login page.
- Log in and authorize Proviews to access your account.
- You will be redirected back to Proviews automatically.
Option B — API Key Authentication
- Log in to your Mailchimp account and navigate to Account - Extras - API Keys.
- Generate a new API Key or copy an existing one.
- Paste the API Key into the input field in Proviews.
- Click Verify to establish the connection.
Success! Once connected, the status indicator will change to "Connected" with a green checkmark. You can now proceed to configure your sync settings.
Step 3 — Configure Sync Settings
| Setting | Description | Recommendation |
| Choose List | Select the Mailchimp audience list where customer data will be synced. All audiences from your Mailchimp account will appear in the dropdown. | Select your primary marketing list |
| Select Customer Type | Choose which customers to include: those who submitted Reviews only, Q&A only, or Both. | Select Both for maximum data |
| Include Old Customers? | When enabled, previously collected review and Q&A data will be synced to Mailchimp. When disabled, only new submissions will sync. | Turn On for initial setup |
| Include Customers With Unverified Reviews? | When enabled, customers with unverified (pending) reviews will also be synced to your list. | Turn On unless you only want verified reviewers |
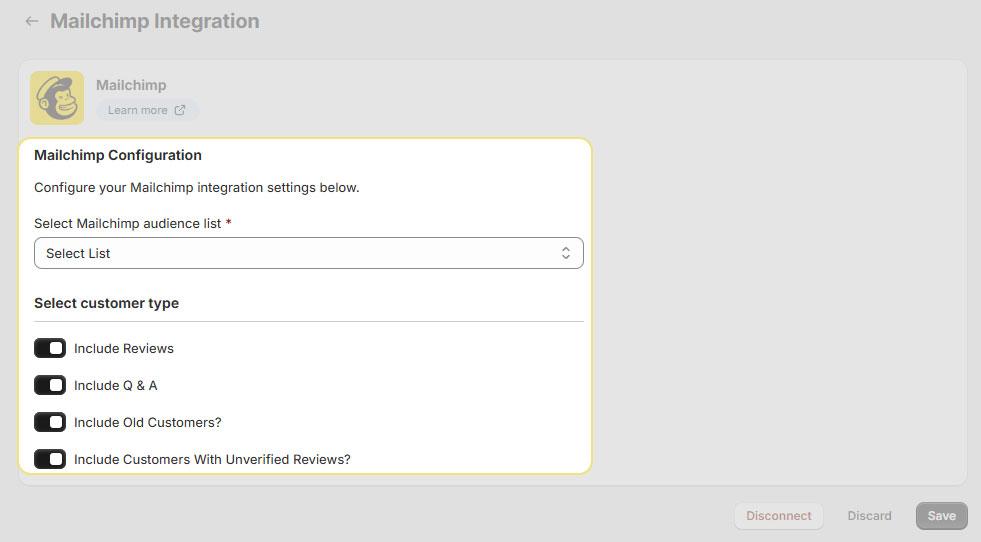
After configuring all settings, click the Save button to activate the sync.
Integration Flow Overview

Data Sync Behavior
Here is what to expect once the integration is active:
- Automatic syncing: Customer data syncs periodically based on your configuration.
- Real-time updates: New reviews and Q&A submissions are added to your Mailchimp list automatically.
- No duplicates: Proviews checks for existing contacts to prevent duplicate entries.
- Editable anytime: Return to this page to update your preferences or change the connected list.
Pro tip: Use Mailchimp's tagging and segmentation features to create targeted campaigns. For example, create a segment of customers who left 5-star reviews and send them exclusive offers or referral invitations.
Disconnecting the Integration
If you need to disconnect your Mailchimp account:
1. Navigate back to Settings - Integrations - Mailchimp.
2. Click the Disconnect button.
3. Confirm the disconnection when prompted.
Note: Disconnecting the integration will stop future syncs but will not remove data already synced to Mailchimp. To remove synced contacts, you will need to delete them directly in your Mailchimp account.
Benefits of This Integration
Targeted Campaigns
- Send personalized emails based on review ratings, Q&A participation, or feedback sentiment.
Automated Workflows
- Trigger Mailchimp automations when customers submit reviews or ask questions.
Customer Insights
- Combine review data with Mailchimp analytics to understand customer behavior better.
Loyalty Programs
- Identify and reward your most engaged reviewers with exclusive offers and early access.
Troubleshooting
| Issue | Solution |
| OAuth connection fails | Clear your browser cache and try again. Ensure pop-ups are not blocked. |
| API Key not verifying | Double-check that you copied the full API Key. Ensure it has not been revoked in Mailchimp. |
| No audience lists appearing | Verify that you have at least one audience created in your Mailchimp account. |
| Data not syncing | Check that you clicked Save after configuring settings. Allow up to 15 minutes for the initial sync. |
Need Help?
Click Help Me on the dashboard to open the support chatbot for real-time assistance.
For email support, contact us at support@simprosys.com
Next article

Proviews ‑ Product Reviews Q&A
Legal Policies
Setup & Configuration
Additional Information
Installation Processes
Feature Policies & Guidelines


