

Simprosys Product Feed for WooCommerce
Pre-Installation
Plugin Setup
Product Submission Controls
Product Attributes & Optimization
Automated Feed Rule
Troubleshooting & Issue Fixes
Advanced Setup Made Easy
Google Merchant Center Setup & Integration
Tracking Tag Setup (Google Ads & Google Analytics 4)
Google Ads & Campaign Setup
Multi-Country
Promotions Feed
Microsoft Advertising Integration & Campaign Setup
META (Facebook) Integration
WooCommerce Store Access & Setup
Billing & Payments
How to Choose Different Options in Sync Settings from WooCommerce?
Dec 31, 2025
We have prepared this help doc to help you better understand the options available under the Sync Settings page of our plugin, so you can choose the options wisely. Let’s understand each option:
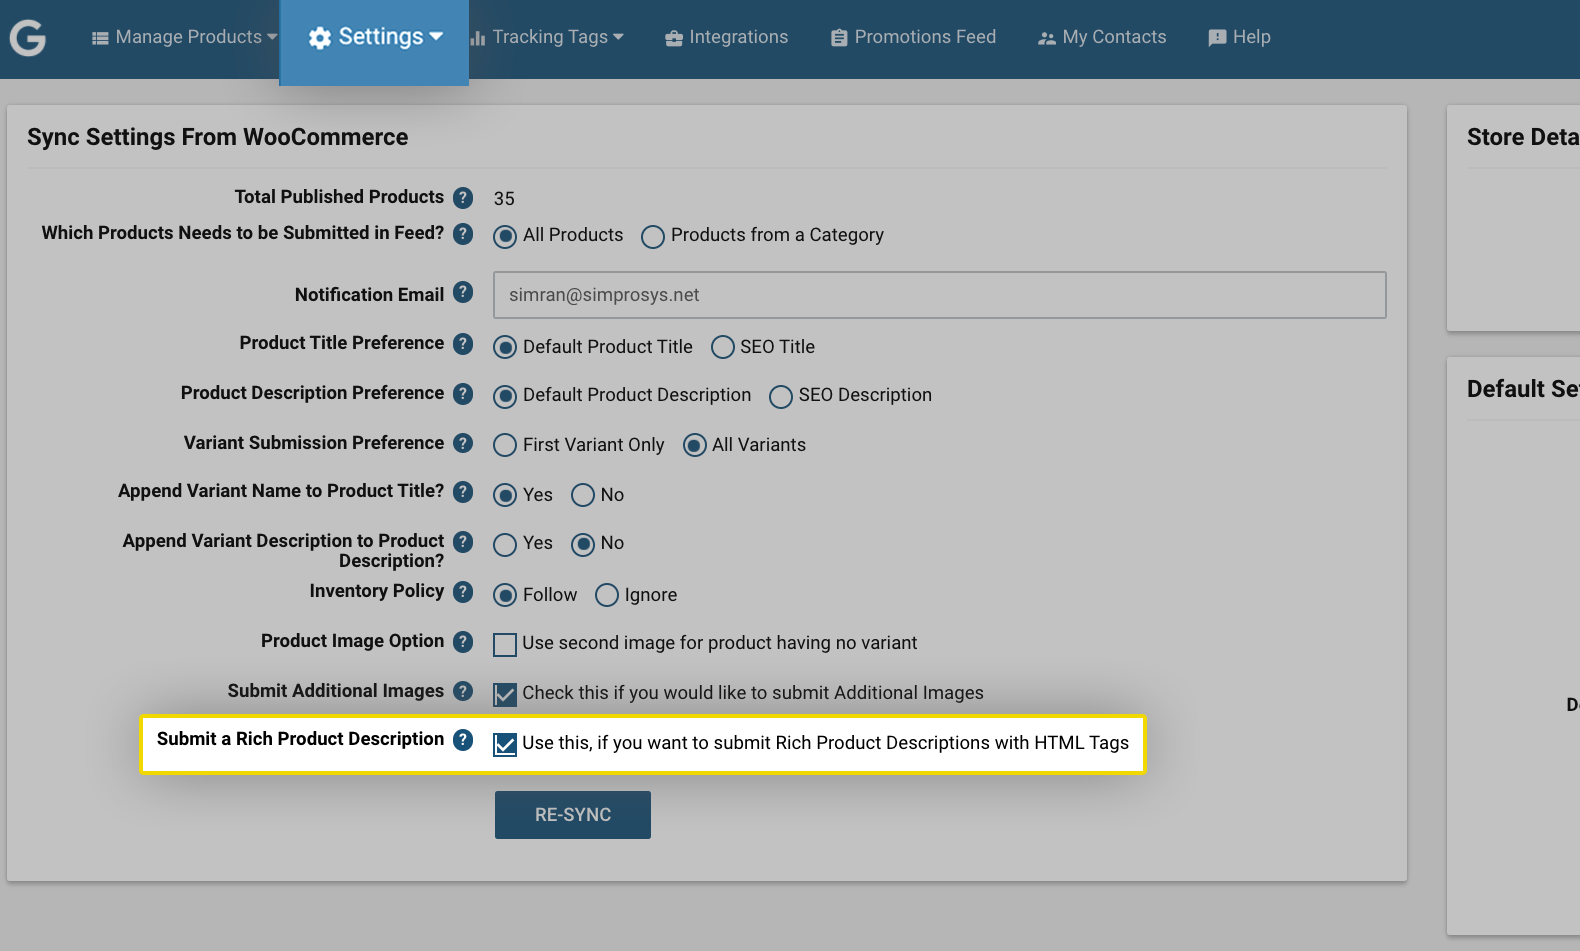
1. Total Published Products: The number of products published on your online store is displayed here excluding the variants count. Based on the number of Total Published Products on your WooCommerce store, the charge for your subscription is calculated
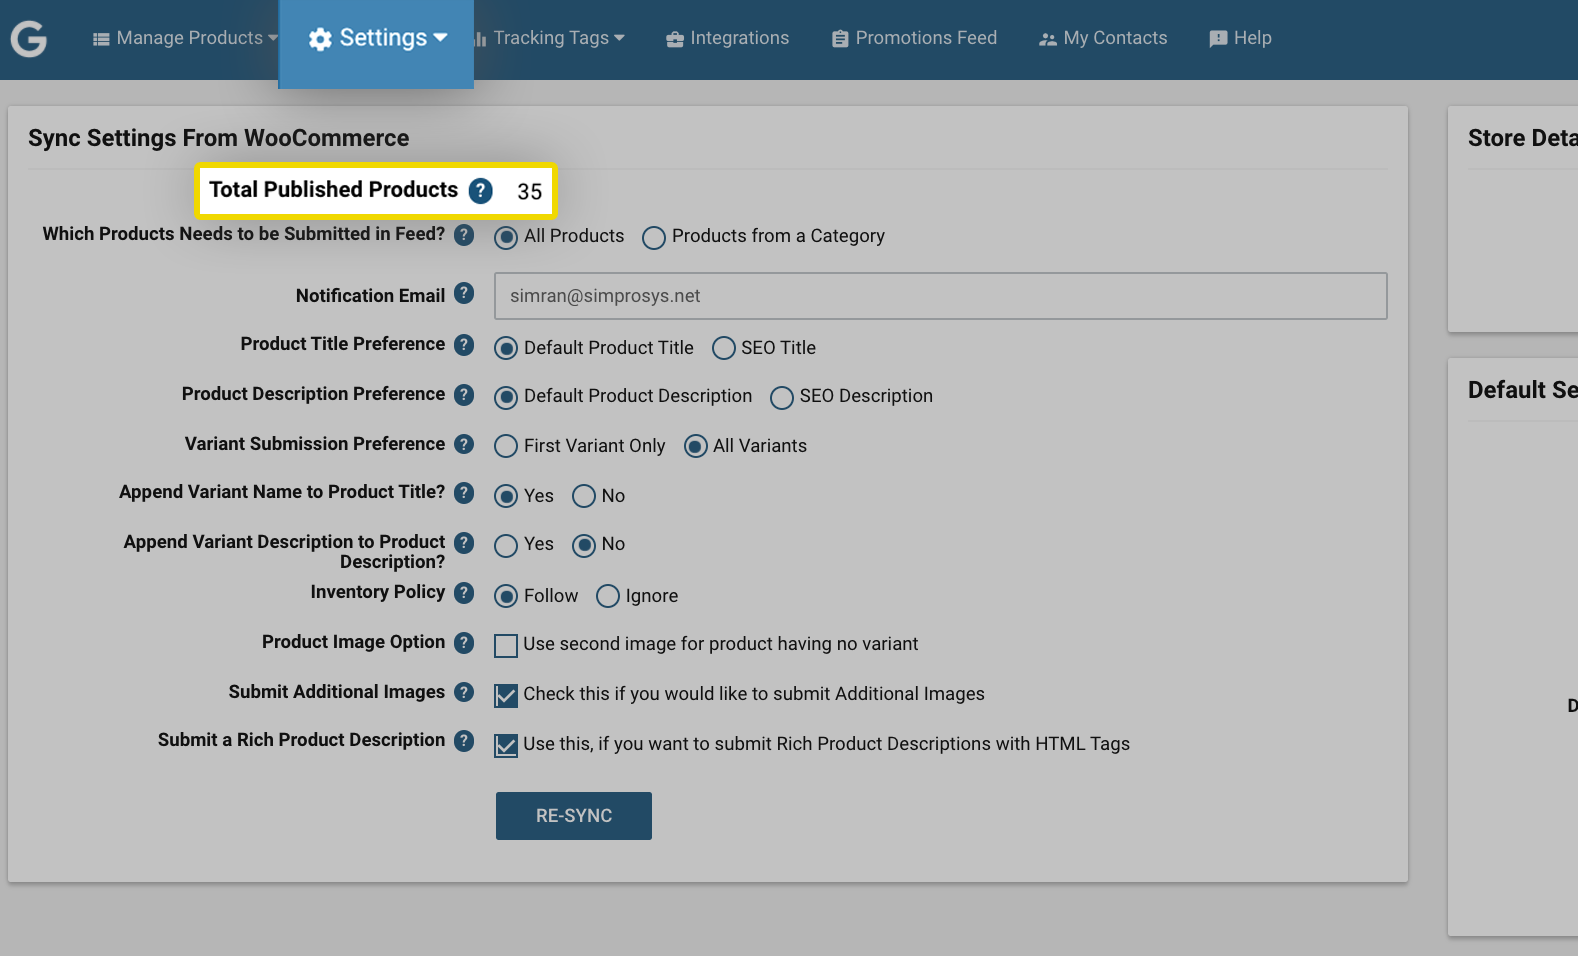
For example; Here you can see, the total number of published products is 35. For pricing structure and plans please check the link: https://support.simprosys.com/faq/pricing-for-the-shopping-feed-for-google-woocommerce
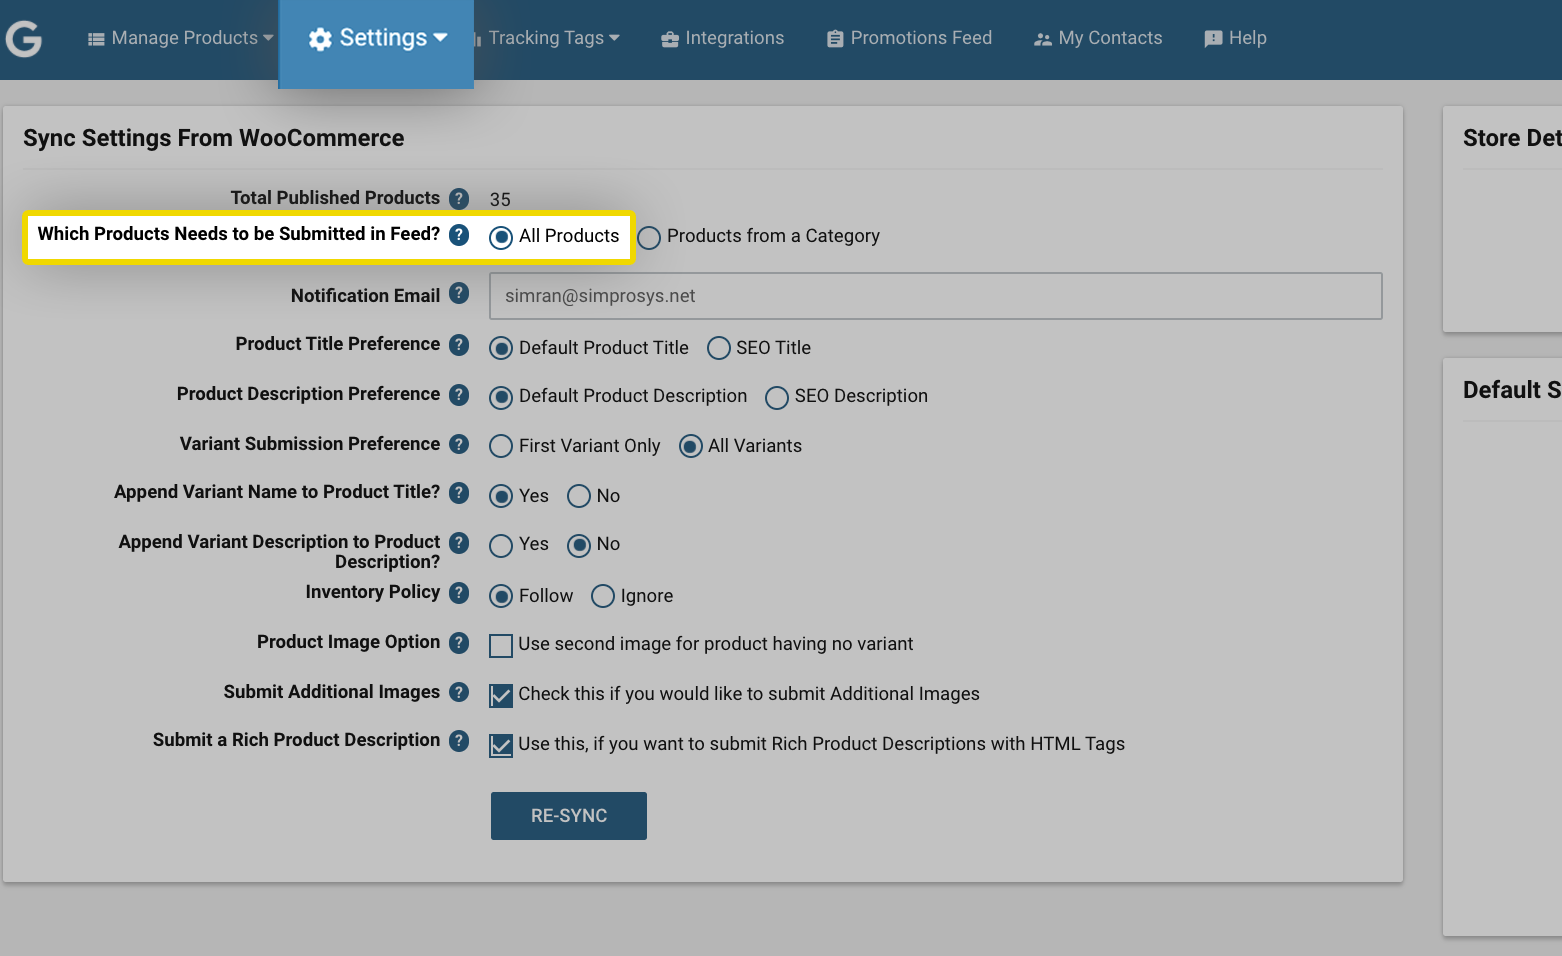
2. Which Products Need to be Submitted in Feed?: Here you’ll get two options to select from “All products” or “Products from a Category”. If you select the “All Products” option, then our plugin will fetch all the products from your WooCommerce store and submit them to Google Merchant Center
The other option is “Products from a Category”, this will help you submit a particular category or multiple categories from your WooCommerce store to Google Merchant Center. You just have to select the desired categories from the dropdown.
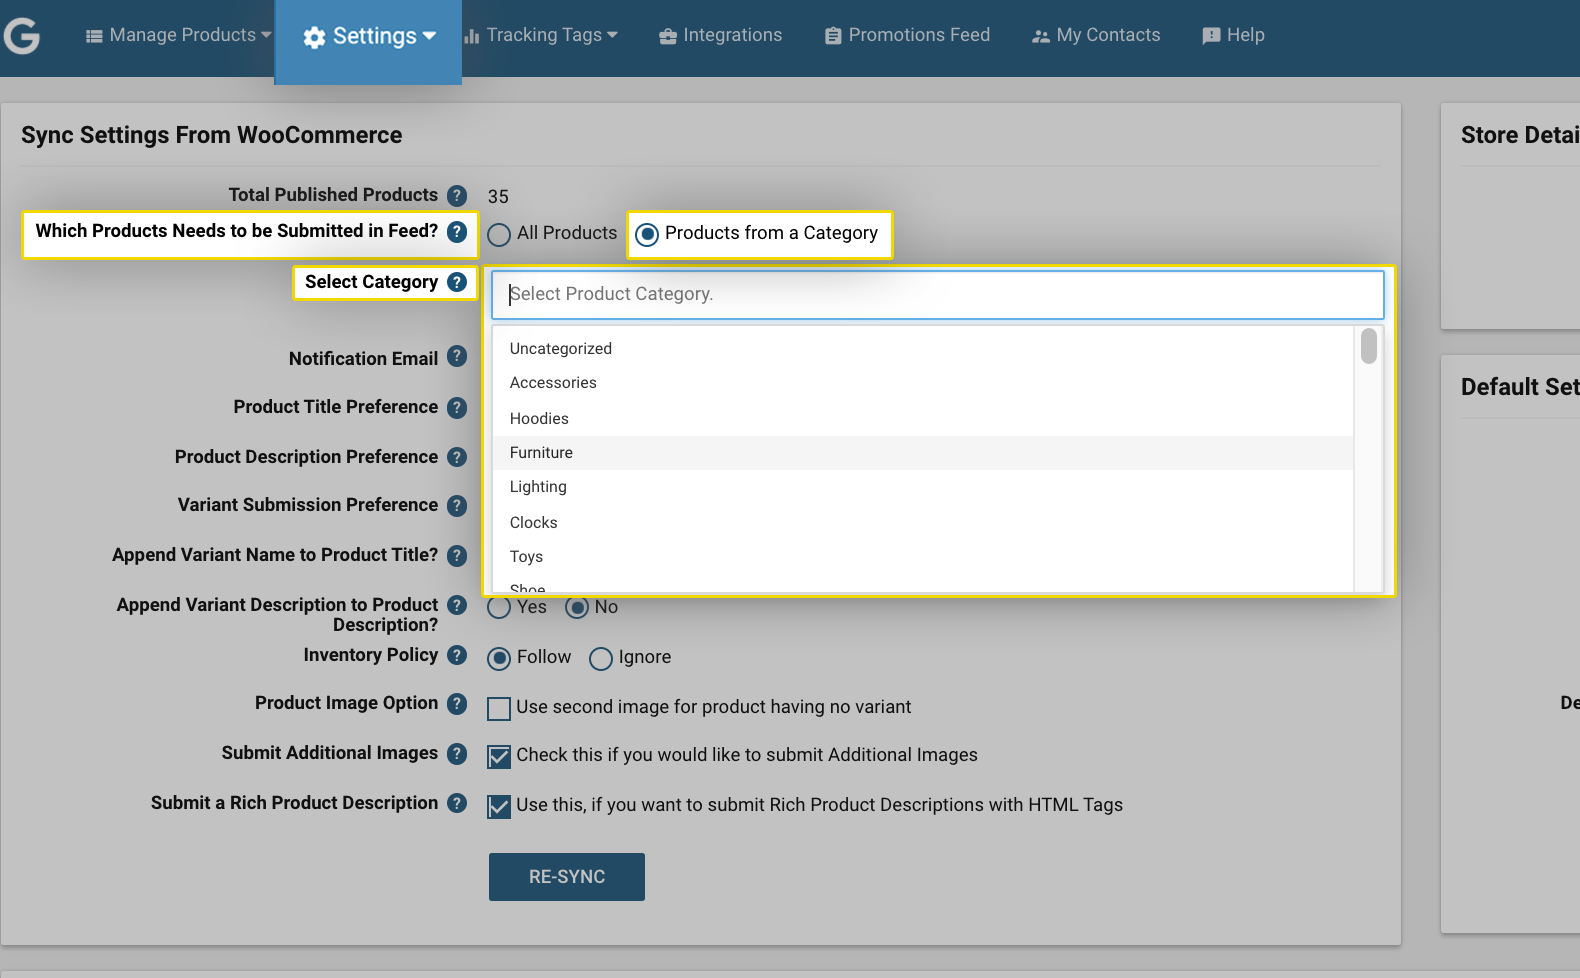
This helps the merchants who are for example interested in marketing only a particular category rather than submitting all the products.
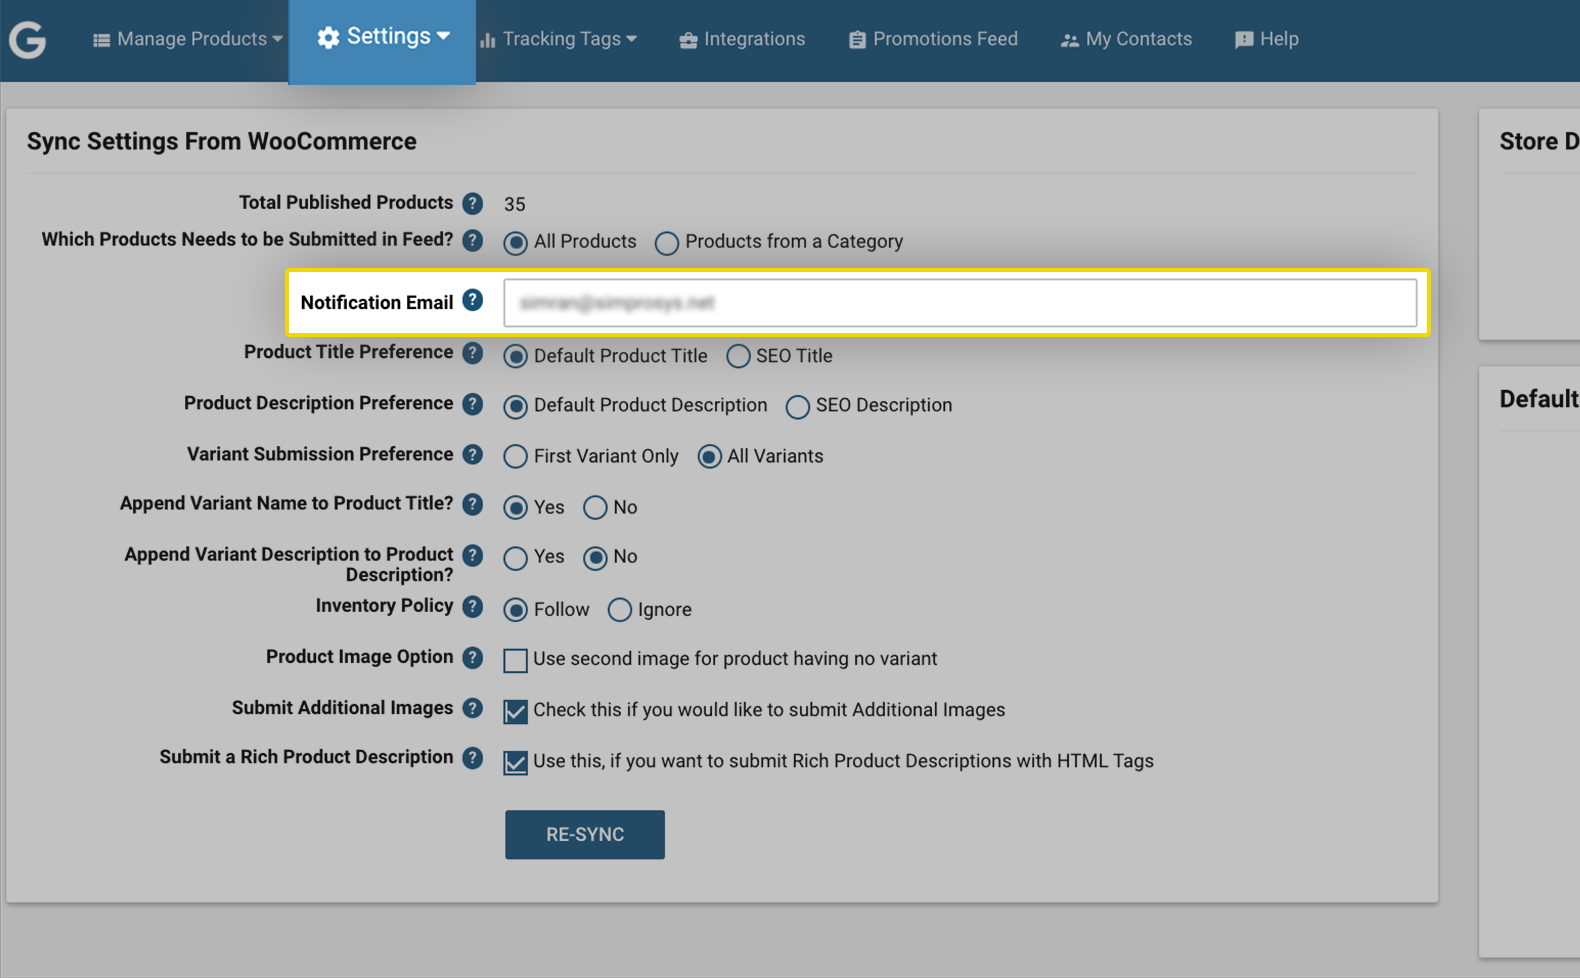
3. Notification Email: This email should be the email of the store owner. The notification email is used to share updates such as product submission, trial period notification, to notify if any new feature is added in our plugin, error refresh status. However, if you are not the owner of the store and some other person like the PPC agency or PPC manager and you are managing the store on behalf of the store owner then you can change this email to your email address. So that whenever there is any update you will be notified on that particular email.
4. Product Title Preference: There are two options for title preference. One option of these two should be selected for the product title. If you select the option “Default Product Title” then the Title will be fetched from the native field provided by WooCommerce.
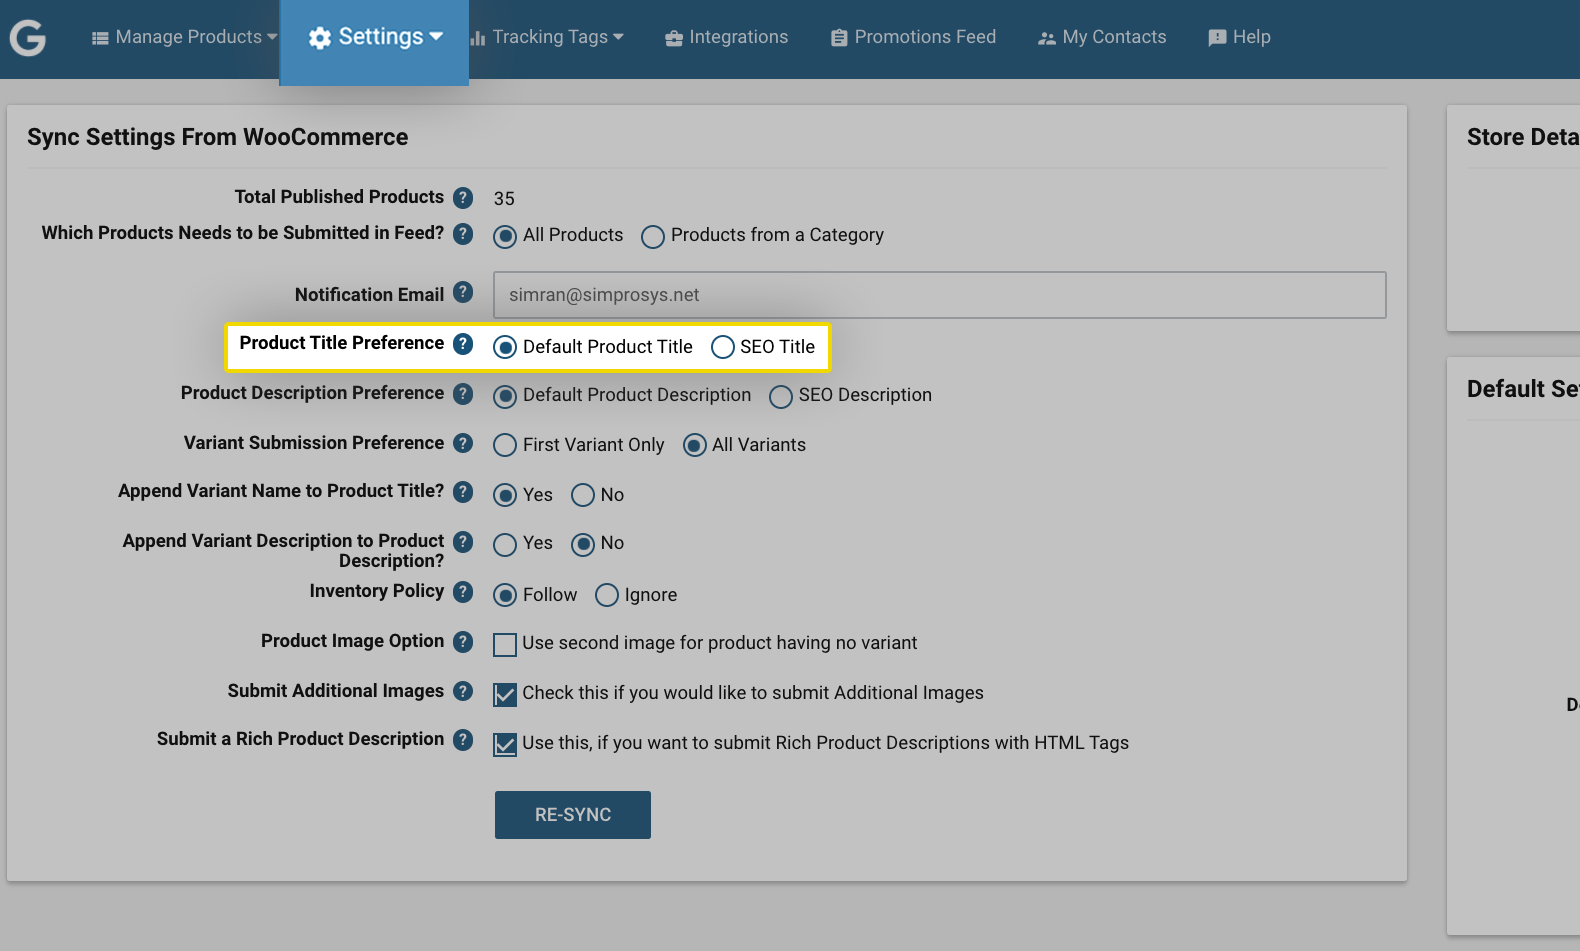
Whereas, when you select the option “SEO Title” the Title will be fetched from the SEO Plugin you’ve used to add the Title. Currently, we are compatible with the Yoast SEO, All-in-One SEO, and Rank Math SEO plugins. If you are not using SEO Plugin to add Titles then we recommend sticking to Default Title and including the Keywords or Phrases that are commonly used by users to search their products on Search Engines to your Product Titles.
5. Product Description Preference: This option works the same as the product title option explained above. In “Default Product Description” you cover a lot of information about the product and when you select this option our plugin fetches the description added in the native field of your WooCommerce store In “SEO description” you just copy-paste a snippet in the SEO Plugin you are using so that Google can render the written content when somebody is looking for this kind of product in the Google search results. Currently, we are compatible with the Yoast SEO, All-in-One SEO, and Rank Math SEO plugins for descriptions.
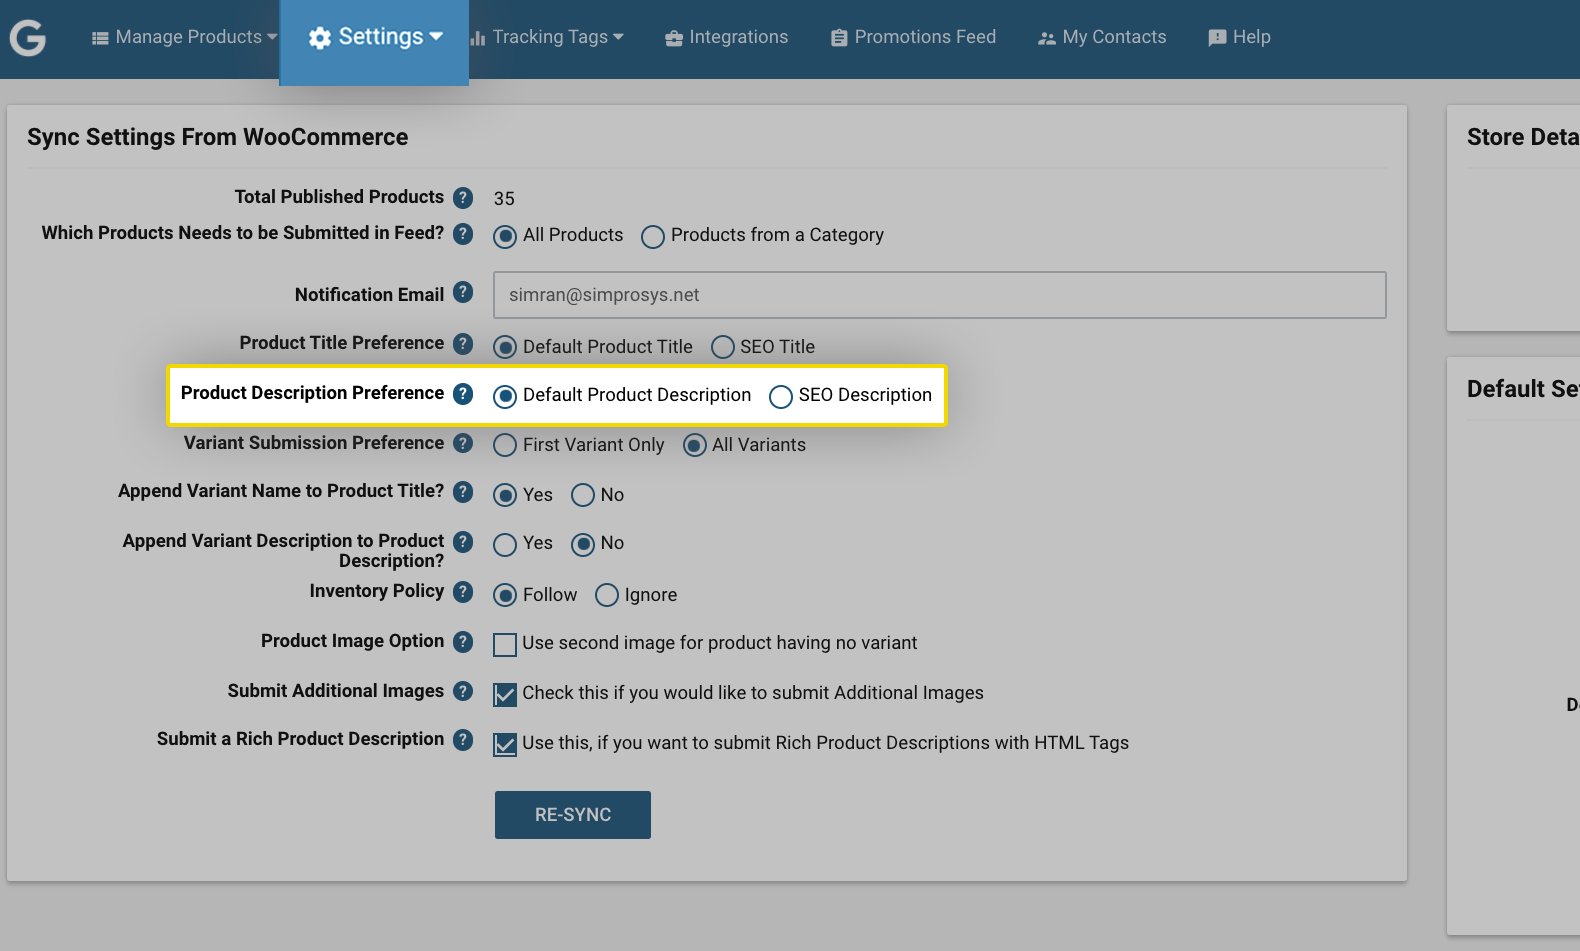
In this case, if you are not sure what to do then we would like to recommend that if you have more keyword-rich descriptions then you should use Default Description because SEO descriptions are very short and they don't cover a lot of information about the product.
6. Variant Submission Preference: This option allows you to choose whether you should submit a “First Variant only” or “All Variants”. “All Variants”: Normally we recommend you submit all variants if you are selling apparel products, electronics, and other kinds of products. “First Variant Only”: This option should be selected only when you are not allowed to advertise other variants of the products and sometimes they are just an extension of the main variant. For example; they are not colors, there's something else that will come.
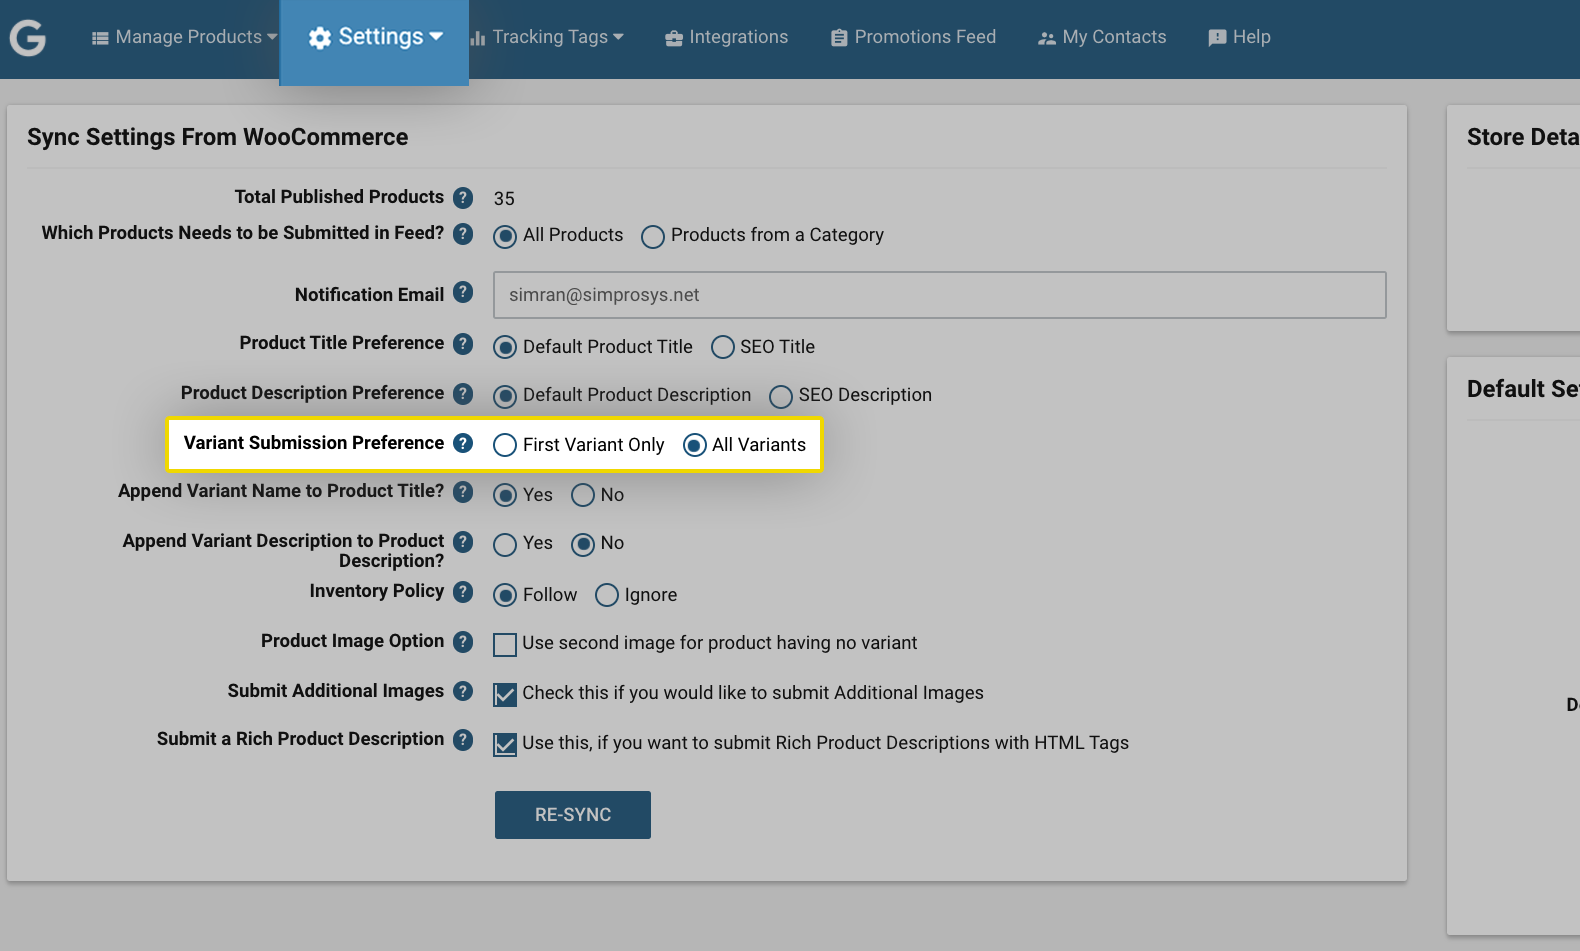
When you are selecting the First Variant Only option then you would need to keep in mind that it will always be the very first variant you’ve created for a product on your WooCommerce store that will be fetched by our plugin and submitted to Google Merchant Center. We also have the cheapest variant and the sequence-based option to fetch the first variant of products, for this you’ll have to reach out to our support team.
7. Append Variant Name to Product Title?: This option refers to whether you want to include the variant title into the main title of the product or not. For example; you are selling iPhone 12 Pro, it does not mean iPhone 12 Pro only. It is just a product and has multiple variants of let's say they have 128 GB or 256 GB storage and have the graphite color or gold color option. So colors and the storage capacities are variants for this iPhone 12 Pro product and if somebody is looking for something like iPhone 12 Pro gold 256 GB storage and if you have this kind of content appended in the product title of the result that matches the search query of the product.
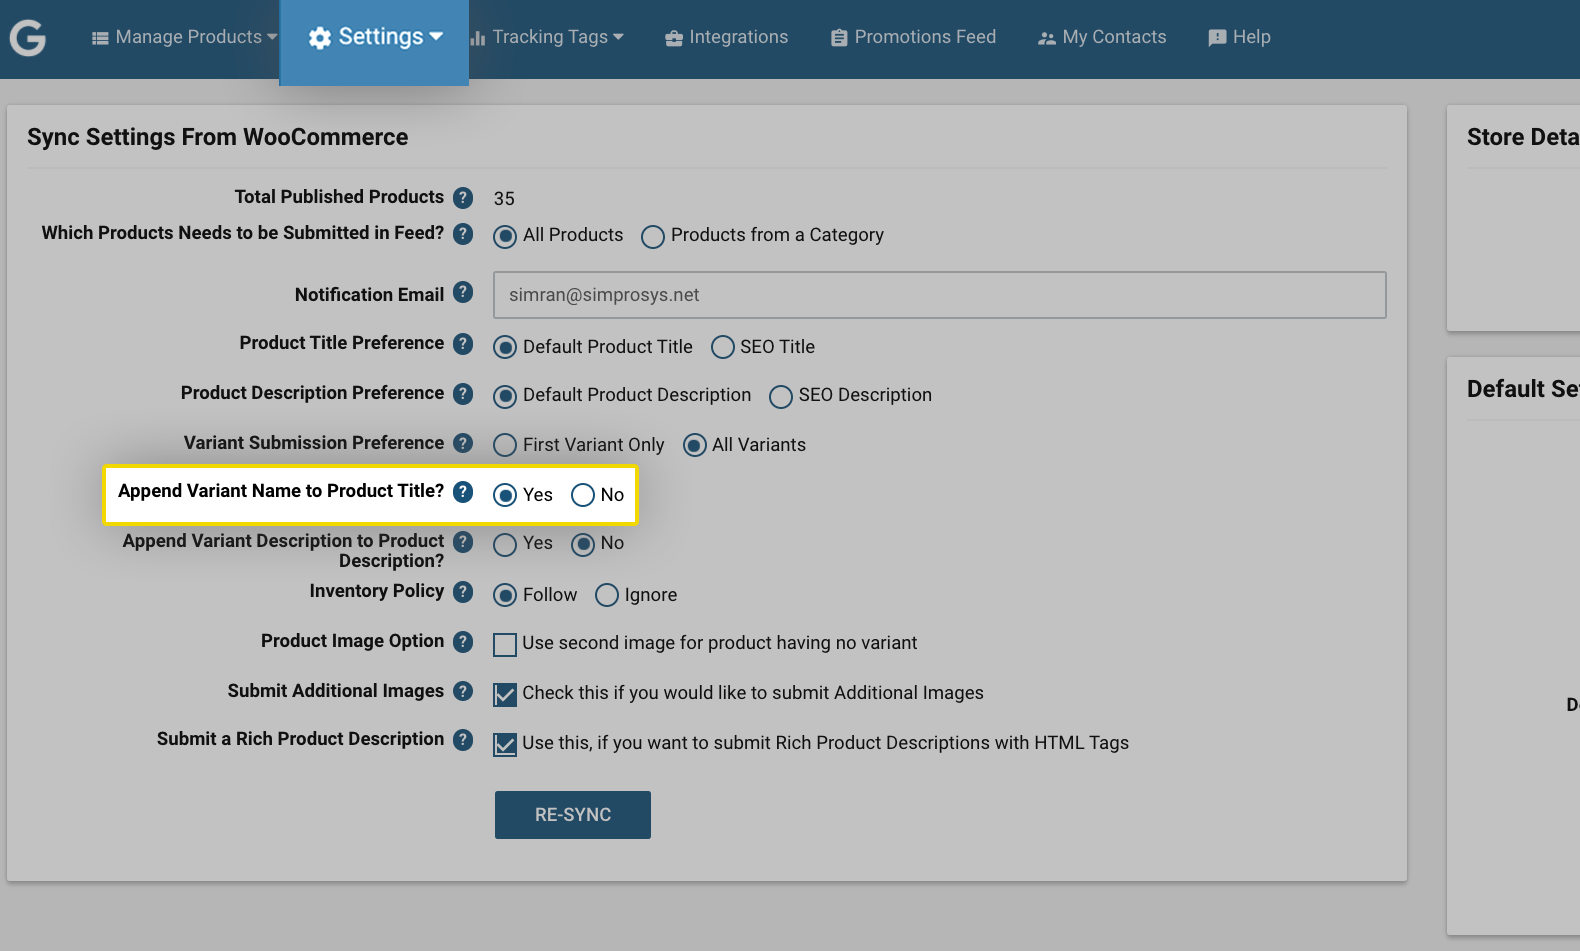
If your variant details are too long then you just need to know that in some cases it might exceed the character limit permitted by Google for Title, in that case, you would like to avoid the variant title getting appended to the product title and at that time you will have to select “no” otherwise in most of the cases it can be “yes”.
8. Append Variant Description to Product Description?: Moving to the next option, including variant description to the product description. If your variant contains additional information which is not included in the main product description and you’ve added the information at the variant level of the product on your WooCommerce store. Then selecting “Yes” would include this information in your Product Description and submitted to Google Merchant Center directly. Please keep a note that you won’t be able to view this content in our plugin. Also, please make sure that you are not exceeding the character limit by Google for description, in that case, you would need to select the “no” option.

9. Inventory Policy: Next option is Inventory Policy, whether we have to “follow” the policy or just “ignore” the policy.

“Follow”: If you have selected the “Follow” option in our plugin and at the same time you have selected “Allow, but notify customers” or “Allow” on your WooCommerce store in the inventory option and the inventory quantity is 0 or less than 1, then we will show the product as in stock and we’ll send the same availability status in Google Merchant Center for your products even when they are out of stock anticipating a restocking of the same product very shortly.
For example; today you may have one of the products out of stock but will continue to take the orders. You will still show it as in stock on store and online Google ads so that whenever the inventory stock gets updated maybe tomorrow or the day after tomorrow you can fulfill those orders within a reasonable time frame. If you have selected “Do not allow” then we will just stick to the inventory quantity and if that is 0 or less than 1 then it will be shown as out of stock.
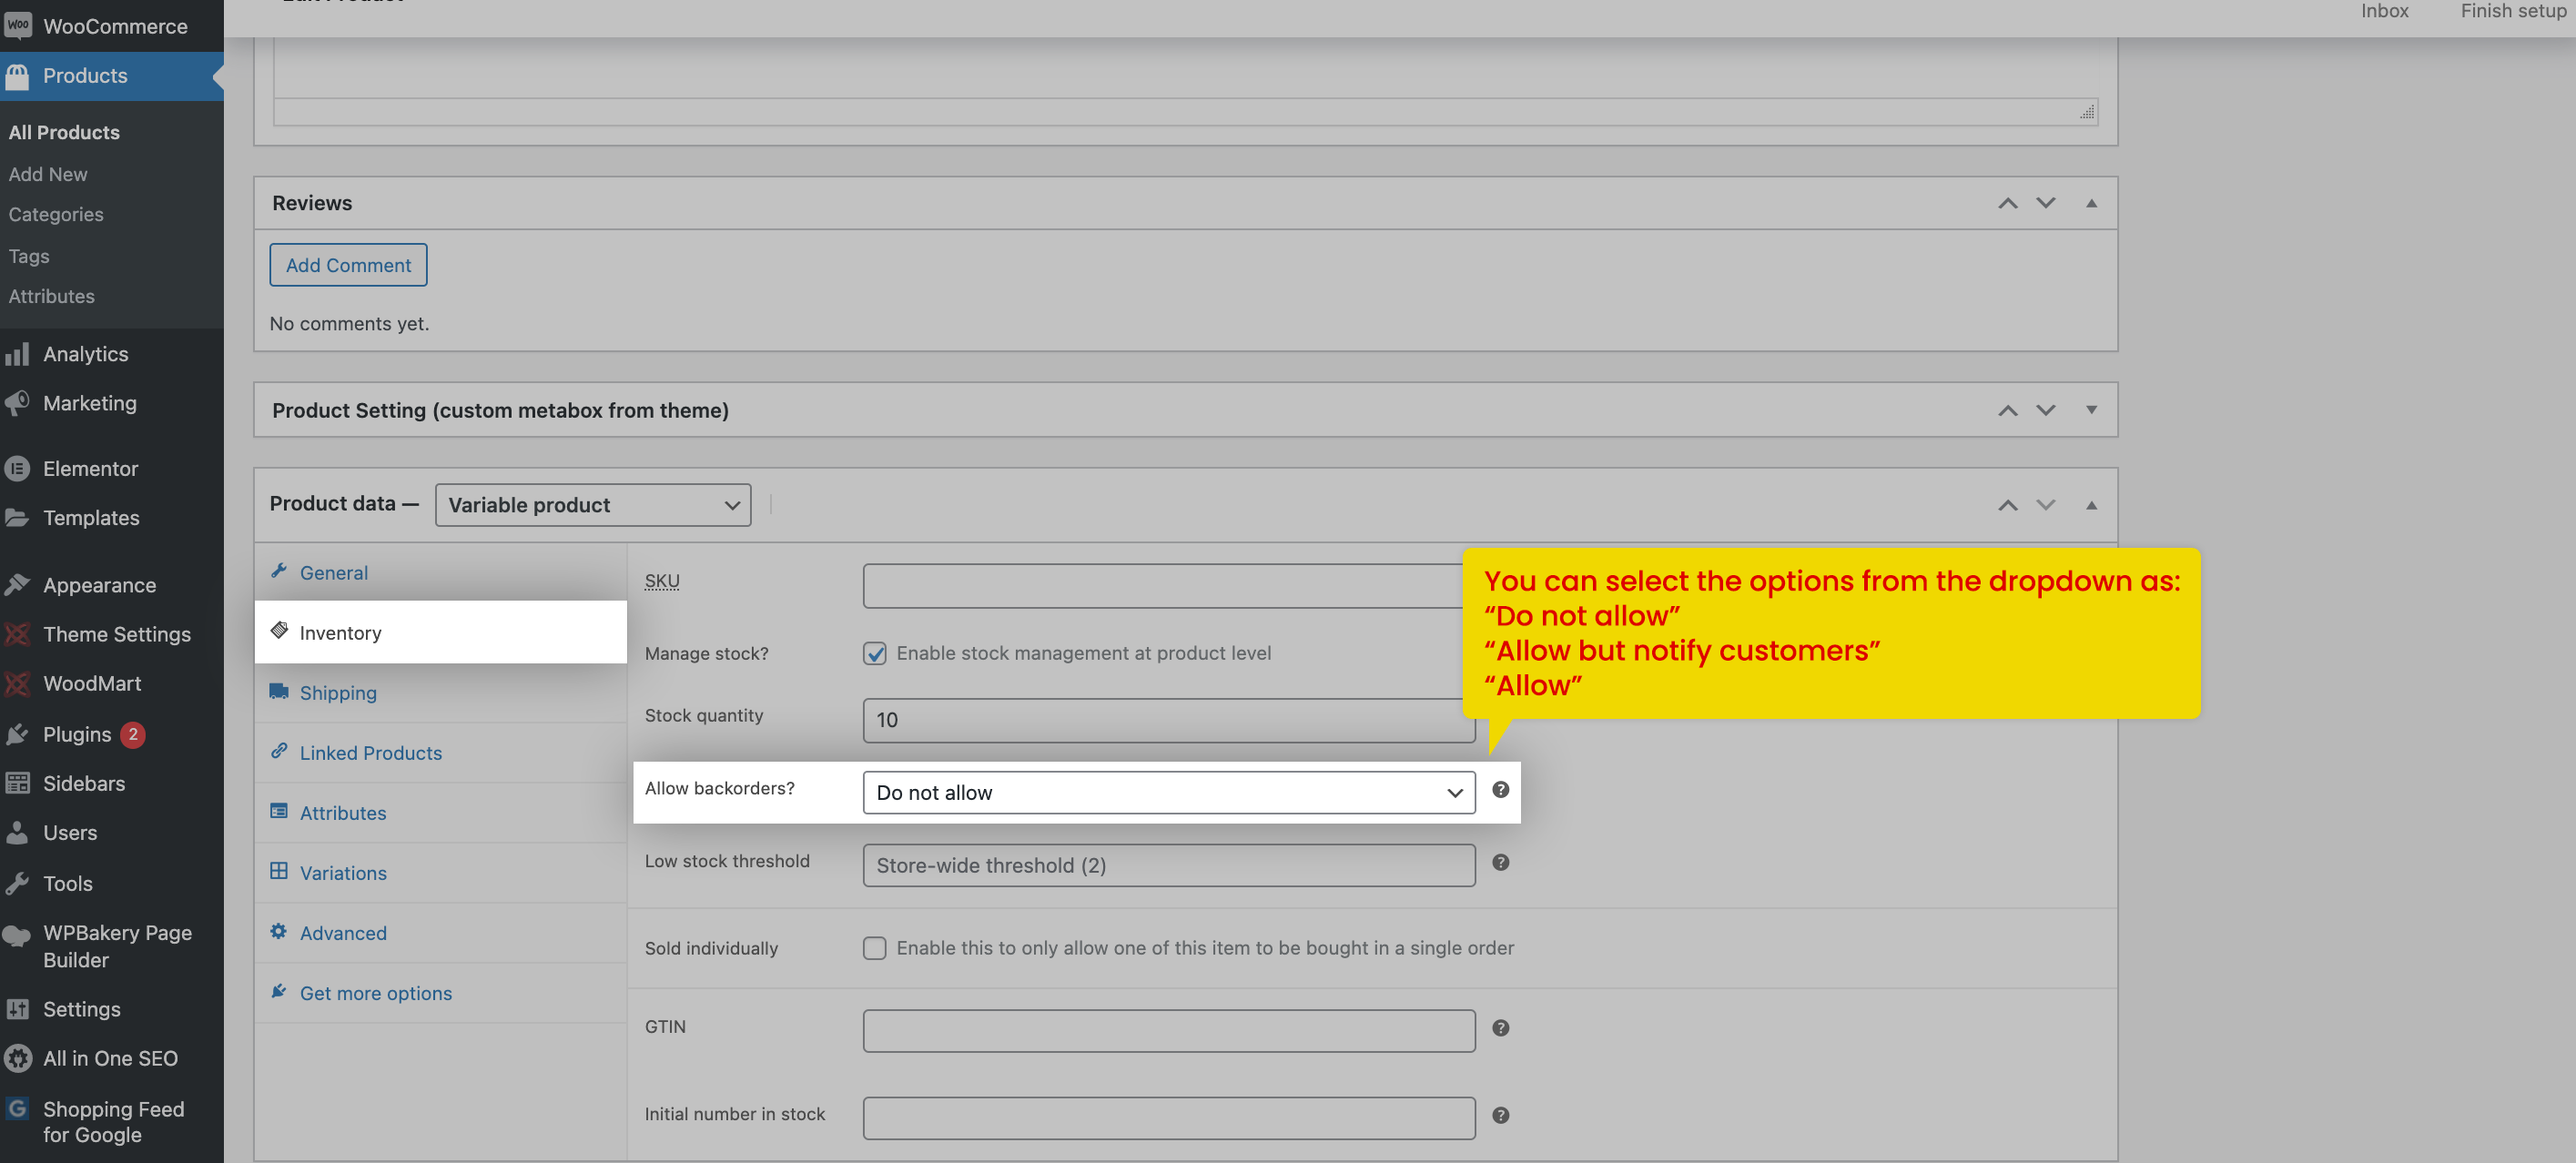
“Ignore”: If you select the “Ignore” option in our plugin for inventory policy and have selected any of the options as “Allow, but notify customers” or “Allow” or “Do not allow” on your Woo-Commerce store in the inventory option then the product will be shown as out of stock if the inventory quantity is 0 or less than 1, else it will reflect as in stock.
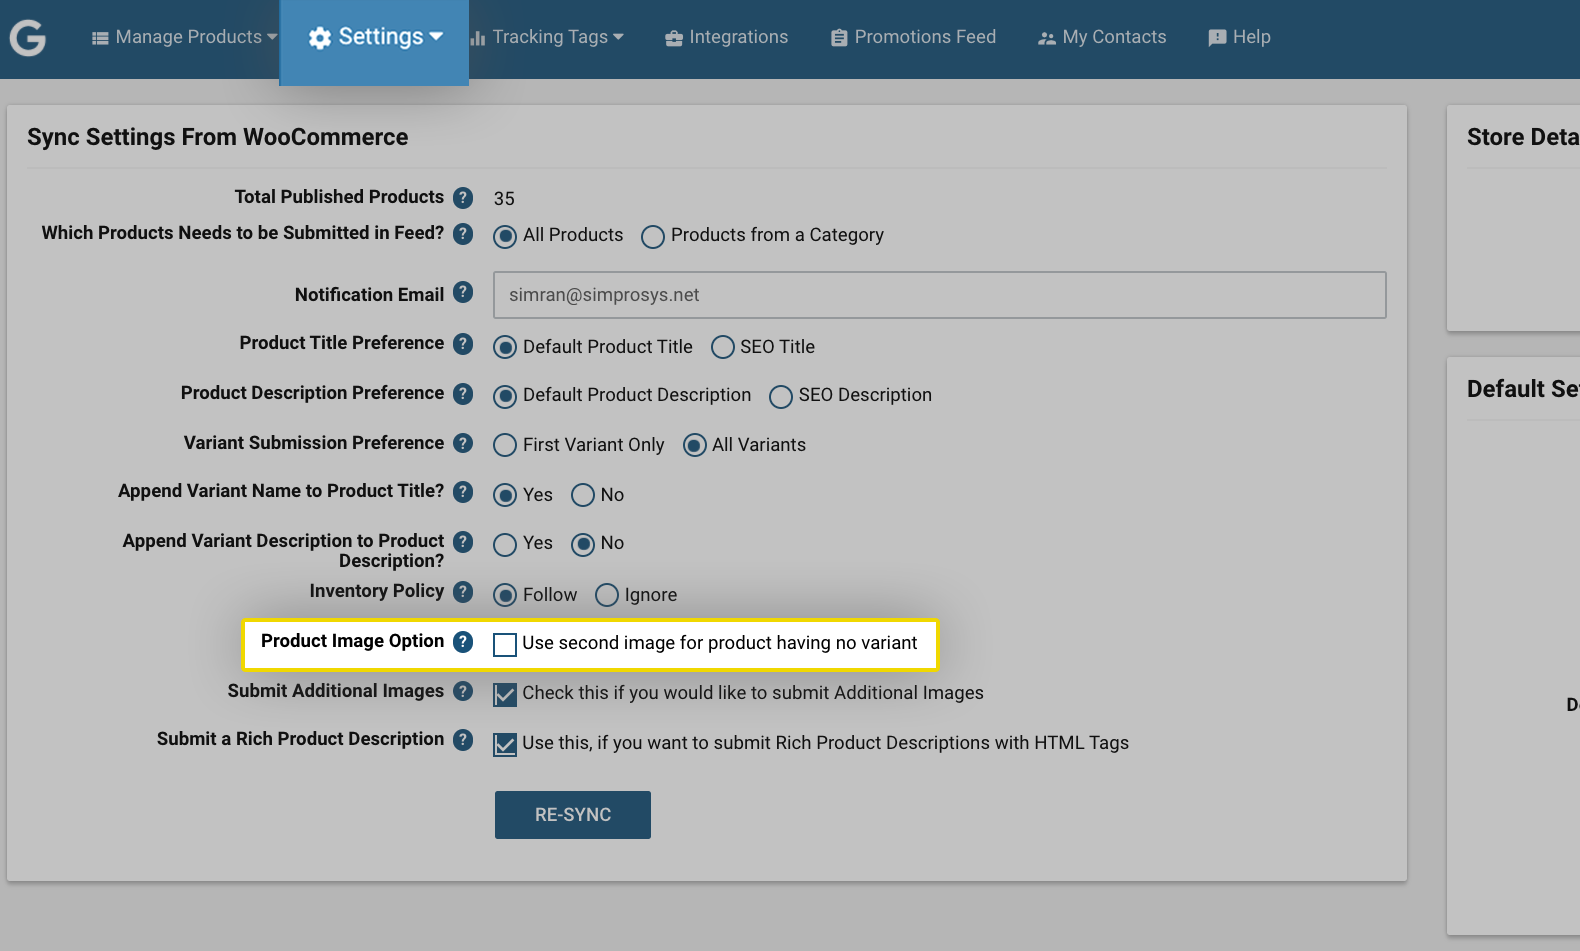
10. Product Image Option: This option will work only for the product having no variant or you are submitting the first variant only. Why is it required to submit the second image? Because a lot of merchants use the first image as a Lifestyle image and Google normally recommends you to submit the images without any kind of background without any kind of cluster or we would say the watermark or some discount offers or something like that you should have your image with a product key and nothing else. In that case, if you have a primary image with something that is not in compliance with Google's policy then you can check the option “Use a second image for the product having no variant”.
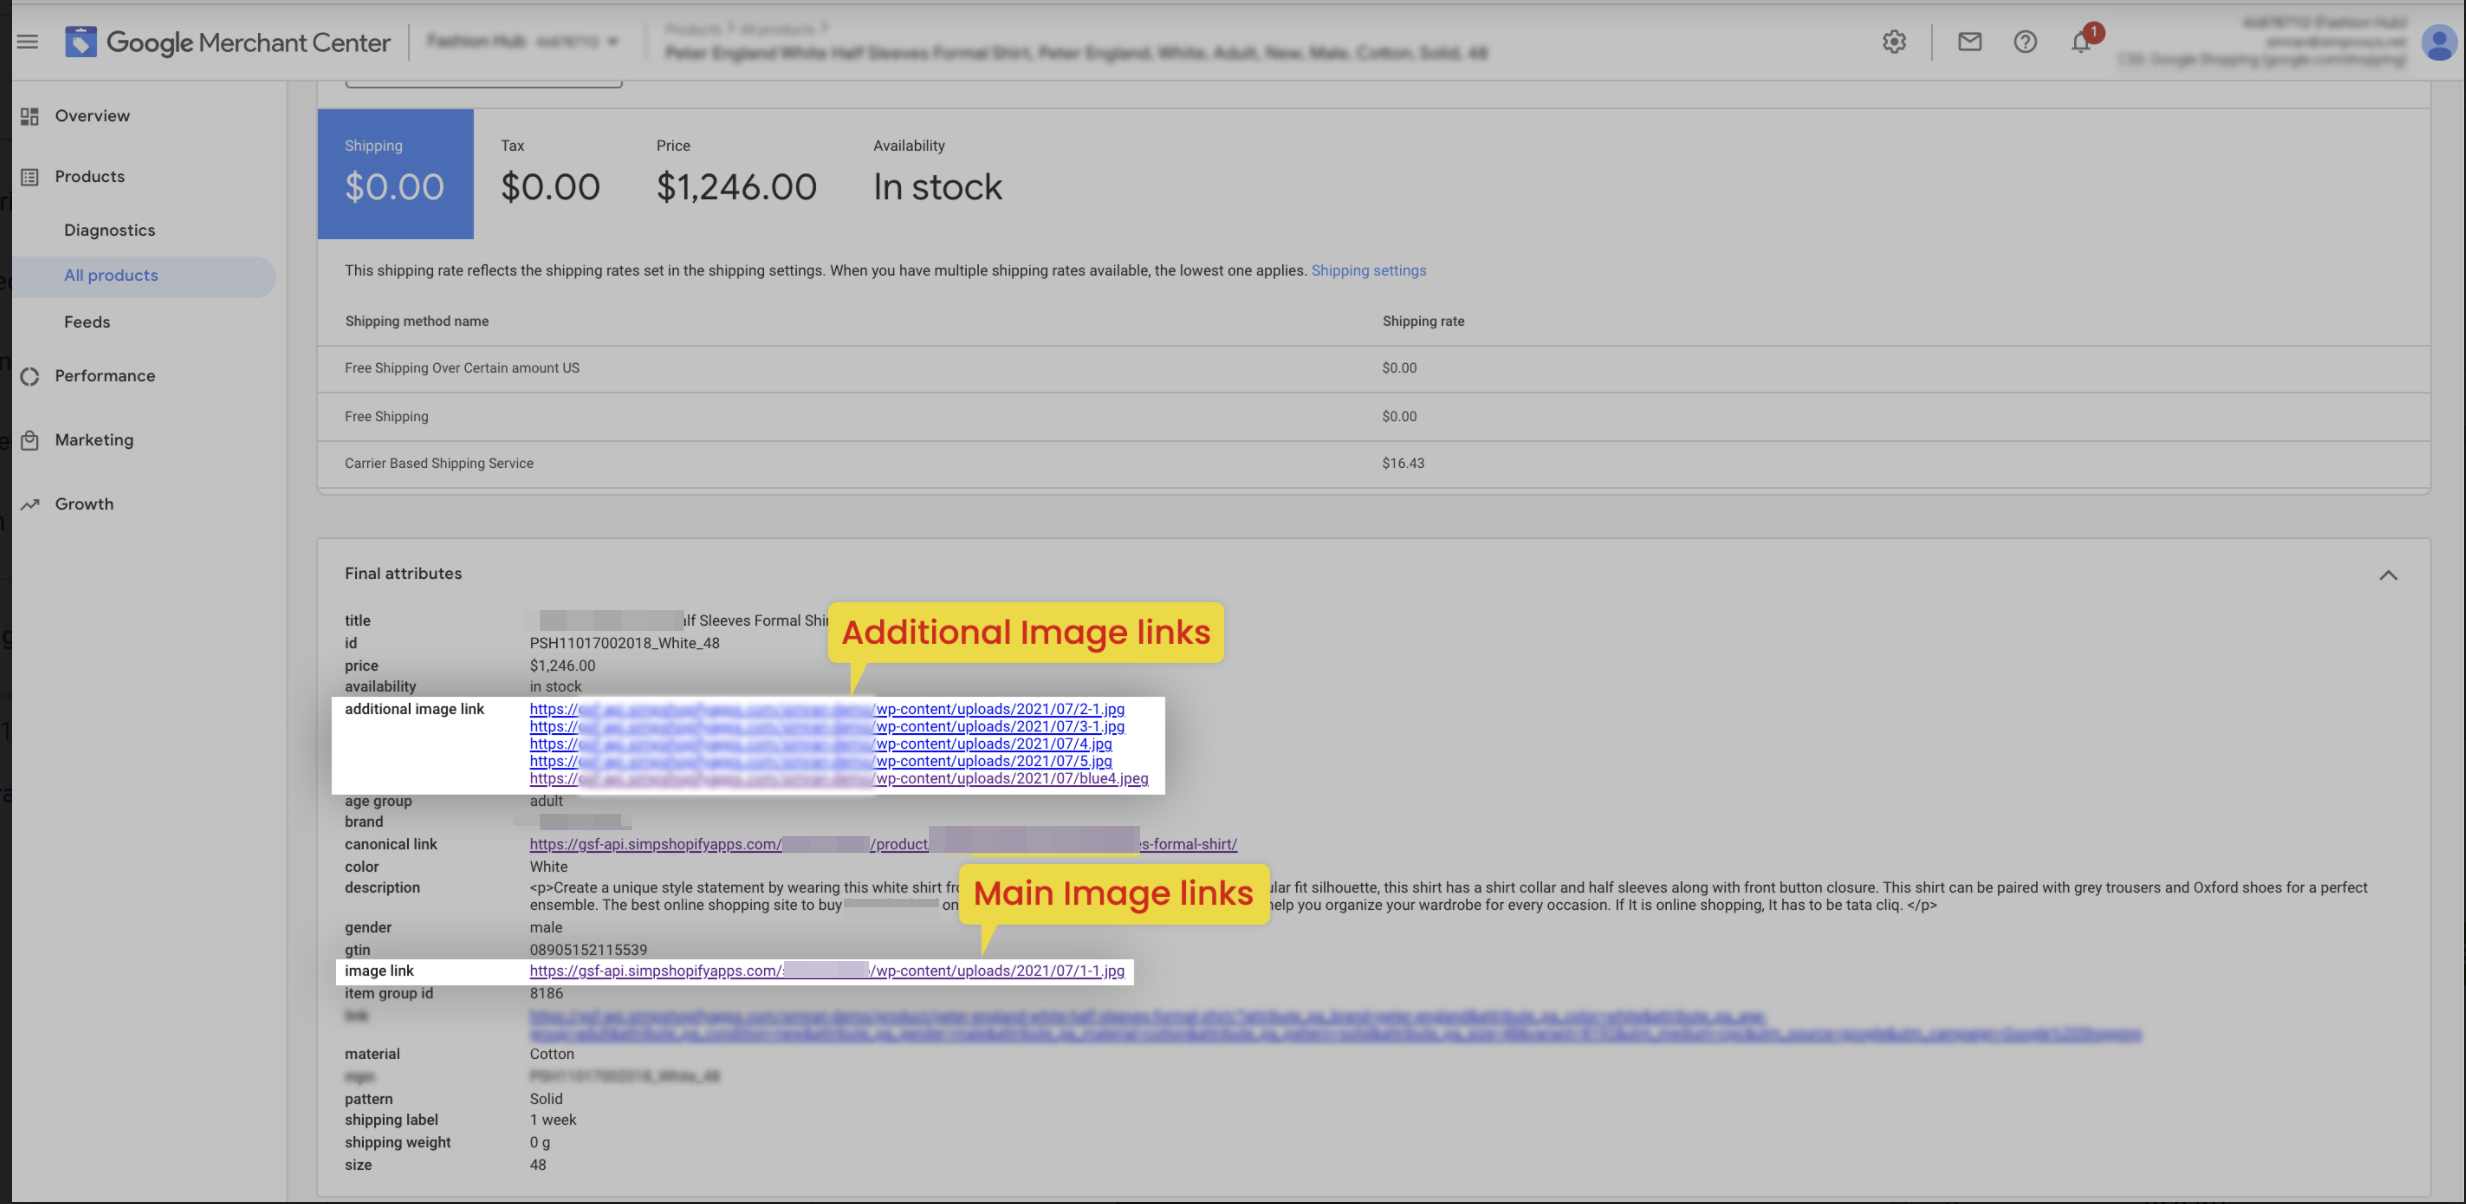
11. Submit Additional Images: When you check this box, our plugin fetches all the images for the products having no variants from the WooCommerce store and then submits them to Google Merchant Center.
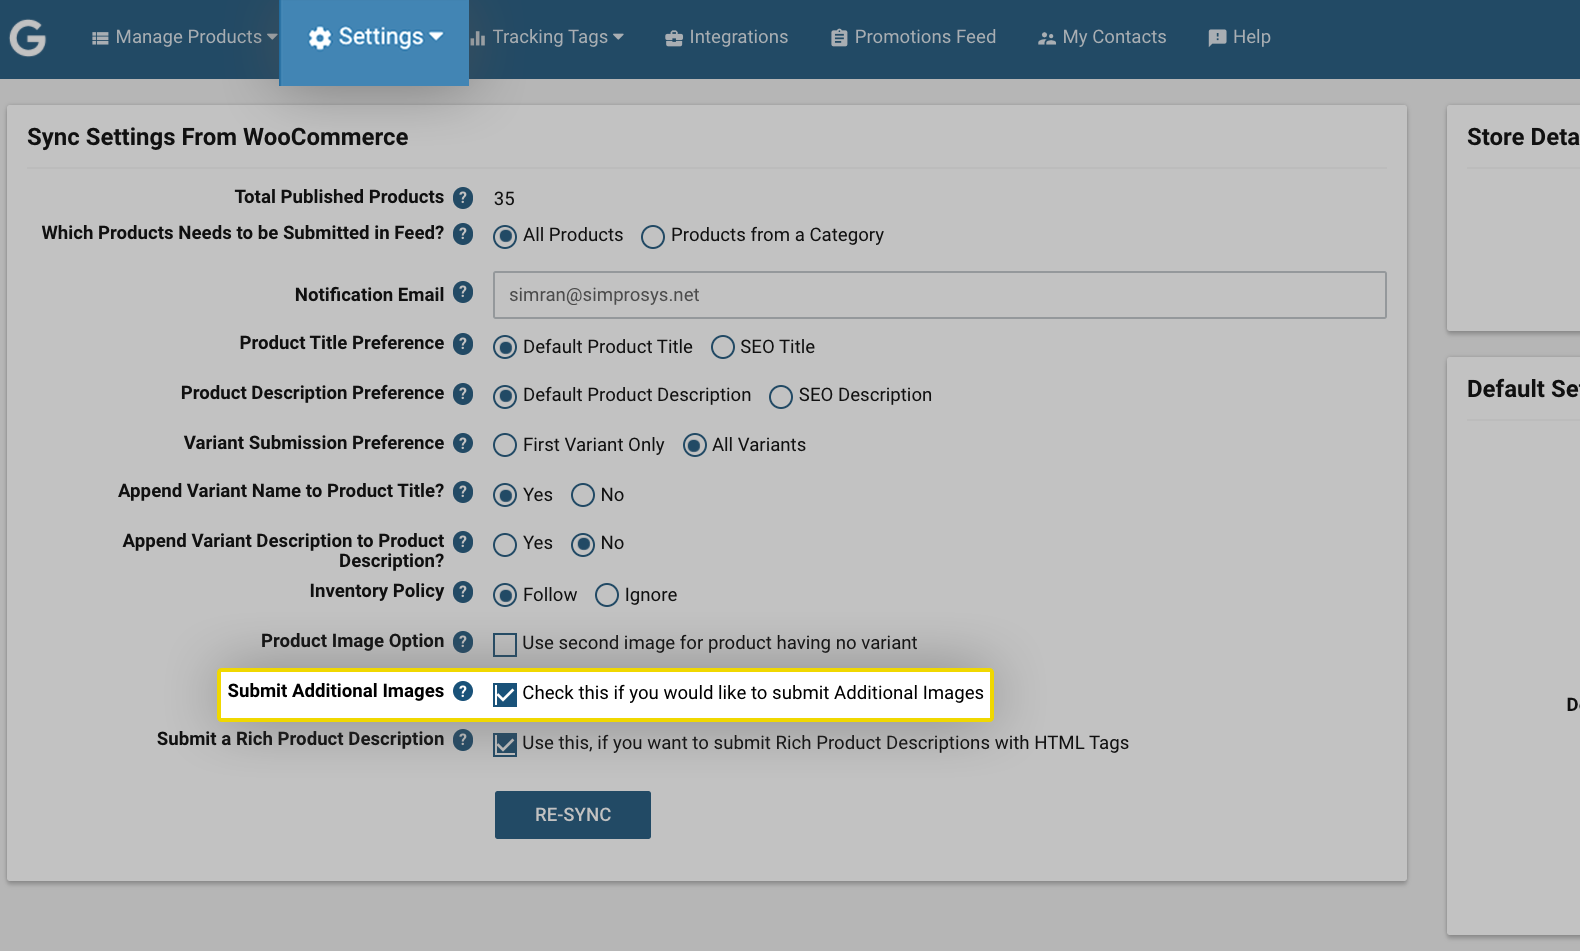
For Example; here you can see for this product that we are submitting 5 additional images and 1 main image.
For Products having Variants or even if you choose to submit First Variant Only: To submit additional images for them, you’ll have to use the ALT Text Image option. Please refer to the attached link to know more about this process: https://support.simprosys.com/faq/how-to-submit-additional-images
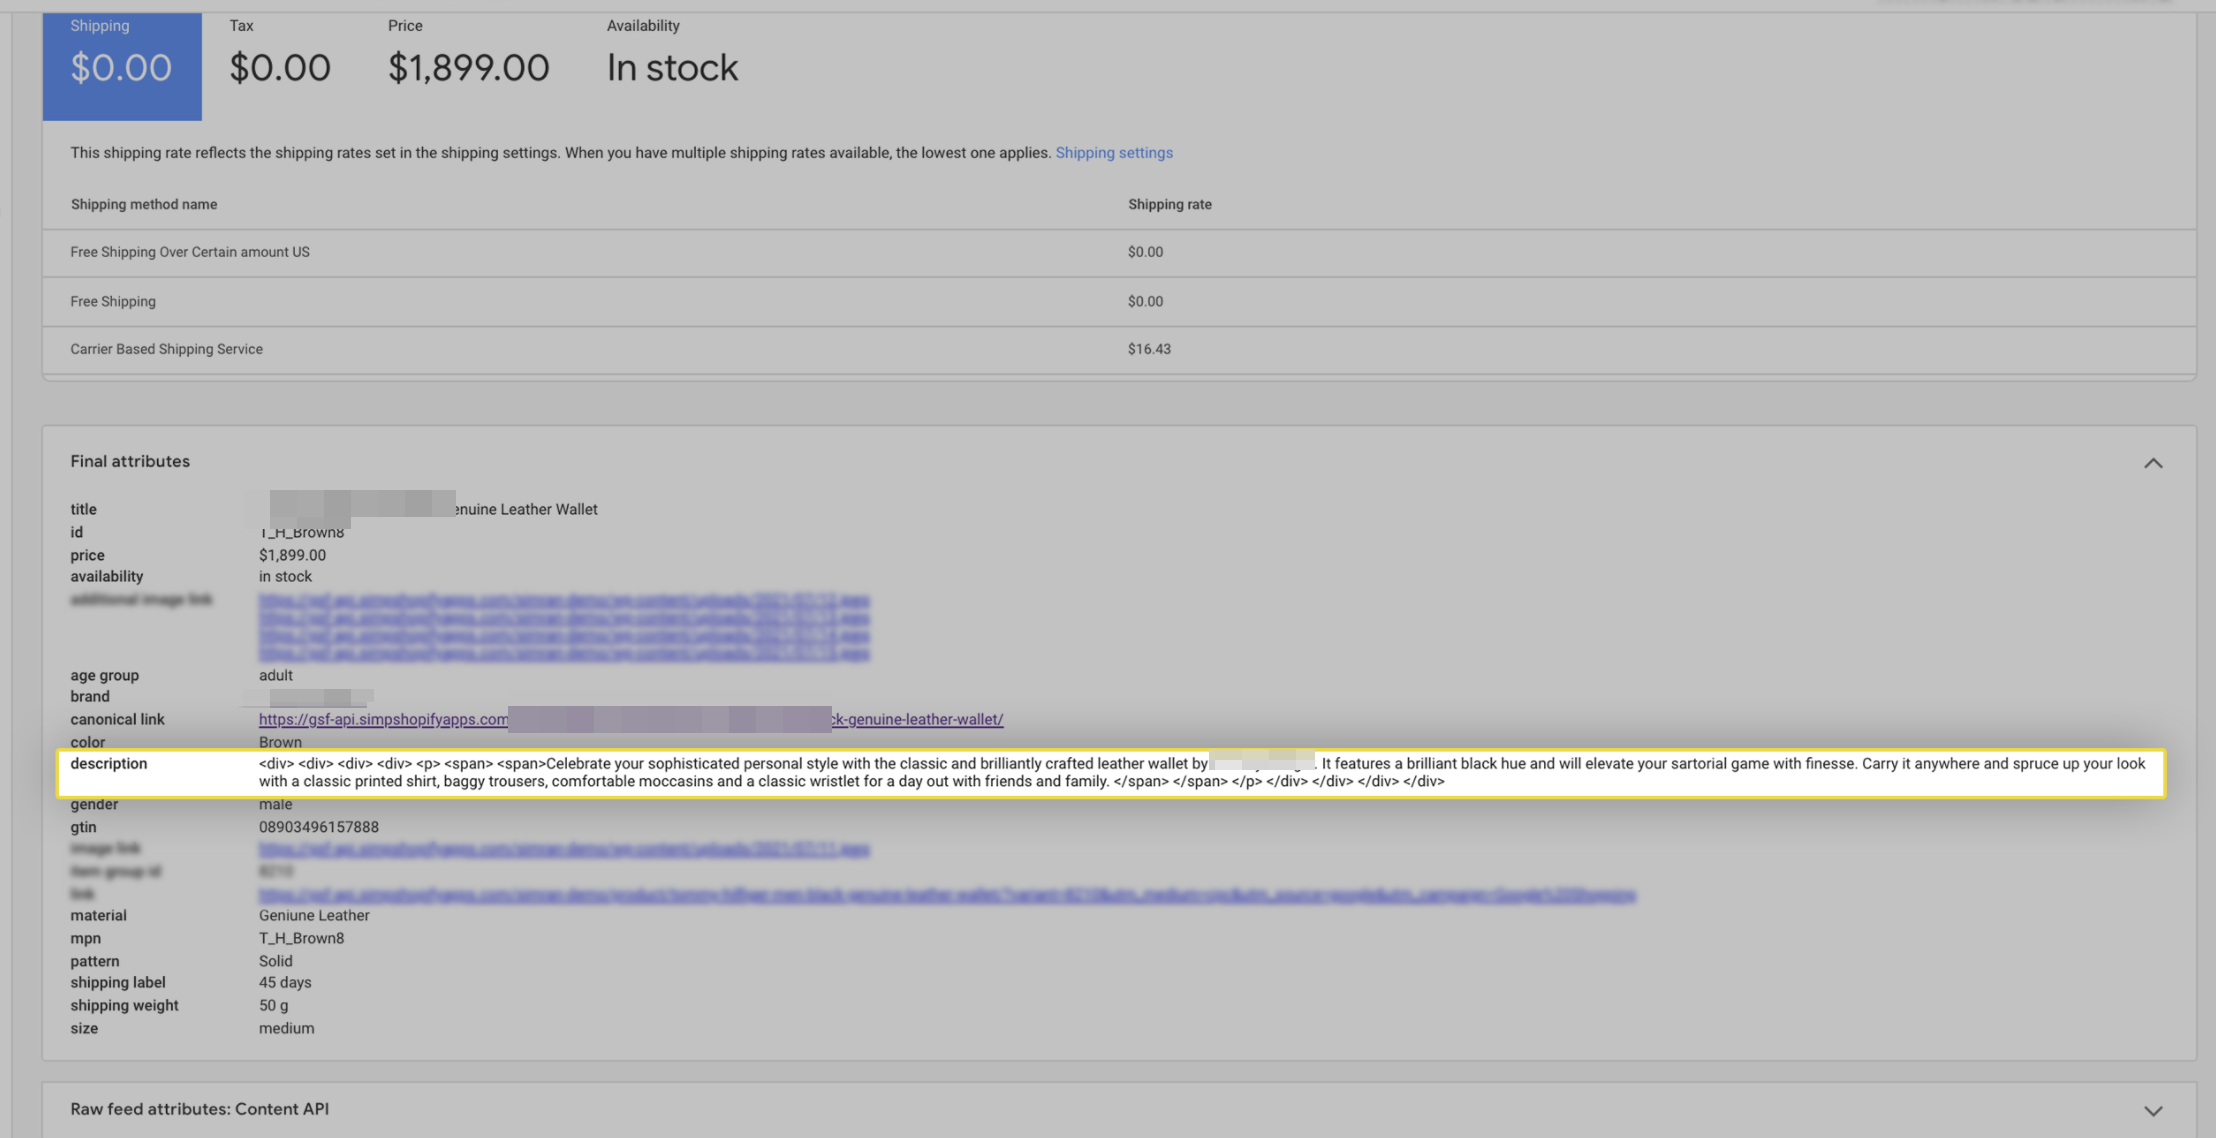
12. Submit a Rich Product Description: This option can be selected to submit a rich form of description or in technical terms submit a description with HTML tags. Although there is too much HTML going into this one, the formatted HTML description helps Google's machine learning process to understand which part has to be shown on which page or which location on this product page.
Please note that when Google displays your products in Google Shopping Ads result it will be showing description in a normal format as you’ve uploaded and not with the HTML tags
We hope it is going to be helpful. If you have any queries on any of these options you can write to us at support@simprosys.com and we will definitely help you
Next article

Simprosys Product Feed for WooCommerce
Pre-Installation
Plugin Setup
Product Submission Controls
Product Attributes & Optimization
Automated Feed Rule
Troubleshooting & Issue Fixes
Advanced Setup Made Easy
Google Merchant Center Setup & Integration
Tracking Tag Setup (Google Ads & Google Analytics 4)
Google Ads & Campaign Setup
Multi-Country
Promotions Feed
Microsoft Advertising Integration & Campaign Setup
META (Facebook) Integration
WooCommerce Store Access & Setup
Billing & Payments


