

Simprosys Product Feed for WooCommerce
Pre-Installation
Plugin Setup
Product Submission Controls
Product Attributes & Optimization
Automated Feed Rule
Troubleshooting & Issue Fixes
Advanced Setup Made Easy
Google Merchant Center Setup & Integration
Tracking Tag Setup (Google Ads & Google Analytics 4)
Google Ads & Campaign Setup
Multi-Country
Promotions Feed
Microsoft Advertising Integration & Campaign Setup
META (Facebook) Integration
WooCommerce Store Access & Setup
How to Assign Custom Labels at Variant Level Using Automated Rules from our plugin?
Dec 31, 2025
In this document, we will demonstrate how to assign custom labels to products using automated rules in our plugin.
Custom labels are simply a type of Tag that can be used to filter and organize products in a Google Ads campaign.
You can identify, filter, and arrange products for the shopping campaign according to your advertising preferences based on the custom
label values assigned to different groups of products or individual products.
Custom labels are particularly useful if you need product categorization that is not provided by Google.
However, it's important to note that custom labels are not intended to be used for campaign keyword matching, and they cannot be used to enter keywords for specific products.
Custom labels are assigned to products or groups of products, and each custom label can have up to 1000 unique values added to it. You can use up to five custom labels, labeled as custom labels 0 to 4.
When using automated rules to assign custom labels, the values will be at the variant level. This means that each variant of a product can have a different custom label value based on the condition it meets.
Let’s understand how to assign custom labels with the help of examples:
To assign custom label 0 values based on different price ranges, we can use the plugin’s interface.
By creating a new automated rule and selecting Custom Label 0, we can set conditions for different price ranges and assign Custom Label 0 values accordingly.
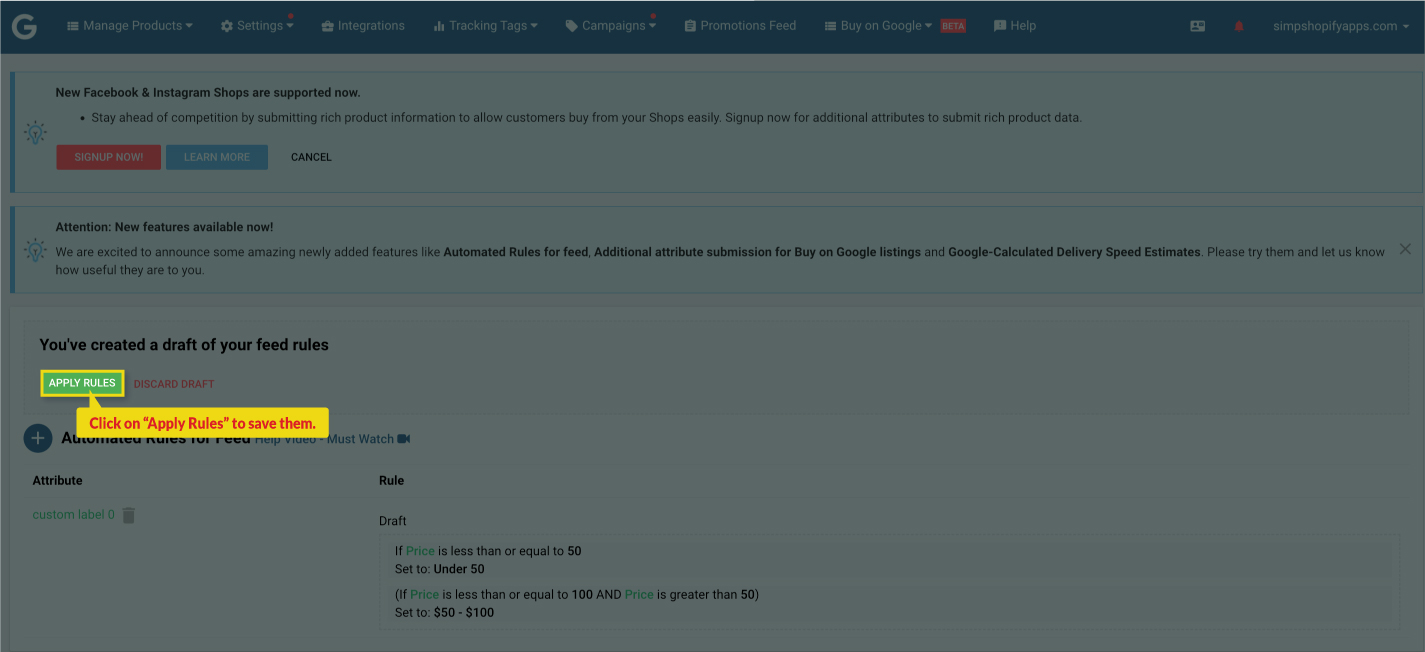
Also, multiple condition sets can be added to assign custom label 0 values for various price ranges. Once all conditions are defined, the rules can be saved as a draft, reviewed, modified, or discarded as needed.
After applying the rules, our plugin will submit the custom label values to respective advertising platforms for each product variant,
based on the assigned condition.
For instance, if a product has multiple variants with different prices, each variant can be assigned a unique custom label value.
To assign custom labels based on different price tiers in our plugin, follow these steps:
1. Hover over the Settings menu and select Automated Rules for Feed. 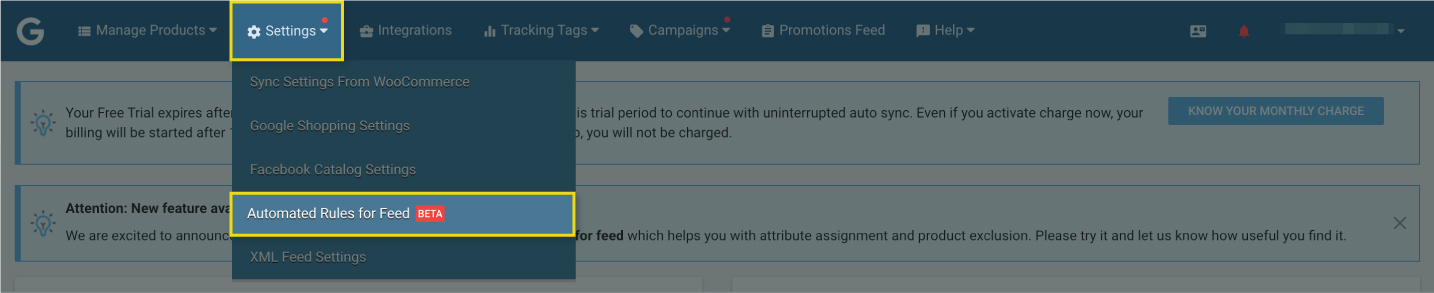 2. Click on the plus icon to create a new automated rule and select Custom Label 0 option.
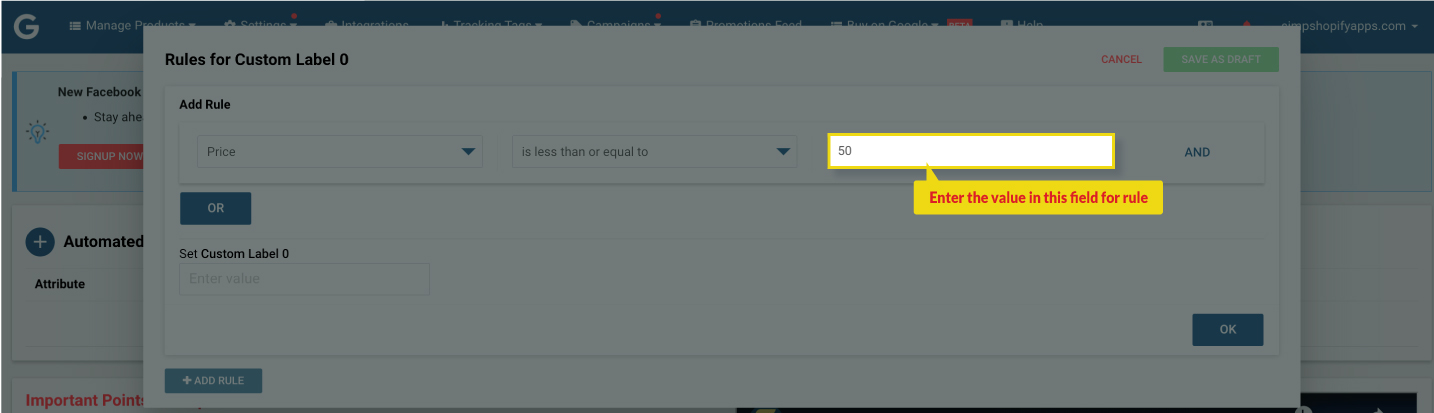
 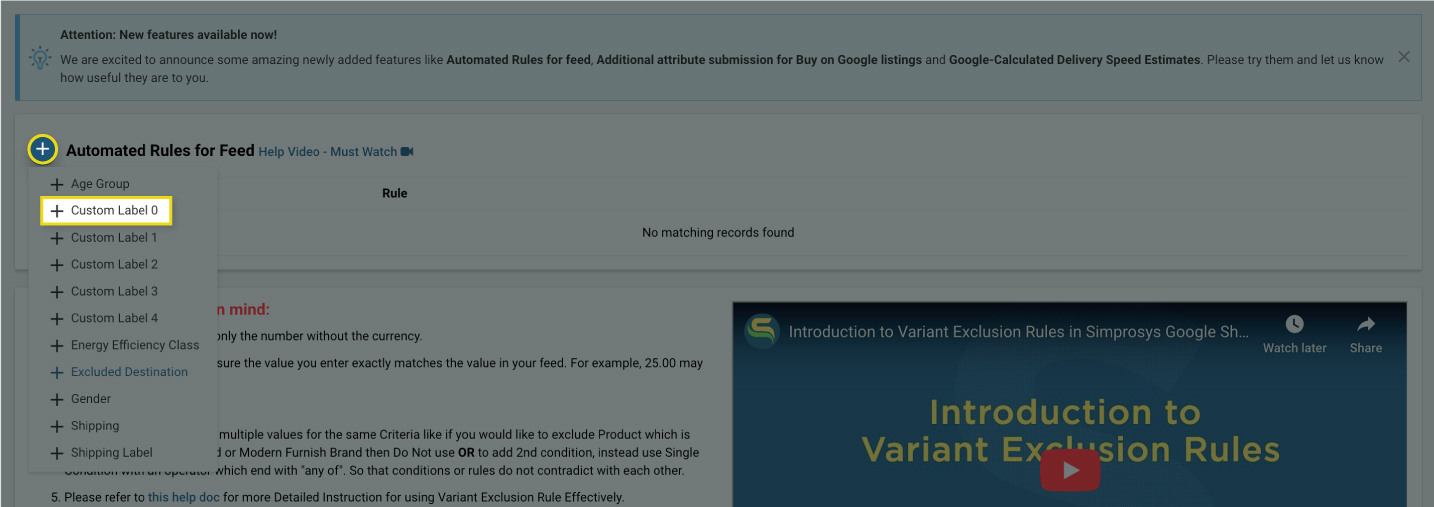 3. In the dialog window that appears, select the price attribute from the first dropdown menu.
 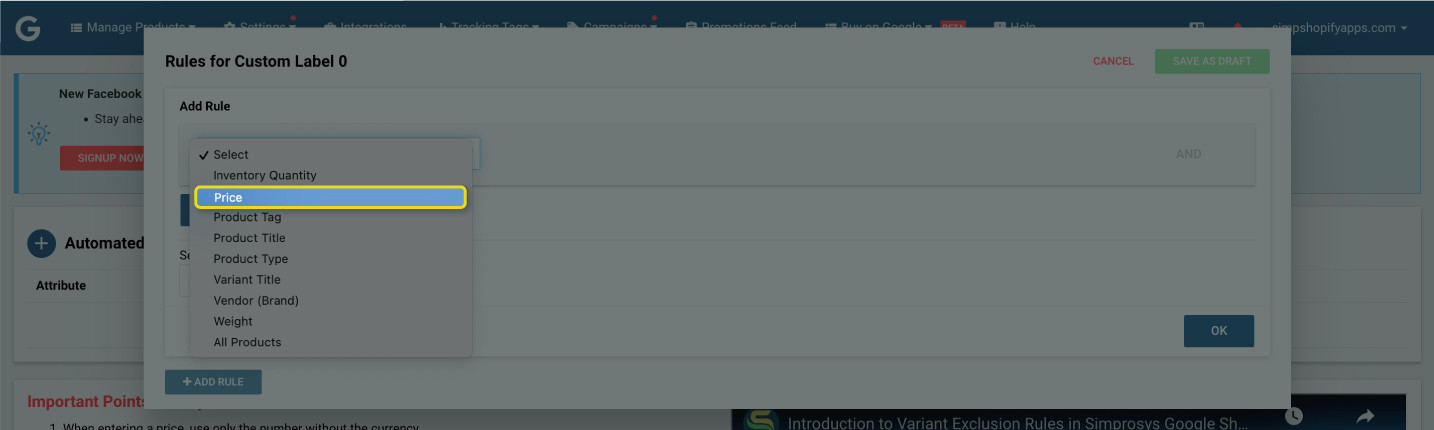 4. Choose "is less than or equal to" as the operator and enter “50” in the condition value field for the rule.
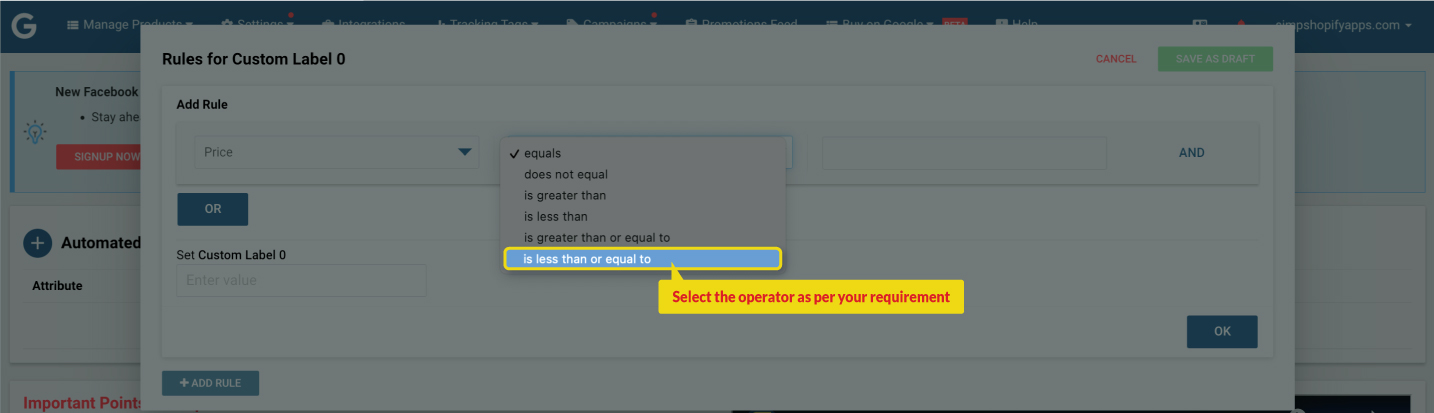
 5. Enter the name of the custom label value you want to assign to products in this price range, such as "Under 50," and click on the OK button to save.
 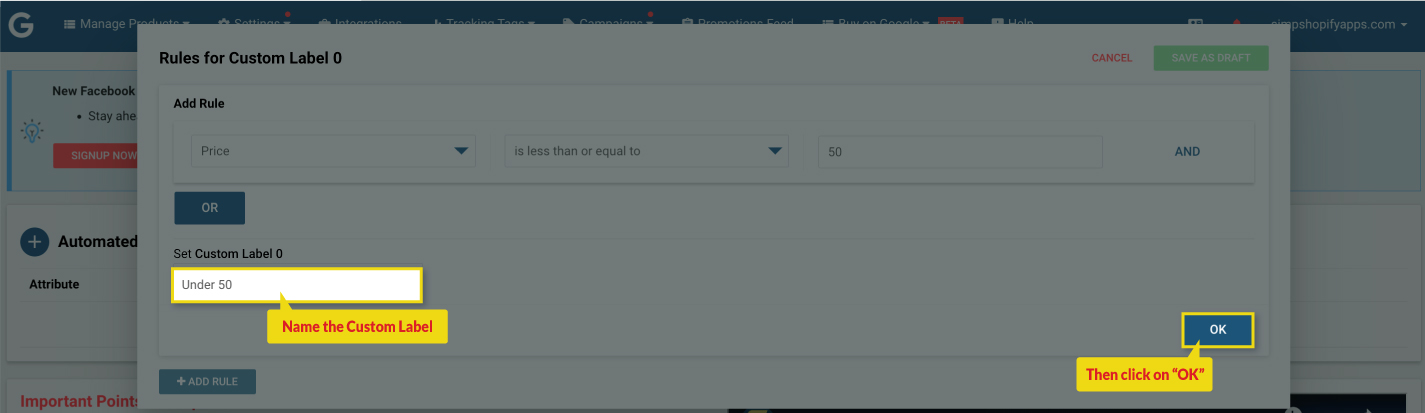 To assign custom label values to product variants based on their price range, we can add another condition by clicking on the "Add rule" button.
 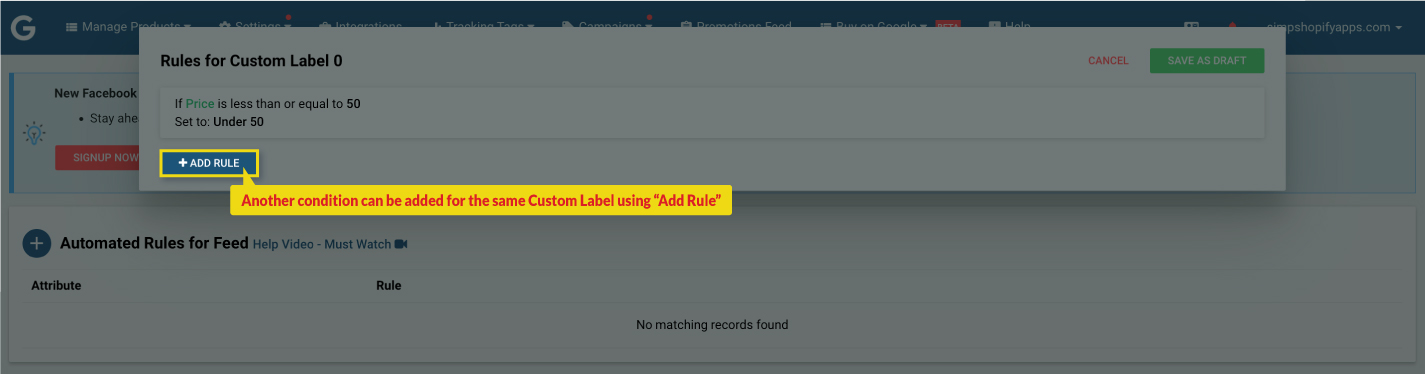 For the other condition set, we will assign a custom label 0 value of "price less than or equal to $100 and greater than $50".
 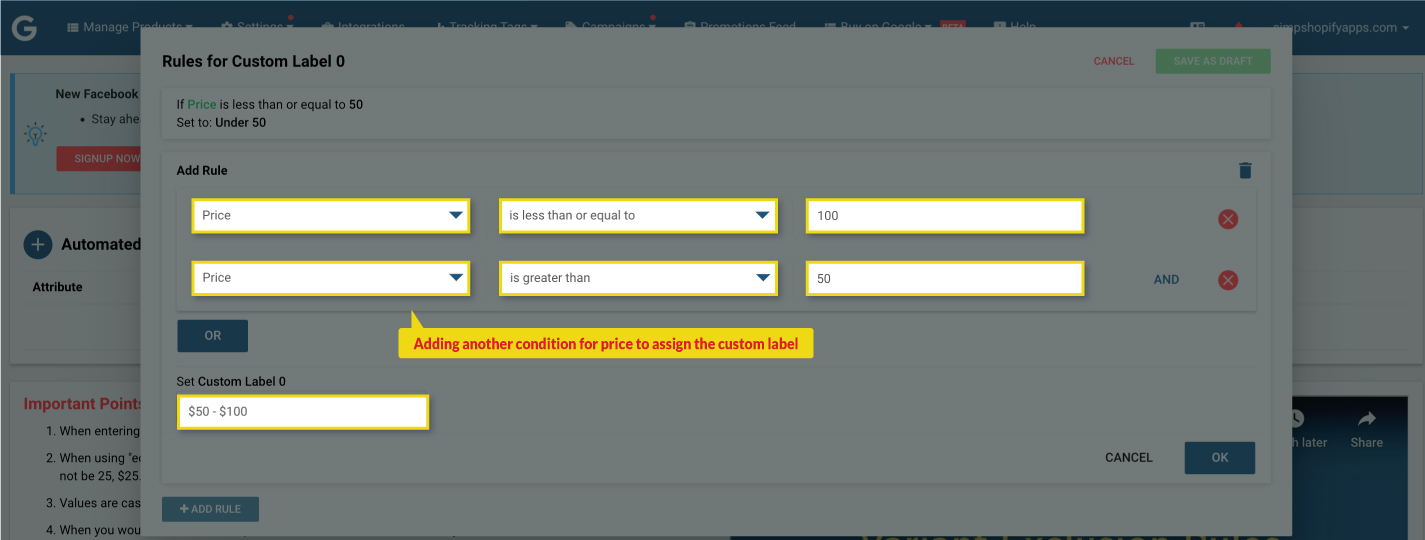 We can create as many conditions set as necessary to assign custom label 0 for different price ranges. After defining all the conditions, we will save the rules as a draft and review them before applying them to submit the custom label values to the Google Merchant Center for each product variant. We can also modify or discard the saved rules as needed.
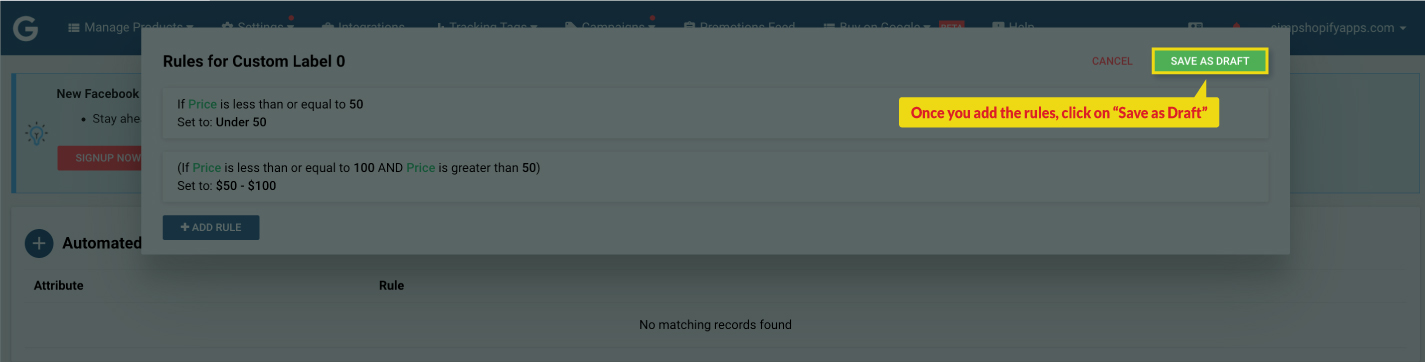
 Similarly, we can create automated rules to assign the custom label based on Brand, Product Type, Inventory Quantity, etc. One or more conditions can be clubbed into a single entity using “AND” to assign the custom label. Let’s see an example of the same: 1. Click on the plus icon to create a new automated rule and select the Custom Label 1 option.
 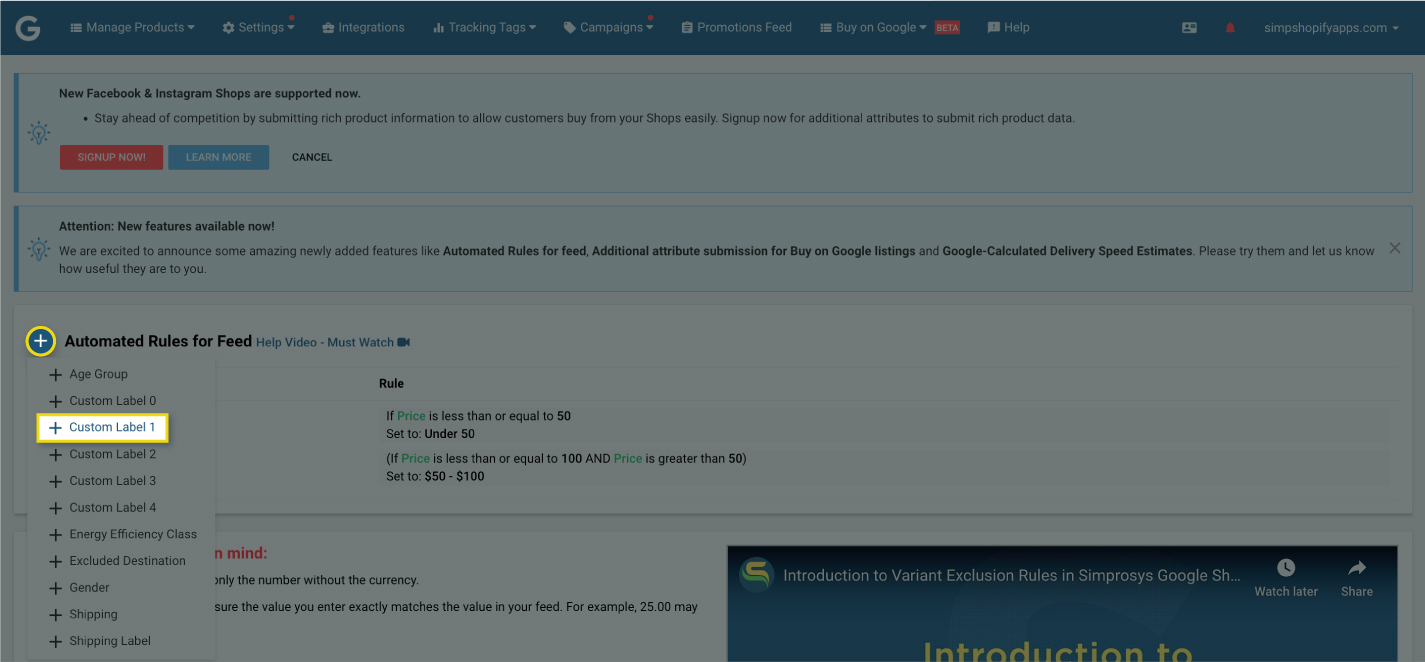 2. In the dialog window that appears, select the brand attribute from the first dropdown menu.
 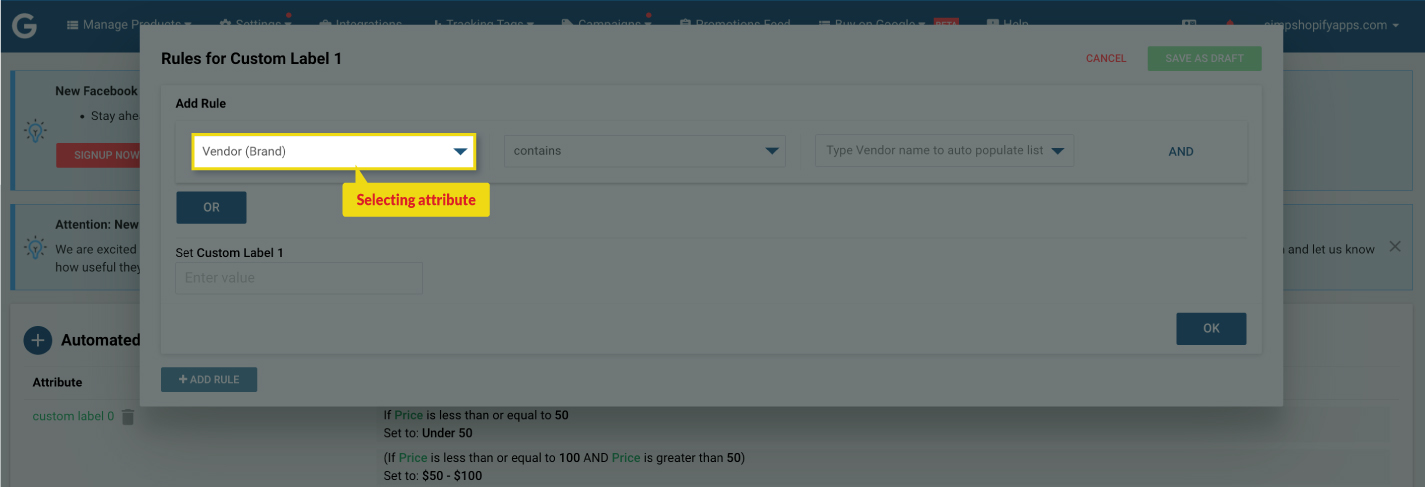 3. Choose "equals" as the operator and you will get the dropdown list to select from.
 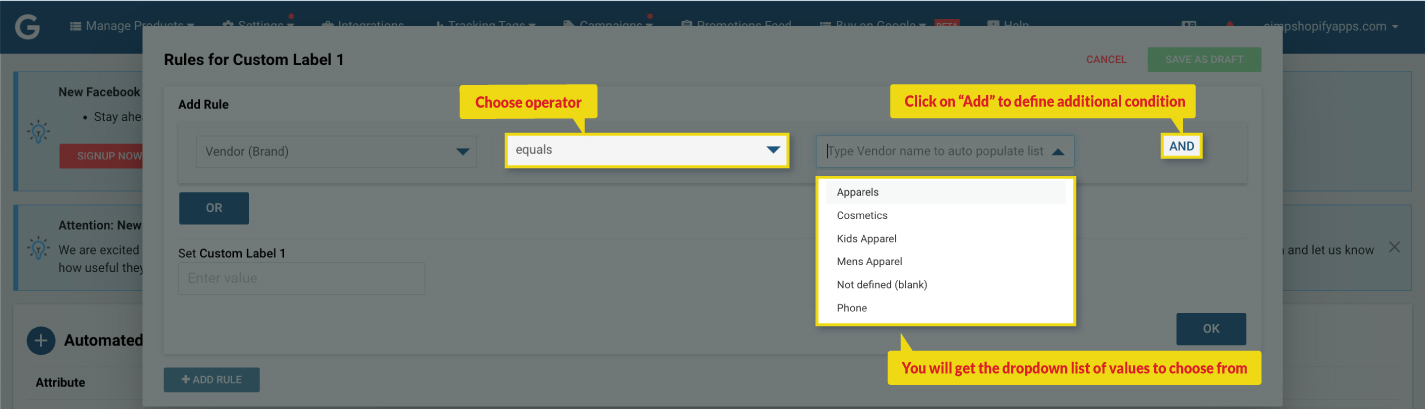 4. Click on “AND” to define an additional condition. 5. Select the 2nd condition as “product type” and the operator as “contains any of”. While adding values, make sure to add a single value per line.
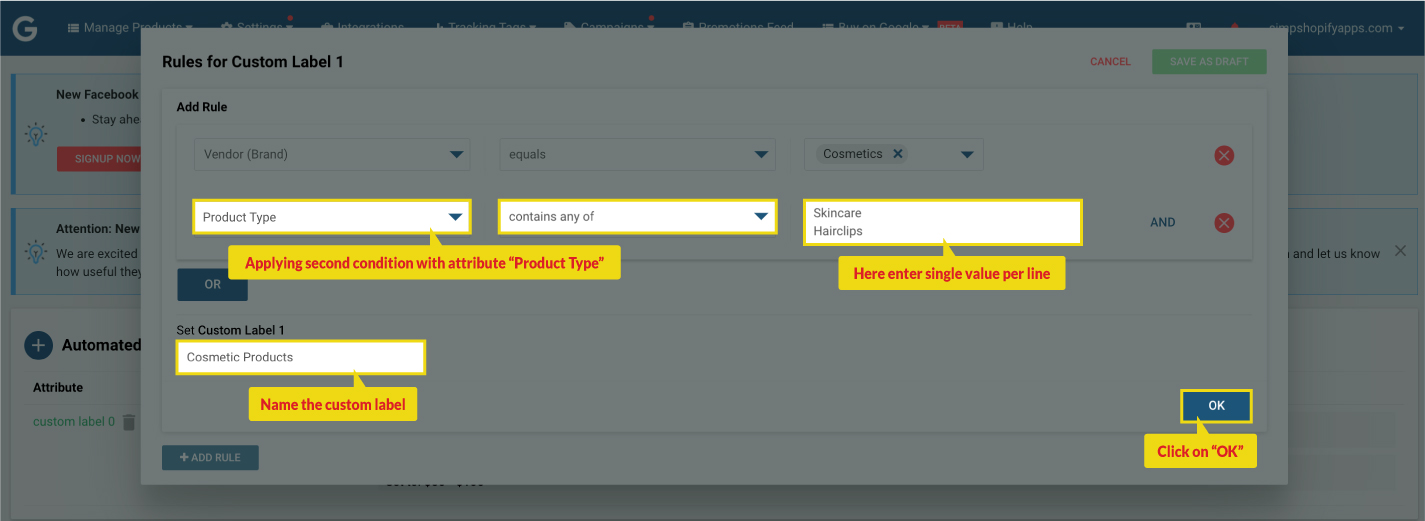 6. Follow the same process stated in the example above to save the rule. Take a look at one more example with the “OR” condition: 1. Click on the plus icon to create a new automated rule and select the Custom Label 2 option.
 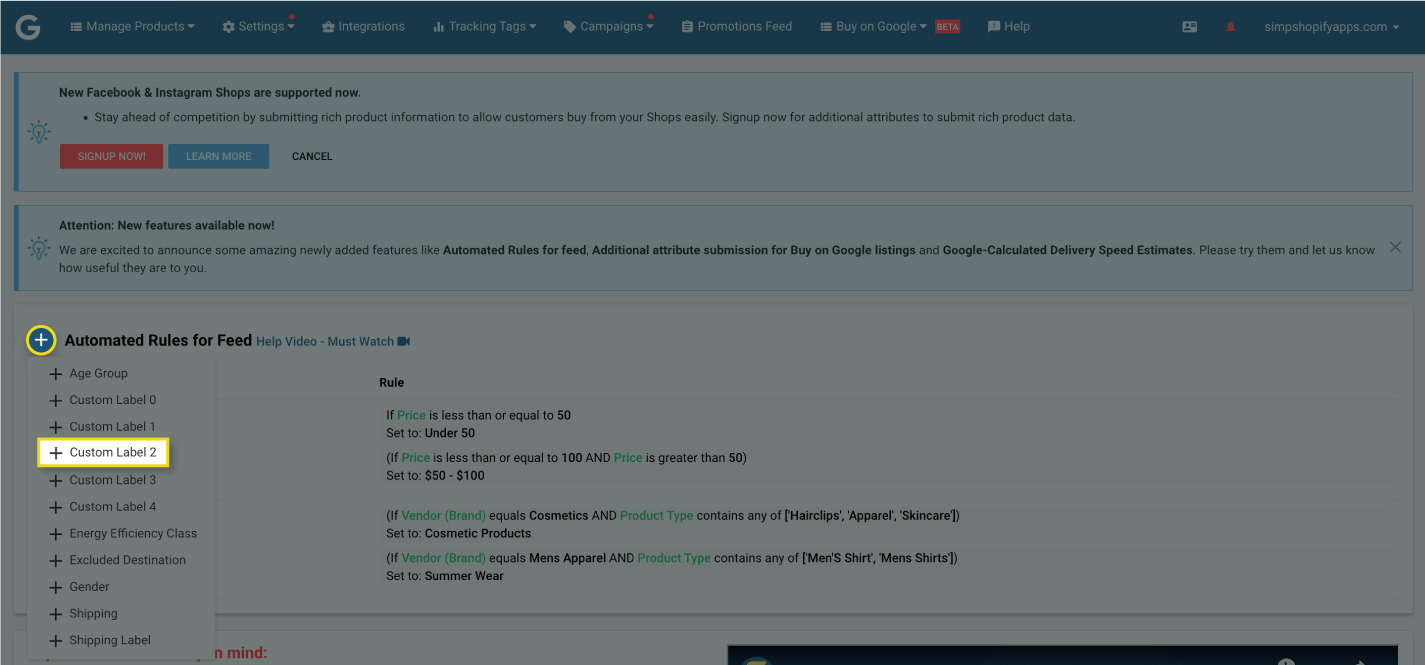 2. From the dialog window, select the “Product Tag” attribute from the first dropdown menu and choose "equals" as the operator and you will get the dropdown list of values to select from.
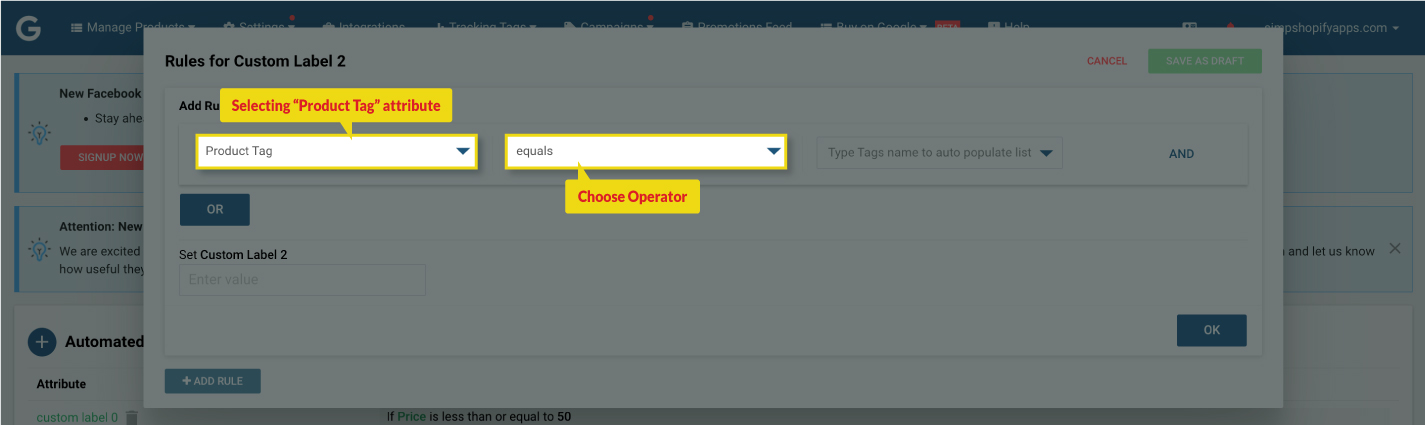
 3. Click on “OR” to define an additional condition.
 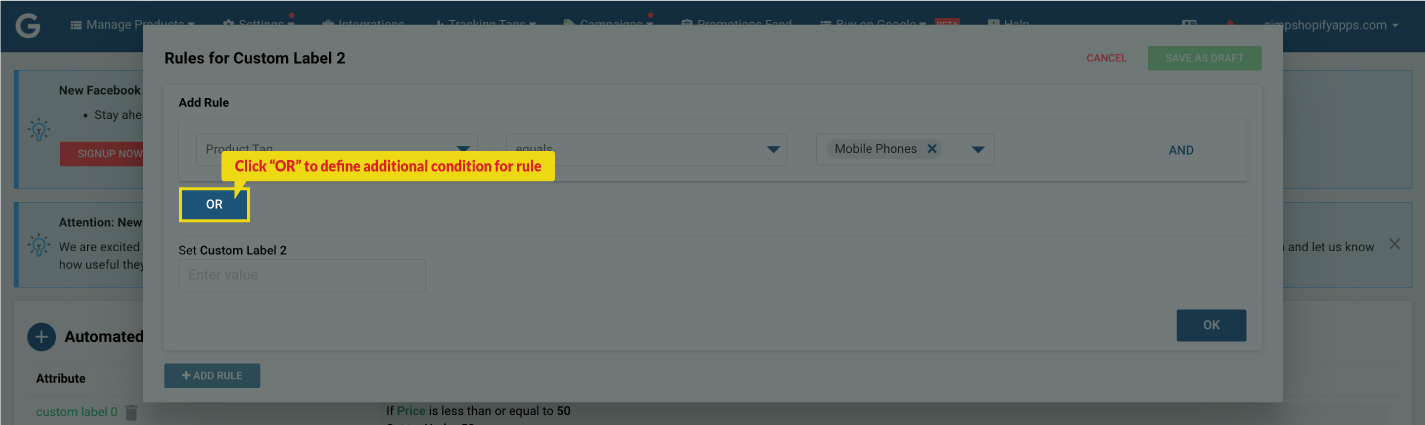 4. Selecting the 2nd condition as “Product Tag” and the operator as “equals” and select the product tag.
 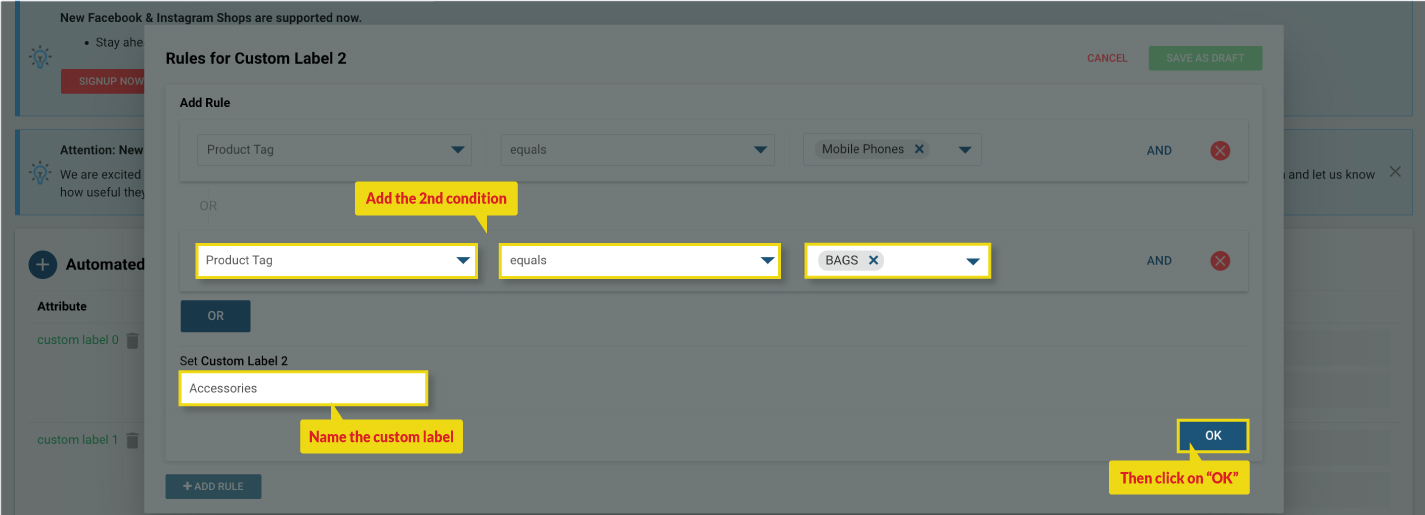 5. Now, follow the same steps again to save and apply the rule. After applying an automated rule within our plugin, it will take up to 30 minutes to process the feed and submit it to the advertising
platforms.
The custom labels assigned using automated rules won't be visible within our plugin neither you will be able to use the filter option of the custom labels to filter out these products.
To check the assigned custom labels, you'll need to directly access your Google Merchant Center by clicking on the link to the merchant center.
How to check custom labels in Google Merchant Center?
a) Applying the filter of “Brand” as we have created an automated rule using the same attribute.
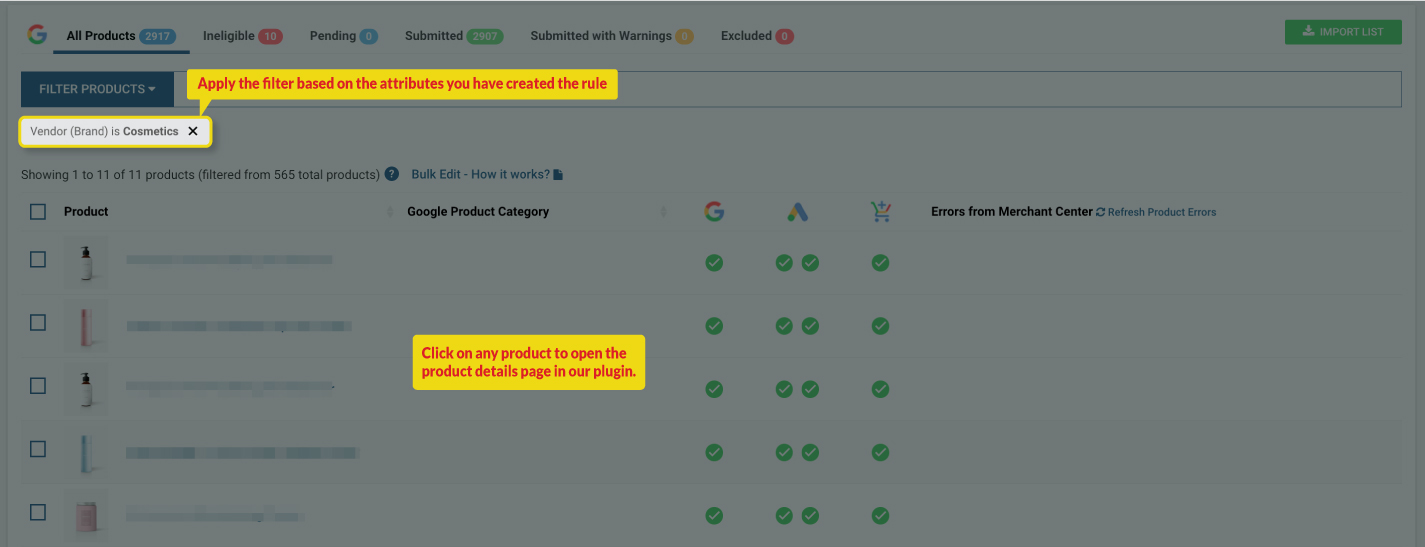 b) Click on any product and you will be redirected to the product details page. Scroll down to the bottom of the page.
  c) Click on the link to “Google merchant center” for the particular product/variant, you will see the assigned custom labels in the final attribute section.
 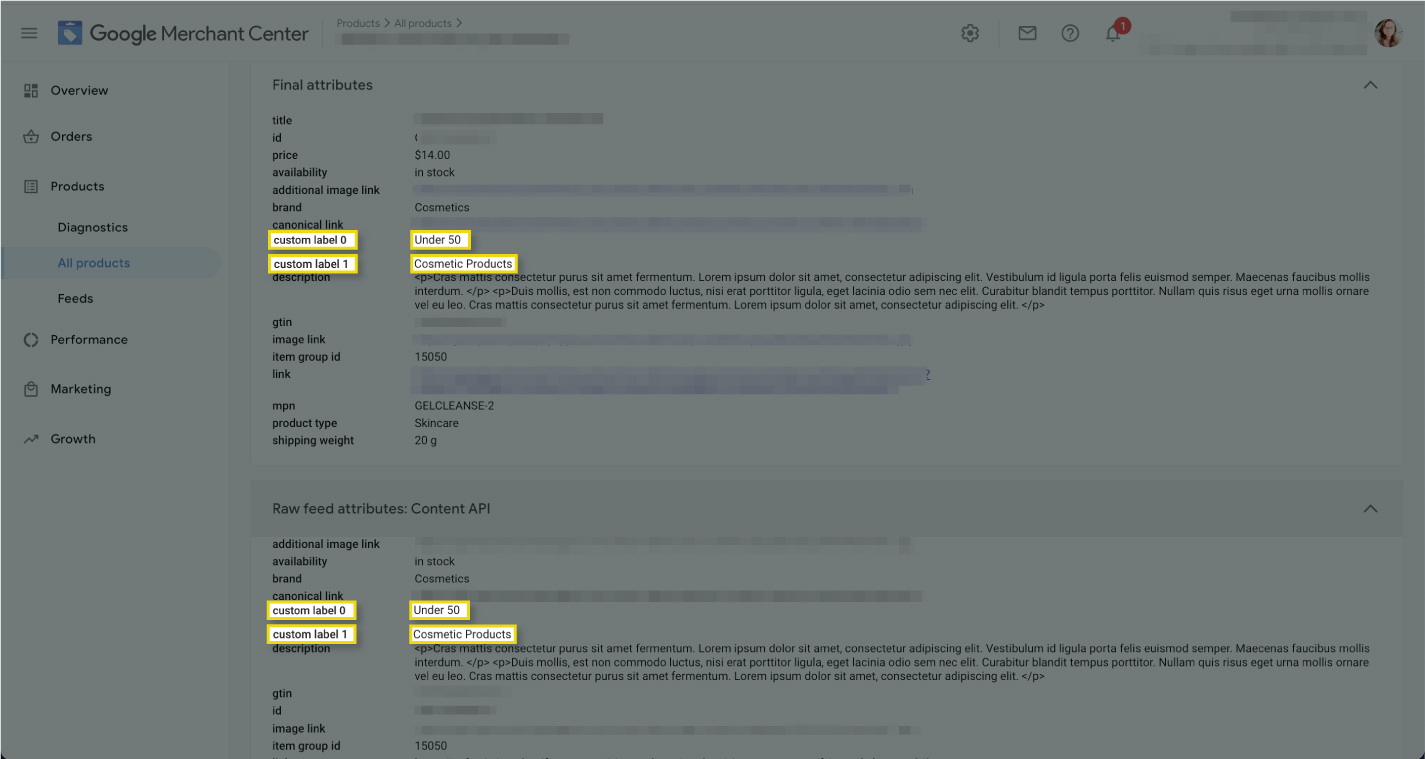 Custom labels will automatically populate in up to 2 hrs in Google Ads. We hope you found this document informative. If you have any queries on any of these options you can write to us at support@simprosys.com and we will definitely help you.
Previous article

Simprosys Product Feed for WooCommerce
Pre-Installation
Plugin Setup
Product Submission Controls
Product Attributes & Optimization
Automated Feed Rule
Troubleshooting & Issue Fixes
Advanced Setup Made Easy
Google Merchant Center Setup & Integration
Tracking Tag Setup (Google Ads & Google Analytics 4)
Google Ads & Campaign Setup
Multi-Country
Promotions Feed
Microsoft Advertising Integration & Campaign Setup
META (Facebook) Integration
WooCommerce Store Access & Setup


