
FeedAPIs For Bing Shopping /MS
After Installation - FeedAPIs For Bing Shopping /MS
Before Installation - FeedAPIs For Bing Shopping /MS
During Installation - FeedAPIs For Bing Shopping /MS
How to Create a Microsoft Advertising Account & Microsoft Merchant Center Store?
Jun 12, 2025
In this help Doc we will show how to create a Microsoft Advertising Account & Microsoft Merchant Center Store.
If you are just starting your journey with Microsoft Advertising which was known as Bing Ads before, you will first need to sign up for the Microsoft Advertising Account.
Let’s see the steps on how to create a new Microsoft Advertising Account?
Once you are on Microsoft Ads Sign-in page, you will see options for “Sign up now” and “Sign In” on the top right-hand side corner. See attached screenshot
Once you log in with a valid Microsoft Account, It will take you to the “Create Account” page.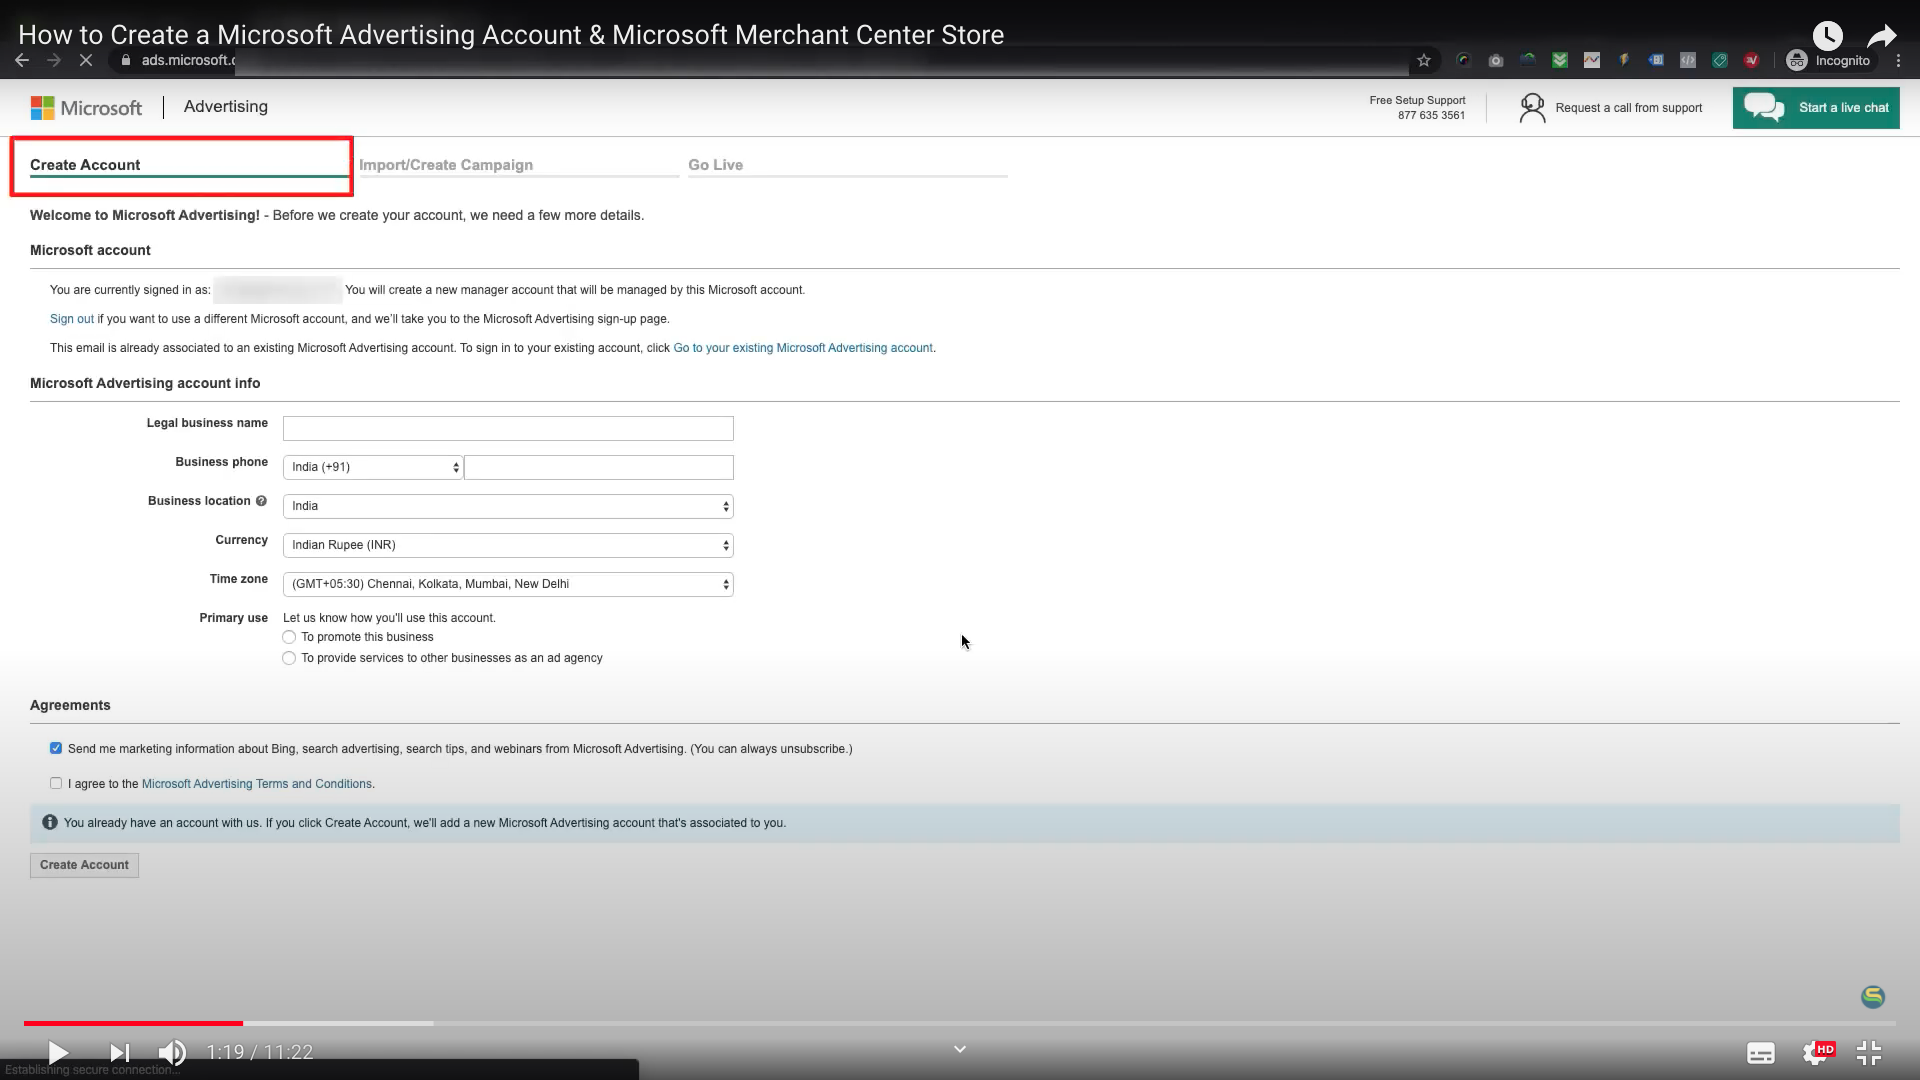
Then You need to provide a Legal Business Name, Phone Number, Business Location, Currency, Time zone, and the purpose of the Primary use of this new account.
Note While entering other details of a business account, make sure you are entering the details of Business Location and not the details of the target country. For example, if you are an entity established in India, but planning to sell products in the United States, then enter the business details of India only.
After providing all these details and accepting the “Microsoft Advertising Terms & Conditions”, you will be able to create an account.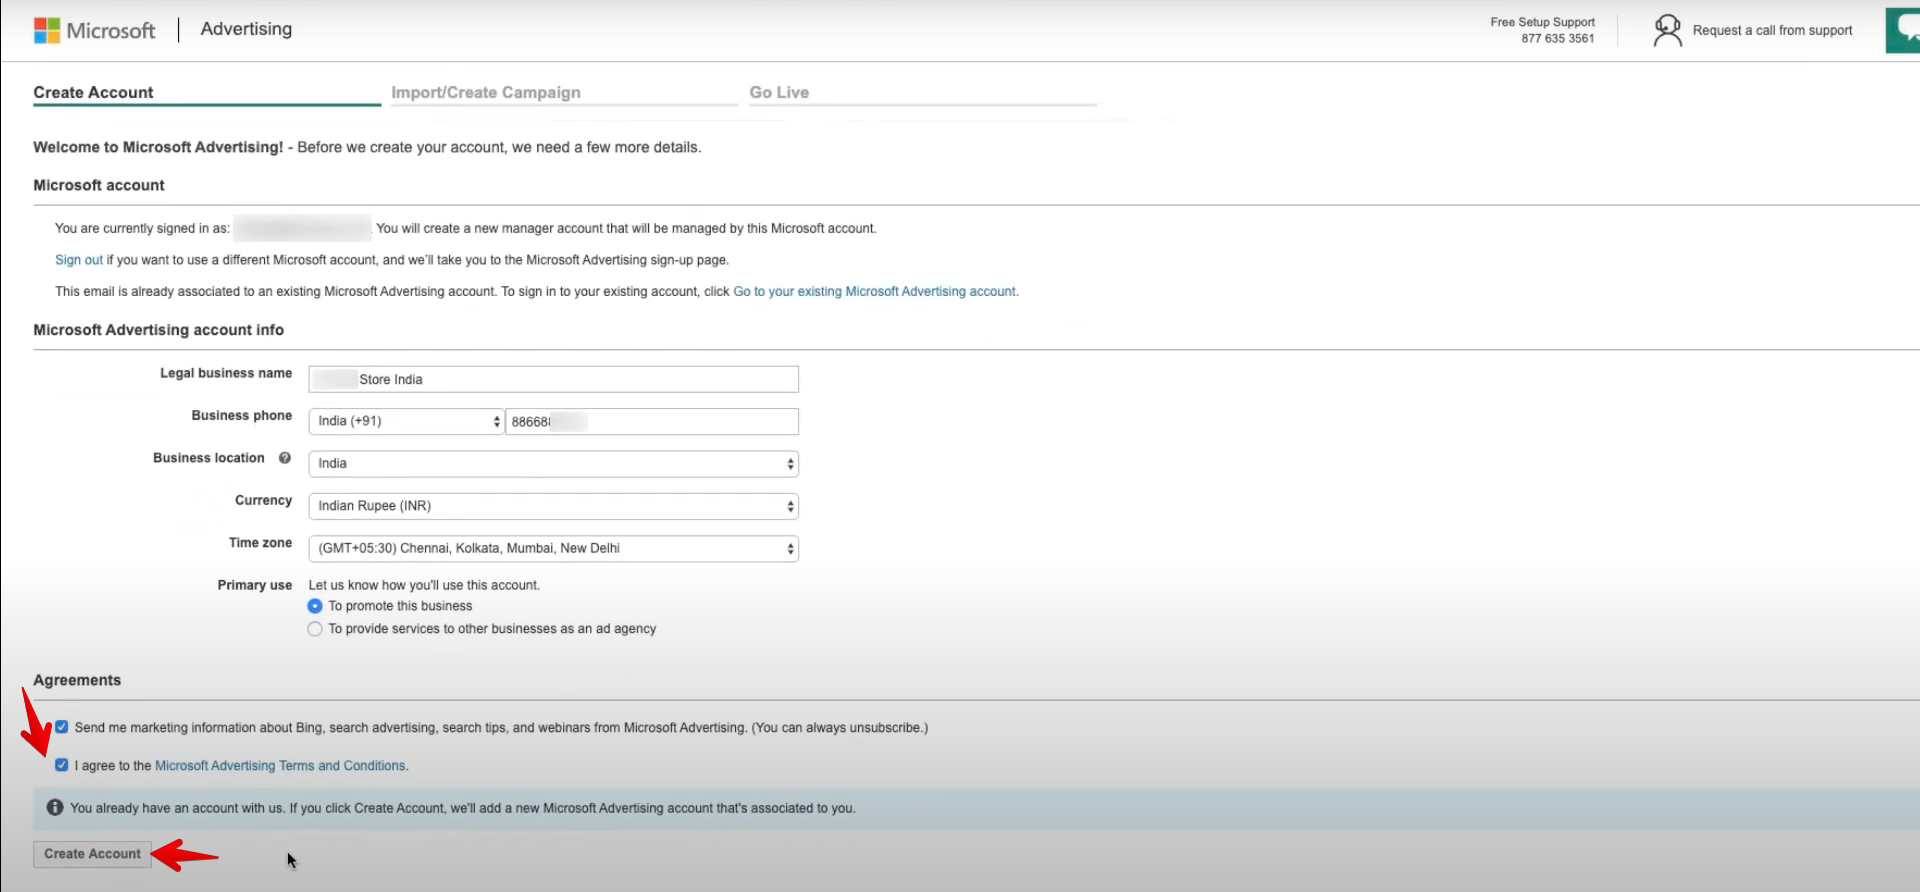
Now, you are on the Import or Create Campaign Page. you will see options like, create a new campaign or import it, but we are going to click on skip campaign creation as of now.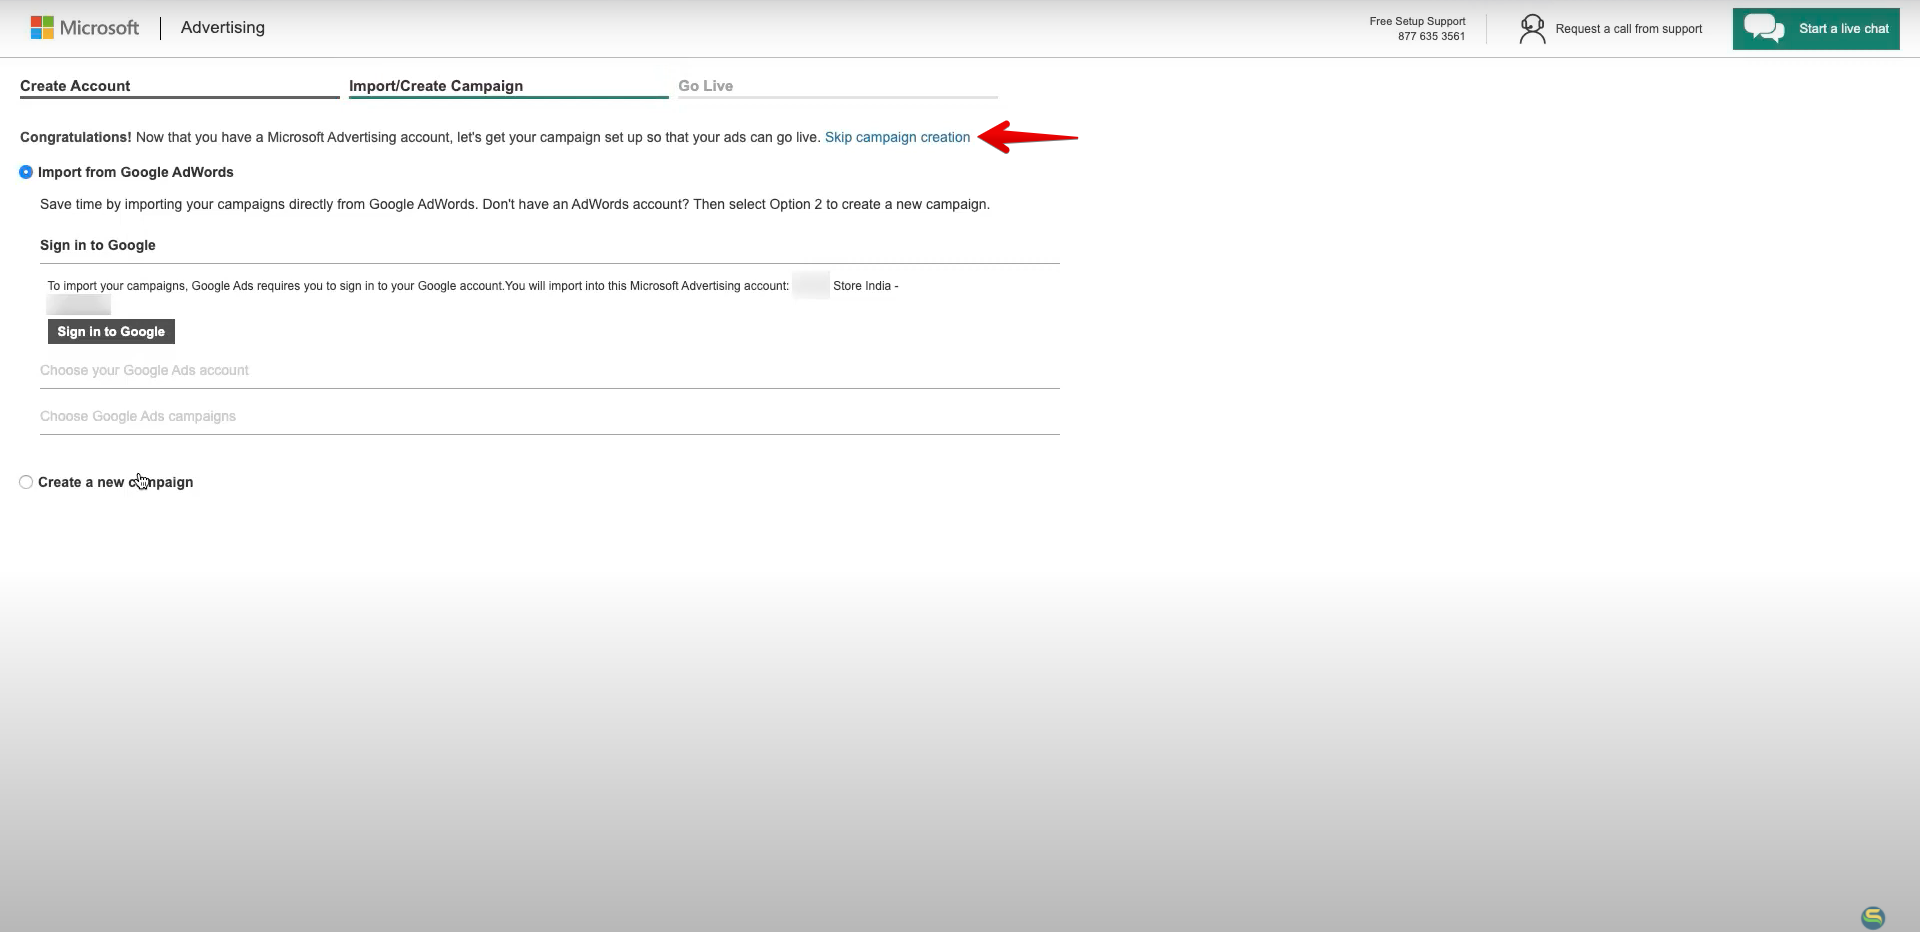
After that, you will need to fill the details in the “business location and tax information” section like business location, business address, and other details as asked.
Save the information filled and then add the Billing information by providing the card details. You can “skip the payment information”.
Note: You have to add the payment information before starting the campaign. And you will be able to do that by clicking on this link given in the overview screen of the account.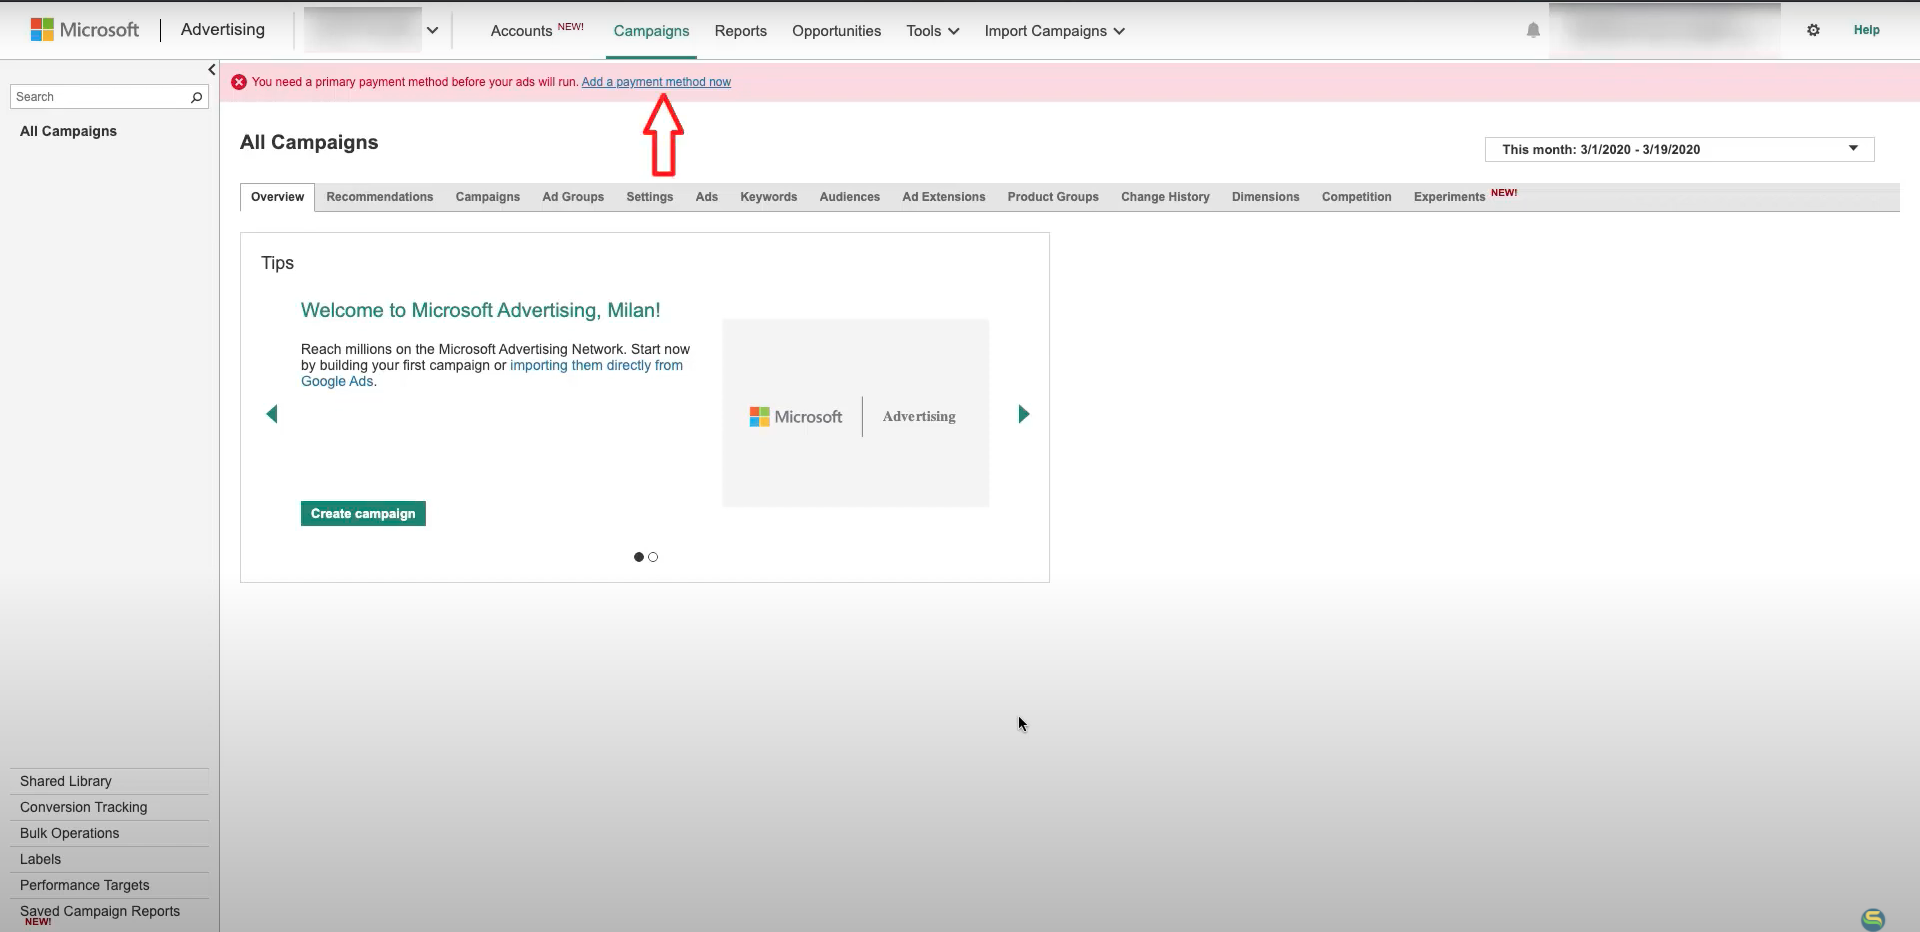
That’s It, now you have just created a Microsoft Advertising account for your business successfully. But, to be able to submit the products for Shopping Ads, you need to create the store inside the Microsoft Merchant Centre Account.
Let's see the steps of how we can create the store inside the Microsoft Merchant Centre Account. In the next step create a new Microsoft Merchant Center store under the Microsoft Advertising account.
To Create a New Microsoft Merchant Center Store, please navigate to Tools and then click on Microsoft Merchant Center, it will take you to the Microsoft Merchant Center page.
If you are not seeing the Microsoft Merchant Center option under the Tools Section of your Microsoft Advertising account then you may need to Contact Microsoft Advertising Support Team to get it enabled.
This option is not visible because you might have provided a Business location and business address for the country which is still not supported by Microsoft Advertising Product Ads.
Note: For creating a Microsoft Merchant Center Store, you will need to verify your store’s primary domain in the Bing Webmaster Tools.
After that, You can visit Bing Webmaster Tools either from the option given below in the screenshot or you can directly visit the link for the Webmasters.
let’s see verifying your primary domain in the Bing Webmaster Tools.
Click on Bing Webmaster Tools option and Sign-in or Sign up using the same email account which you have used to sign up for the Microsoft Advertising account. This will help you manage all the Microsoft assets using a single account.
After logging into Bing Webmaster Tools, There is a section called “Add a Site”, where you have to add your Shopify store’s Primary Domain in the “Enter site URL” field and hit the “ADD” Button. While adding the website URL make sure you use your store's custom domain.
You can also import your already verified domain from your Google Search Console using the IMPORT Option. If you have done this on Google before, we recommend you to follow the process of Importing from Google Search Console. On the next page, it will again confirm your Store’s Primary Domain and you will have to add the sitemap of your store.
To add a sitemap for your store you just need to add your primary domain, followed by a forward slash, and text, sitemap dot XML. Select “All Day” in timing for the most traffic for your store and hit the “ADD” button to proceed with the Verification page.
Here it will show you 3 options to verify your domain.
First, Place an XML File on your web server
Second, Copy and paste a tag in your default webpage
Third, Add CNAME record manually to DNS
Now, the store is hosted on Shopify, so the second option is the only recommended for us in which we will need to copy the meta tag and paste it in our Shopify theme.liquid file.
Now to place the code you will go to our Shopify store admin, Click on Online Store from the sidebar, then click on Themes. Under the Current Theme section click on the “Actions” dropdown, then choose the “Edit Code” Option. Open theme.liquid file. Now find the opening Head tag as shown here and paste the copied Meta Tag under it and then Save the changes.
Please make sure your store is already published and not password protected or blocked for crawling, using any other meta tag. and if your store is password protected then you have to remove the password protection and make your store live.
Check if Password protection is enabled or disabled, go to Themes or Preferences, If you see the yellow box section with “Online store is password protected” then Password Protection is still not disabled. To Disable it, click on “Disable Password” button. Then uncheck the “Enable Password”, and save the settings. Once it is saved, Shopify will show the success message that “Your Online Store is now live & visible to Customers”.
Now the Meta Tag is placed and password protection is also disabled, please navigate back to the Bing Webmaster Tools verification page.
Click on VERIFY Button available under “Copy and paste a meta tag in your default webpage” section.
Note: If it shows any Error message like “unable to locate any meta Tag on your store” you will need to wait, as Microsoft sometimes takes up to 24 hours to validate the Meta Tag from your store.
Once Microsoft will validate and verify your domain in your Bing Webmaster Tools, it will show you a Dashboard with some basic details about your store. You can proceed with creating a Microsoft Merchant Center store. So let’s get back to the “Microsoft Merchant Center” Page.
Under Microsoft Merchant Center Page, Click on the “Create Store” button to enter store info and create a new account. Here, add the Shopify store name in the first field.
Select “Validated via Bing Webmaster Tools” option from Domain Validation dropdown. Then Select your Primary Domain from the “Destination URL” dropdown.
Note: Sometimes Microsoft might take a few hours to list your domain under this dropdown even if the domain is already verified in Bing Webmaster Tools.
If it does not show the domain in the dropdown even after 24 hrs, kindly get in touch with Microsoft Advertising support and request them to review the domain verification status. Once it starts showing up in the dropdown, Select that domain. Then, add a short description of your store in the “Store Description” field.
Please make sure to select the “YES” option for SSL Checkout, or else Microsoft will straightaway reject your Microsoft Merchant Center store. Now, in the Aggregators section make sure not to block the Aggregators. If you block the aggregators then you will not be able to show your products in Bing Ads.
Select your preferred language to receive any notifications from Microsoft, from the Language drop-down menu available under the “Contact Details” section.
Further, you can also provide Contact Name and Email for Technical Details which is optional. Then click on “SAVE” to create a new account. Please navigate back to the List page of the Microsoft Merchant Center store to check the status of the newly created account.
If it shows “Approval Pending” Status then your account is still under the Manual Review by Microsoft, which might take up to 3 business days to verify your domain and other account details. You can contact the Microsoft Advertising Support team for expediting the review process.
Once this store is approved, You will be able to complete the integration process within our app and submit the feed to your newly created Microsoft Merchant Center Store.
Next article

FeedAPIs For Bing Shopping /MS
After Installation - FeedAPIs For Bing Shopping /MS
Before Installation - FeedAPIs For Bing Shopping /MS
During Installation - FeedAPIs For Bing Shopping /MS


